17
3. Remove the burn grate from the fi rebox. Inspect and clean thoroughly. Make certain that the
combustion holes in the burn grate and the igniter tube in the fi rebox are free of debris or ash build up.
Visually inspect the air way between the combustion fan and the fi rebox to be certain that it is free and
clear of ash and debris. (A shop vacuum works well for ash and debris removal.)
4. Inspect for and remove any grease build up on the bottom of the cooking chamber.
5. Inspect the silicone seal around the fi rebox, paying particular attention to the seal above the fi rebox
at the hopper wall. It will be necessary from time to time to reapply high heat silicone such as Permatex
81878 in this area which ensures proper combustion and grill performance.
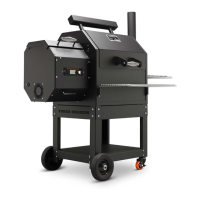
6. Reinstall the burn grate. Begin by resting the right hand side of the burn grate on the fi rebox and then
pressing down on the left hand side of the burn grate until fully seated. When the burn grate is properly
seated it rests fi rmly on the right hand side of the fi rebox and fi ts close to the hopper wall. Finally, check
that the igniter assembly is centered in the respective hole in the burn grate.
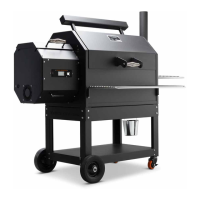
7. Reinstall the heat diff user/drip plate. The heat diff user plate attaches to the hook on the auger shield
BURN GRATE
FIREBOX
MOUNT
IGNITER
END IN
OPENING
RIGHT SIDE
FIG 11
FIREBOX
BURN GRATE
FIG 12
42
ITEM # PART # DESCRIPTION QTY.
1 A91425
3 INCH CASTER WHEEL, 3/8-16
2
2 1420LNN
NUT, NYLOCK, 1/4-20
16
3 3816WHN
NUT, WHIZ, 3/8-16
2
4 1420X58WHB
BOLT, WHIZ, 1/4-20 X 5/8” LONG
16
5 701-102-02
PIN
2
6 90398
AXLE
2
7 10X34HHSDS
SCREW, HEX HEAD, SELF DRILLING, 10 X 3/4
16
8 90172LFP
BOTTOM SHELF
1
9 W90786
RIGHT FRONT LEG
1
10 W90784
LEFT FRONT LEG
1
11 24252
WHEEL
2
12 90166LFP
SKIRT, LONG, UNDERCARRIAGE
2
13 90165LFP
SKIRT, SHORT, UNDERCARRIAGE WITH LOGO
2
14 W90782
REAR LEG
2
640 CART
 Loading...