EasyManua.ls Logo

Yost Vises 750-E - User Manual

Yost Vises 750-E
6 pages
Print Icon
To Next Page IconTo Next Page
Loading...
Thank you for choosing a Yost Vise. For future reference please record the following:
Model #: 750-E
Purchase Date: _____________
Supplier: _____________
I n s p e c t i o n a n d A c c e p t a n c e
Claims for damage, shortage or errors in shipping must be reported within one (1) day
following delivery to Buyer. Buyer shall have seven (7) days from the date Buyer
receives any products to inspect such products and services for defects and
nonconformance which are not due to damage, shortage or errors in shipping and notify
Seller, in writing, of any defects, nonconformance or rejection of such products. After
such seven (7) day period, Buyer shall be deemed to have irrevocably accepted the
products, if not previously accepted. After such acceptance, Buyer shall have no right to
reject the products for any reason or to revoke acceptance. Buyer hereby agrees that such
seven (7) day period is a reasonable amount of time for such inspection and revocation.
Buyer shall have no right to order any change or modification to any product or services
previously ordered by Buyer or its representatives or cancel any order without Seller's
written consent and payment to Seller of all charges, expenses, commissions and
reasonable profits owed to or incurred by Seller. Specially fabricated or ordered items
may not be canceled or returned, and no refund will be made. The sole and exclusive
remedy for merchandise alleged to be defective in workmanship or material would be the
replacement of the merchandise subject to the manufacturer's inspection and warranty.
Product Specifications:
1. Technical Statistics:
Model Item Jaw Jaw Pipe Throat
Number Number Width Opening Capacity Depth Weight
750-E 12750 5 4-7/8” 0.5- 2.5 3 37 lbs
Vise components are rated to a maximum torque of 165 Foot-Pounds or an applied
load of 7,000 pounds clamping force. Exceeding will result in product failure.
Question and Answer IconNeed help?

Do you have a question about the Yost Vises 750-E and is the answer not in the manual?

Summary

Product Acceptance and Returns Policy

Inspection and Acceptance Policy

Policy for reporting shipping claims, inspecting products for defects within seven days, and limitations on returns.

Product Specifications

Technical Specifications

Details model, item number, jaw width, opening, pipe capacity, throat depth, and weight.

Important Safety Instructions

Mounting the Vise

Vise Operation Guide

Basic Vise Operation

Instructions on how to use the vise, including clamping items and avoiding misuse.

Swivel Base Adjustment

How to loosen, swivel, and re-secure the vise base for optimal positioning and access.

Overview

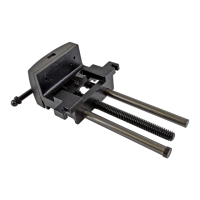
The Yost 750-E vise, also identified as Item #12750, is a robust clamping tool designed for securing workpieces during various tasks. Its primary function is to hold objects firmly, allowing for hands-free operation and increased precision in tasks such as cutting, drilling, filing, or assembly. The vise is engineered for durability and safe operation, provided users adhere to the detailed instructions and warnings outlined in the manual.

Important Technical Specifications:

  • Model Number: 750-E
  • Item Number: 12750
  • Jaw Width: 5 inches
  • Jaw Opening: 4-7/8 inches
  • Pipe Capacity: 0.5 inches to 2.5 inches
  • Throat Depth: 3 inches
  • Weight: 37 lbs
  • Maximum Torque Rating: 165 Foot-Pounds
  • Maximum Clamping Force: 7,000 pounds

The vise components are specifically rated to withstand a maximum torque of 165 Foot-Pounds or an applied load of 7,000 pounds of clamping force. Exceeding these limits will result in product failure, emphasizing the importance of proper usage to ensure longevity and safety.

Usage Features:

Mounting:

The Yost 750-E vise is designed for secure mounting to a workbench. The manual provides a detailed four-step process for installation:

  1. Placement: Position the vise on the workbench to mark the locations for mounting holes.
  2. Reinforcement: For enhanced strength, especially with heavy-duty use, it is recommended to place an 18" x 18" x 2" piece of wood or an 18" x 18" x ¼" metal plate on the underside of the workbench. This distributes the load and prevents damage to the workbench.
  3. Drilling: Use the swivel base as a template to mark and drill holes through both the workbench and the reinforcing plate. Before drilling, ensure the area is clear of any hazards.
  4. Securing: Install proper length and diameter bolts through the swivel base. Yost recommends bolts that protrude at least 1 inch beyond the underside of the workbench and reinforcing plate. Secure the bolts with a flat washer, lock washer, and locking nut on the underside. Periodically recheck and re-tighten these nuts to maintain stability. The mounting holes are 5 inches apart, and 3/8-inch bolts are recommended. The base has a diameter of 6.85 inches, with a diagonal measurement of 6.10 inches between mounting points. It is advised to locate the vise near the edge of the workbench for optimal access and stability.

Operation:

Operating the vise involves a series of steps to ensure secure clamping:

  1. Mounting Check: Confirm that the vise is securely mounted to the workbench.
  2. Swivel Base Lockdowns: Ensure the swivel base lockdowns are secure before use.
  3. Opening the Vise: Turn the vise handle counterclockwise to open the jaws. Do not exceed the maximum rated jaw opening of 4-7/8 inches.
  4. Placing the Item: Position the workpiece between the serrated jaws.
  5. Closing the Vise: Turn the vise handle clockwise to close the jaws until the item is snug.
  6. Tightening: Continue to tighten the screw handle until the clamped item can no longer move or twist. Avoid over-tightening, as this can damage both the item and the vise.
  7. Releasing the Item: When finished, slowly turn the screw handle counterclockwise to release the workpiece.

Swivel Base Operation:

The swivel base allows for repositioning the vise to optimize access to the workpiece:

  1. Loosening Lockdowns: After the item is securely mounted, slowly loosen each lockdown handle on both sides of the vise by approximately ¼ of a turn (counterclockwise). Exercise caution not to over-loosen or remove the lockdowns, as this could cause the vise to tip.
  2. Swiveling: Rotate the vise to the desired position for better and safer access.
  3. Tightening Lockdowns: Once repositioned, tighten each lockdown handle clockwise to secure the vise firmly to the base.

Safety Instructions:

The manual emphasizes several critical safety instructions to prevent injury and damage:

  • Bench Security: Always ensure workbench tops are properly secured.
  • Mounting Hardware: Use proper nuts, bolts, and lock washers in all mounting holes to secure the bench vise.
  • Vise Sizing: Use a vise of appropriate size and capacity for the work object.
  • Personal Protective Equipment (PPE): Always wear eye, face, and ear protection when striking or using power tools with a vise. Wear a dust mask or respirator when working with wood, metal, chemical dusts, or mists.
  • Attire: Wear restrictive hair covering and anti-slip footwear. Avoid loose clothing or jewelry.
  • Handle Usage: Never use a hammer, extension pipe, or cheater bar on the spindle handle of the vise. Never use an extension pipe to tighten lockdown handles.
  • Jaw Limits: Never unscrew the movable jaw beyond its maximum specified opening.
  • Welding: Never weld the base of the vise to any metal object.
  • Pressing: Never use the vise to press an object into or out of another object.
  • Hazardous Materials: Never place pressurized containers or combustible materials in the vise.
  • Heat Application: Never apply extreme or prolonged heat to the vise, as it may alter its structural properties.
  • Inspection: Always inspect the vise for stress fatigue or damage before use.
  • Unsafe Conditions: If there is any question about a condition being safe or unsafe, do not operate the vise.

Work Area Conditions:

To avoid personal injury, equipment damage, fire, and shock, the work area should meet the following conditions:

  • Dry Floor: The floor must be dry to prevent slips.
  • Operator Age: The operator must be of sufficient age to operate the vise safely.
  • Lighting: The area should be well lit.
  • Clearance: The area must be clean and unobstructed.
  • Workbench Security: The workbench must be properly secured to the floor or wall.
  • Workbench Design: The workbench must be sufficiently designed to handle the vise and the workload (torque placed upon the vise and workbench).

Maintenance Features:

  • Regular Greasing: Always maintain the vise by regularly greasing the main screw. This ensures smooth operation and extends the life of the vise.
  • Periodic Re-tightening: Periodically recheck and re-tighten the nuts securing the vise to the workbench to maintain stability and safety.
  • Inspection: Regular inspection for stress fatigue or damage is crucial for identifying potential issues before they lead to product failure or injury.

Warranty and Claims:

Claims for damage, shortage, or errors in shipping must be reported within one day of delivery. Buyers have seven days from receipt to inspect products for defects not related to shipping damage and must notify the seller in writing of any non-conformances. After this period, products are deemed accepted. Specially fabricated or ordered items cannot be canceled or returned, and no refunds are provided. The sole remedy for defective workmanship or material is the replacement of the merchandise, subject to manufacturer inspection and warranty.

The Yost 750-E vise is a robust and reliable tool when used according to the provided guidelines, ensuring both efficiency and safety in various workshop applications.

Yost Vises 750-E Specifications

General IconGeneral
BrandYost Vises
Model750-E
CategoryTools
LanguageEnglish

Related product manuals