EasyManua.ls Logo

Yost Vises LV-4 - User Manual

Yost Vises LV-4
6 pages
Print Icon
To Next Page IconTo Next Page
Loading...
Thank you for choosing a Yost Vise. For future reference please record the following:
Model #: LV-4
Purchase Date: _____________
Supplier: _____________
I n s p e c t i o n a n d A c c e p t a n c e
Claims for damage, shortage or errors in shipping must be reported within one (1) day
following delivery to Buyer. Buyer shall have seven (7) days from the date Buyer
receives any products to inspect such products and services for defects and
nonconformance which are not due to damage, shortage or errors in shipping and notify
Seller, in writing, of any defects, nonconformance or rejection of such products. After
such seven (7) day period, Buyer shall be deemed to have irrevocably accepted the
products, if not previously accepted. After such acceptance, Buyer shall have no right to
reject the products for any reason or to revoke acceptance. Buyer hereby agrees that such
seven (7) day period is a reasonable amount of time for such inspection and revocation.
Buyer shall have no right to order any change or modification to any product or services
previously ordered by Buyer or its representatives or cancel any order without Seller's
written consent and payment to Seller of all charges, expenses, commissions and
reasonable profits owed to or incurred by Seller. Specially fabricated or ordered items
may not be canceled or returned, and no refund will be made. The sole and exclusive
remedy for merchandise alleged to be defective in workmanship or material would be the
replacement of the merchandise subject to the manufacturer's inspection and warranty.
Product Specifications:
1. Technical Statistics:
Model Item Jaw Jaw Pipe Throat
Number Number Width Opening Capacity Depth Weight
LV-4 40004 4.5 3 .6-1.85 2.63" 9 lbs
2. Vise rated to a maximum clamping force of 1000 lbs./in of clamping force. Exceeding
this amount can cause injury and damage to the vise.
Question and Answer IconNeed help?

Do you have a question about the Yost Vises LV-4 and is the answer not in the manual?

Summary

Inspection and Acceptance

Product Specifications

Technical Statistics

Details key physical and dimensional specifications of the vise, including jaw width and weight.

Important Safety Instructions

Mount Vise To A Secure Workbench

Identify Mounting Location

Locate and mark the mounting points for the vise on the workbench surface.

Reinforce Workbench

Add a wood or metal plate underneath for increased workbench strength.

Drill Mounting Holes

Mark and drill holes using the vise base as a template, ensuring the area is clear.

Install Mounting Hardware

Secure the vise using bolts, washers, and lock nuts for a stable connection.

Vise Operation

Swivel Base Operation

Maintaining Your Vise

Lubricate Main Screw

Apply lubricant to the main screw for smooth operation and to prevent dust buildup.

Clean Saw Dust

Use a blade or bit cleaner to remove built-up saw dust from vise threads.

Parts List

Overview

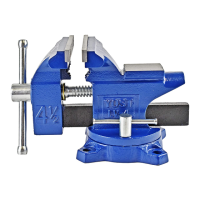
This document describes the Yost LV-4 Light Duty Homeowner's Vise, a tool designed for clamping workpieces securely. The manual provides essential information for safe operation, installation, and maintenance of the vise.

Function Description:

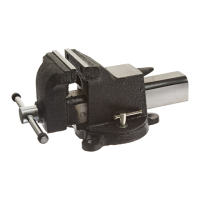
The Yost LV-4 vise is primarily used for clamping objects to a workbench, allowing for various tasks such as cutting, drilling, or shaping. It features a main screw assembly that tightens and loosens the jaws, a machinist jaw assembly for gripping, and a swivel base that allows the vise to be rotated for optimal access to the workpiece. The vise is designed for light-duty homeowner use, providing a stable platform for holding materials during work.

Important Technical Specifications:

  • Model Number: LV-4
  • Item Number: 40004
  • Jaw Width: 4.5 inches
  • Jaw Opening: 3 inches
  • Pipe Capacity: 0.6 to 1.85 inches
  • Throat Depth: 2.63 inches
  • Weight: 9 lbs
  • Clamping Force Rating: Maximum of 1000 lbs./inch of clamping force. Exceeding this limit can cause injury and damage to the vise.

Usage Features:

Safety Instructions:

The manual emphasizes several critical safety warnings to prevent injury and damage. Users must read, understand, and follow all instructions before setup and use.

  • Bench Security: Always ensure workbench tops are properly secured.
  • Mounting: Use proper nuts, bolts, and lock washers in all mounting holes to securely hold the bench vise down.
  • Vise Sizing: Use a vise of the proper size and capacity for the work object.
  • Personal Protective Equipment (PPE): Always wear eye, face, and ear protection when striking or using power tools with a vise. Wear a dust mask or respirator when working with wood, metal, chemical dusts, or mists.
  • Clothing and Hair: Wear restrictive hair covering and anti-slip footwear. Never wear loose clothing or jewelry while operating the vise.
  • Inspection: Always inspect the vise for stress fatigue or damage before use.
  • Prohibited Actions:
    • Never use a hammer, extension pipe, or cheater bar on the spindle handle.
    • Never unscrew the movable jaw beyond its maximum specified opening.
    • Never weld the base of the vise to any metal object.
    • Never use the vise to press an object into or out of another object.
    • Never use an extension pipe to tighten lockdown handles.
    • Never place pressurized containers or combustible materials in the vise.
    • Never apply extreme or prolonged heat to the vise, as it may alter structural properties.

Workbench Mounting:

Proper installation is crucial for safety and performance.

  1. Positioning: Place the vise on the workbench to identify mounting hole locations.
  2. Reinforcement (Optional but Recommended): For added strength, place an 18" x 18" x 2" piece of wood (or an 18" x 18" x ¼" metal plate) underneath the workbench where the vise will be mounted.
  3. Drilling: Mark and drill holes through the workbench and any reinforcement using the swivel base as a template. Ensure the area is clear of hazards before drilling.
  4. Securing: Install proper length and diameter bolts with flat washers through the swivel base. The bolt should protrude at least 1 inch beyond the underside of the workbench and reinforcement. On the underside, place a flat washer, lock washer, and locking nut onto the bolt. Securely tighten the vise to the workbench. Periodically recheck and re-tighten the nuts.

Vise Operation:

  1. Mounting Check: Ensure the vise is securely mounted to the workbench.
  2. Swivel Base Lockdowns: Make sure the swivel base lockdowns are secure.
  3. Opening Jaws: Open the vise by turning the vise handle counterclockwise. Do not exceed the rated jaw opening capacity.
  4. Placing Item: Place the item between the serrated jaws.
  5. Closing Jaws: Close the vise by turning the vise handle clockwise until the item is snug.
  6. Tightening: Continue to tighten the screw handle until the clamped item can no longer move (twist). Avoid over-tightening to prevent damage to the item or the vise.
  7. Releasing Item: When finished, slowly turn the screw handle counterclockwise to release the item.

Swivel Base Operation:

The swivel base allows for repositioning the vise for better access.

  1. Loosening Lockdowns: After the item is securely mounted, slowly loosen each lockdown on both sides of the vise by about ¼ of a turn (counterclockwise). Be careful not to over-loosen or remove them, as this could cause the vise to tip.
  2. Swiveling: Swivel the vise to the desired position.
  3. Tightening Lockdowns: Tighten each lockdown clockwise to securely clamp the vise to the base.

Maintenance Features:

Regular maintenance ensures smooth operation and extends the life of the vise.

  1. Lubrication: Apply dry graphite or silicone-based lubricant to the main screw regularly to keep it operating smoothly and prevent sawdust buildup in the threads.
  2. Cleaning: If sawdust accumulates on the vise threads, use a blade or bit cleaner to remove it.

Parts List (LV-4 “Yost Light Duty Homeowner's Vise”):

  • LV-4-01: Main Screw Assembly (Quantity: 1)
  • LV-4-02: Machinist Jaw Assembly (Quantity: 2)
  • LV-4-03: Nut (Quantity: 1)
  • LV-4-04: Lock Down Assembly (Quantity: 1)
  • LV-4-05: Screw (Quantity: 1)
  • LV-4-06: Outer Base (Quantity: 1)
  • LV-4-07: Inner Base (Quantity: 1)

For missing or broken parts, contact Yost Vises at (616) 396-2063 or sales@yostvises.com. The full version of terms and conditions of sale is available online at www.yostvises.com.

Yost Vises LV-4 Specifications

General IconGeneral
BrandYost Vises
ModelLV-4
CategoryTools
LanguageEnglish

Related product manuals