Do you have a question about the YOSUDA H-187 and is the answer not in the manual?
Adjusts machine tension by turning a knob clockwise to increase or counterclockwise to decrease.
Adjusts foot stabilizers clockwise/counterclockwise to find balance when the machine is unstable.
Proper posture involves sitting on the seat, fastening pedal straps, and holding the handlebar.
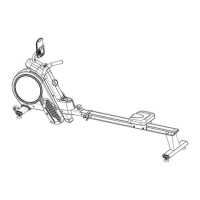
Attaching the front stabilizer to the main frame using specific screws, spring washers, and flat washers.
Attaching pedals to the main frame using M12*150 screws and a multifunctional wrench.
Sliding the seat onto the slide rail and attaching cushions and buffer shaft.
Attaching the rear stabilizer to the slide rail using bolts, washers, and an Allen wrench.
Assembling the slide rail to the main frame using a knob, screws, washers, and a union nut.
Mounting the monitor onto the monitor holder using screws and connecting the sensor wire.
Connecting the sensor wire and securing the Ipad holder to the main frame with screws.
Disassemble knob and bolt to fold the slide rail vertically for storage, noting seat movement.
Reinsert bolt and reassemble knob to secure the slide rail in its folded position.
Explains the functions of the MODE, SET, and RESET buttons on the monitor interface.
Details usage of TIME, COUNT, TOTAL COUNT, SPM, and CALORIES display functions.
Notes on auto-shutoff, troubleshooting display issues, and battery specifications for the monitor.
Stretch for the lower body by leaning forward with feet shoulder-width apart.
Seated torso stretch; pull chest towards bent knee, twisting at waist.
Seated stretch with legs wide apart, reaching towards the knee on the right and left.
Standing stretch where upper body leans towards a leg, letting head hang down.