Do you have a question about the YOSUDA H-185 and is the answer not in the manual?
Key safety rules to follow when operating the rowing machine.
Attaching the monitor and connecting the sensor to the main frame.
Attaching the mobile phone holder to the steel cube.
Attaching the front stabilizer to the main frame using specific hardware.
Attaching the pedals to the main frame with specific screws.
Attaching the rear stabilizer and cylindrical cushions to the slide rail.
Sliding the seat onto the slide rail and attaching cushions.
Connecting the slide rail to the main frame with various hardware.
Guidelines for daily cleaning, cleaning agents, and lubrication frequency.
Procedure to adjust the shell for proper handle return functionality.
Advice on using the machine correctly to prevent failures.
Steps to disassemble knob and bolt to fold the sliding rail for storage.
Reinserting bolt and tightening knob to secure the folded sliding rail.
Instructions on adjusting the machine's resistance tension clockwise/counterclockwise.
Adjusting foot tubes to ensure machine stability and balance.
Guidance on proper posture, pedal belt, and handlebar grip.
Safe rowing practices, avoiding improper movements to prevent injury.
Explanation of MODE, SET, and RESET button functions and their uses.
Details on SCAN, TIME, COUNT, CALORIES, and DIST functions.
Technical specifications like scanning interval, battery, and temperature ranges.
Importance of warming up and suggested activities before exercise.
Guidelines for stretching muscles after warm-up and exercise sessions.
Descriptions and illustrations of various stretches like Lower Body and Floor Stretch.
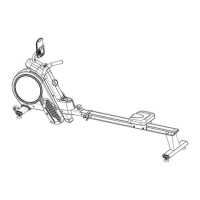
The YOSUDA Rowing Machine H-185 is a magnetic-resistance exercise machine designed for home use, providing a comprehensive full-body workout. This device comes with an installation guide and user manual to ensure proper setup and operation, emphasizing safety and optimal performance.
The primary function of the YOSUDA Rowing Machine H-185 is to simulate the action of rowing, engaging multiple muscle groups simultaneously for cardiovascular and strength training. It utilizes a magnetic resistance system, which allows for smooth and quiet operation, making it suitable for indoor use without disturbing others. The machine is equipped with a monitor that tracks various workout metrics, enabling users to monitor their progress and tailor their exercise routines.
The rowing machine offers several features to enhance the user experience and accommodate different fitness levels:
Proper maintenance is crucial for the longevity and optimal performance of the YOSUDA Rowing Machine H-185:
| Type | Indoor Cycling Bike |
|---|---|
| Weight Capacity | 270 lbs |
| Adjustable Seat | Yes |
| Adjustable Handlebars | Yes |
| Flywheel Weight | 35 lbs |
| Display | LCD Monitor |
| Pedals | Caged |
| Drive System | Belt Drive |
| Maximum User Weight | 270 lbs |
| Connectivity | No |
| Material | Steel Frame |
| Color | Black |
| Resistance System | Magnetic |
| Included Accessories | Water Bottle Holder |
| Warranty | 12 Months |