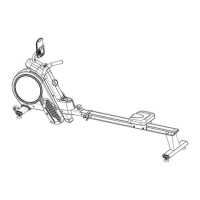
The YOSUDA H-181 Rowing Machine is a magnetic-resistance exercise machine designed for consumer and home use, offering a comprehensive workout experience with safety and user convenience in mind. This manual provides detailed instructions for installation, operation, and maintenance, ensuring optimal performance and longevity of the device.
Function Description:
The primary function of the YOSUDA H-181 Rowing Machine is to provide a full-body, low-impact cardiovascular and strength training workout. It utilizes a magnetic resistance system, allowing users to adjust the intensity of their exercise. The machine simulates the motion of rowing a boat, engaging multiple muscle groups including the legs, core, back, and arms. A built-in monitor tracks key workout metrics, helping users to monitor their progress and achieve fitness goals.
Important Technical Specifications:
- Model: H-181
- Type: Magnetic-resistance rowing machine
- Maximum Weight Capacity: 350 pounds
- Monitor Power: 2 AAA batteries (included as item #77 in the hardware package)
- Monitor Functions: SCAN, TIME, COUNT, CALORIES, DISTANCE, TOTAL COUNT
- Monitor Scanning Interval: Every 6 seconds
- Monitor Time Range: 0:00-99:00 minutes
- Monitor Count Range: 0-9999 times
- Monitor Calories Range: 0.0-999.9 kcal
- Monitor Distance Range: 0.00-999.9 miles
- Monitor Total Count Range: 0-9999 times
- Operating Temperature: 0°C to +40°C
- Storage Temperature: -10°C to +60°C
- Main Frame: 1 unit (#1)
- Slide Rail: 1 unit (#3)
- Front Stabilizer: 1 unit (#2)
- Rear Stabilizer: 1 unit (#4)
- Handlebar: 1 unit (#6)
- Pedals: 2 units (#49)
- Seat Cushion: 1 unit (#44)
- Mobile Phone Holder: 1 unit (#61)
- Hardware Package: Includes various screws, washers, nuts, and wrenches for assembly. Key components include:
- Hexagon socket half-round head screws M10*105 (#69, 2pcs)
- Spring washers 10 (#70, 3pcs)
- Flat washers 10*20 (#71, 3pcs)
- Hexagon socket half-round head screws M12*150 (#72, 4pcs)
- Buffer shaft (#73, 2pcs)
- Cylindrical cushion (#74, 4pcs)
- Hex screw M10*105 (#75, 1pc)
- Cover type union nut M10 (#76, 1pc)
- Hexagon socket round head bolt M8*16 (#9, 4pcs)
- Spring washers 8 (#35, 7pcs)
- Flat washers 8 (#22, 15pcs)
- S13~19 Multifunctional wrench (#78, 1pc)
- #6 Hexagonal Wrench (#79, 1pc)
Usage Features:
- Assembly: The machine requires assembly, with clear step-by-step instructions provided in the manual. An installation video is available by searching "YOSUDA rowing machine installation" or by scanning the transparency barcode on the product's packaging using the Amazon Shopping APP.
- Tension Adjustment: The tension can be adjusted using the tension adjustment knob (#24). Turning it clockwise increases tension, while turning it counterclockwise reduces tension.
- Foot Tube Adjustment: The foot tube (#21) can be adjusted clockwise or counterclockwise to ensure stability of the machine on uneven surfaces.
- Proper Sitting Posture: Users are instructed to sit on the seat, fasten the pedal belt tightly, and hold the handlebar firmly.
- Rowing Technique: Emphasizes pulling straight back with both hands, avoiding letting the handle fly into the chain guide, and refraining from rowing with one hand only. Users are warned against twisting the chain or pulling from side to side to prevent injury and to keep clothing clear of the seat rollers.
- Monitor Operation:
- MODE Button: Used to select functions. A long press (3 seconds) clears time, count, and calories.
- SCAN Mode: Displays all 5 functions (Time, Count, Calories, Total Count, Distance) for 6 seconds each.
- Automatic Shut-off: The monitor automatically shuts down after 4 minutes of no movement signal.
- Wake-up: The monitor wakes up with a movement signal or by pressing any button.
- Warm-up Exercise: The manual includes a dedicated section on warm-up exercises and stretching routines to prepare the body for exercise and minimize the risk of injury. These include Lower Body Stretch, Floor Stretch, Bent Torso Pulls, and Bent Over Leg Stretch.
- Storage: The rowing machine can be conveniently stowed upright when not in use, saving space.
Maintenance Features:
- Daily Cleaning: The machine should be cleaned daily after use.
- Cleaning Agents: Use a cloth or non-abrasive scouring pad with soap and water or any glass cleaner.
- Prohibited Cleaning Agents: Avoid using mineral acids, bleach, or coarse abrasives, as these can damage the machine.
- Handlebar Ribbon Adjustment: If the handle does not return to its original position, the shell may need to be opened to adjust the ribbon.
- Pre-use Inspection: Before each use, inspect the exercise bike for worn or loose components. Tighten or replace any such components to ensure safe operation.
- General Care: Proper use of the rowing machine is encouraged to prevent failures and extend its lifespan.