This document describes the YOSUDA Water Rowing Machine-RW207-01, an exercise equipment designed for full-body workouts. The manual provides installation and operation instructions, safety precautions, training guidance, and details on the monitor functions, accessory kit, and parts list.
Function Description
The YOSUDA Water Rowing Machine-RW207-01 is a fitness device that simulates the action of rowing on water, providing a comprehensive workout that engages multiple muscle groups. It utilizes a water resistance system, which offers a smooth and natural rowing feel, with resistance levels that adjust based on the intensity of the user's stroke. The machine includes a monitor to track various workout metrics, allowing users to monitor their progress and optimize their training.
Important Technical Specifications
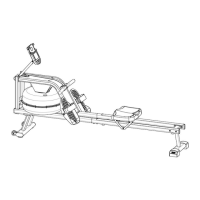
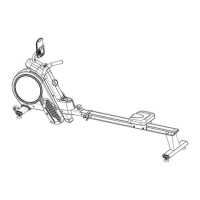
The rowing machine consists of several key components:
- Main frame assembly (A)
- Front stabilizer assembly (B)
- Rear stabilizer assembly (C)
- Electronic monitor support assembly (D)
- Left and right foot pedal (E)
- Cushion assembly (F)
- Limit mat (G)
- Right-slide rail assembly (H)
- E-meter (I)
- Accessory kit (J)
- Left -slide rail assembly (K)
- Water pump (R)
- Funnel (T)
The accessory kit (J) includes various hardware components necessary for assembly:
- (52) Nut M8: 4PCS
- (13) Washer Φ8: 4PCS
- (51) Spring Washer Φ8: 4PCS
- (50) Screw M8*40: 4PCS
- (35) Wave Gaskets: 4PCS
- (12) Screw M8*15: 4PCS
- (87) Screw M8*30: 4PCS
- (55) Screw M6*16: 2PCS
- (83) Open Spanner #10: 1PCS
- (85) Cross Spanner: 1PCS
- (84) Allen Wrench #4: 1PCS
- (86) Allen Wrench #5: 1PCS
The maximum weight capacity for the training equipment is 350 pounds. The training equipment is not suitable for use as medical equipment.
The monitor (I) displays various workout metrics:
- SPM (Strokes Per Minute)
- TIME (Workout Duration)
- DIST (Distance)
- CAL (Calories Burned)
- STR (Strokes)
- KM/MI (Mileage in Kilometers or Miles)
The monitor features several buttons:
- NO/OFF: Turns the monitor on/off (long press for 3 seconds).
- MODE: Switches between display modes.
- ▲ (UP): Increases set value.
- ▼ (DOWN): Decreases set value.
- RESET: Clears current and last exercise data (long press for 3 seconds).
- CAL: Displays cumulative calories burned.
- STROKES: Displays cumulative number of paddles.
- SPEED: Displays current speed of motion.
- KM/MI: Displays current mileage (km/mi).
Usage Features
Installation:
- Attach the right-slide rail (H) and left-slide rail (K) to the rear stabilizer (C) using M8*40 screws (50), washers (13), spring washers (51), and M8 nuts (52). Use allen wrench #5 (86) and cross wrench (85). Do not overtighten.
- Install the cushion assembly (F) onto the slide rail, ensuring it moves in the direction of the arrow.
- Turn the cushion assembly (F) upside down. Take out the limit mat (G) and install it to the slide rail using M6*16 hexagonal socket head screws (55).
- Install the front stabilizer (B) into the main frame (A) using M8*15 hexagonal pan head screws (12), wave gaskets (35), and spring washers (51). Use allen wrench #5 (86).
- Secure the front assembly and rear assembly together with allen wrench #5 (86) using M8*30 hexagonal pan head screws (87), spring washers (51), and wave gaskets (35). Lock the unlocked screws in step 1.
- Unscrew the inner hexagonal flat round head screw M610 (72) from the main frame. Connect the interfaces O and P, and plug them into the electronic gauge assembly pipe. Install the electronic monitor support assembly (D) into the main frame with Allen Wrench #4 (84). Unscrew the inner hexagonal flat round head screw M610 (72) from the cross spanner (85) to remove it. Connect the cross pan head screw (80) which was preinstalled on the electronic monitor (I), then connect the wire head M through the center hole in the support plate, and connect the electronic monitor support assembly (D) of the electronic monitor (I).
- Install the left and right pedals (E). Take out the foot pedal spindle (45) from the accessory kit. Install the left and right foot pedals (E) to the main frame using allen wrench #5 (86).
- Assembly is finished.
- Remove the tank plug (S) from the upper tank.
- Fill water according to the diagram. Insert the pump (R) into the tank, then fill the tank with the pump (R) and the bucket. Measure the amount of water in the tank by referring to the digit mark on the side of the tank.
- Pump water as shown. Place a bucket next to the machine and use the pump (R) to pump water from the tank into the bucket. Insert the water tank plug (S) into the upper water tank and dry the water on and around the machine with a dry cloth.
Training:
- Starting position: Straighten arms forward, relax shoulders, raise head, look forward, and compress feet and lower legs vertically.
- Sliding process: Grasp the arm with hands, keep body in the correct position and angle, slowly open legs and climb forward.
- Return position: Straighten legs forward, pull handle to chest, relax shoulders and look forward with eyes.
Monitor Operation:
- Turning on/off: Press NO/OFF for 3 seconds to power off. Short press to power on.
- Setting values: Use UP (▲) and DOWN (▼) buttons.
- Clearing data: Press RESET for 3 seconds.
- Displaying metrics: Press CAL, STROKES, SPEED, or KM/MI to view respective data.
Warm-up:
Before training, perform warm-up exercises to enhance blood circulation and reduce the risk of cramping or muscle strain. Exercises include forward bends, inner thigh stretches, calf/Achilles stretches, and side bends. Hold each stretch for about 30 seconds.
Training Phase:
The training phase involves regular practice to improve flexibility and leg muscles. Maintain a stable training intensity according to your own training situation. The manual provides a heart rate zone chart for guidance.
Recovery Phase:
After training, repeat the activities done in the preparation stage. Adjust the heat in the body through exercise to relax the muscles. Stretching activities should not be done during exercise to avoid muscle damage. Gradually increase training time and intensity. It is recommended to train at least 3 times a week, recording the average level of practice every week.
Build Muscle:
To strengthen muscles, adjust resistance during exercise. Increase exercise intensity in a short time if you want to strengthen muscles at the same time. For fitness, use another training method, do warm-up activities first, then do regular exercises, increase training intensity at the end of the training, increase the resistance of the legs, but pay attention to slow down while increasing the intensity. The speed of training so that the heart rate is kept within the target value range, and the post-training finishing activities should be done after the training.
Reduce Weight:
To achieve the effect of losing weight, the key lies in training time and intensity. The greater the training intensity, the longer the time, and the more calories will be burned, thereby achieving the effect of losing weight. The same can also be achieved through exercise to achieve the effect of fitness and enhance physical fitness. During the training process, you can do appropriate exercises according to different needs.
Maintenance Features
- General Safety: Read the instruction manual before installing and using the product. Always pay attention to your physical condition when training. Incorrect/excessive training will be detrimental to your health. If you have any symptoms (including headache, chest tightness, irregular heartbeat, shortness of breath, dizziness, dizziness, nausea, etc.), please stop training immediately and continue training only after the doctor checks and confirms that it is OK.
- Placement: Place the training equipment in a solid, flat place to use, and place a protective layer on the floor and carpet surface to prevent ground damage. For safety, ensure that the distance between the perimeter of the training equipment and each obstacle is not less than 0.5m.
- Pre-use Check: Before using the training equipment, check all the bolts and nuts that need to be locked to ensure that they are locked before use.
- Wear and Tear: Only regular repair and maintenance of easily damaged, easily worn, and easily broken parts can ensure the safe use of the training equipment.
- Damaged Parts: Ensure that the equipment is used in the way specified in the manual. When defective parts are found during assembly and maintenance or noise is emitted during use, please stop the operation and use immediately and ensure that all problems are solved before continuing.
- Clothing: When using the training equipment, please wear clothes suitable for training and avoid wearing loose clothes. The loose clothes will be caught by the machine, which will hinder the operation and may be trapped on the equipment and cannot move.
- Movement: When lifting or moving the training equipment, be careful not to injure your back. Please use the correct movement method, or do it with the assistance of others.
- Cleaning: After filling the water tank, dry any spilled water on and around the machine with a dry cloth.