EasyManua.ls Logo

Zenna Home 35635ALSSL User Manual

Zenna Home 35635ALSSL
18 pages
To Next Page IconTo Next Page
Page #1 background imageLoading...
Page #1 background image
Pg 1 of 18
(800) 892-3986 IS035635-I
MCS 5/16/2018
SAFETY WARNING:
Make sure you are installing in a clean, dry and safe environment. DO NOT STAND ON TUB LEDGE.
Before You Begin:
Thank you for purchasing this product. Please identify all parts and hardware pieces before
you begin. When laying out parts, place them on a soft surface to prevent scratching.
If any pieces are missing, call our Toll Free Number 1-800-892-3986 between 8:00AM-5:00PM EST
Monday through Friday.
ADVERTENCIA DE SEGURIDAD:
Asegúrese de que está haciendo una instalación en un entorno limpio, seco y seguro. NO SE PARE EN EL REBORDE DE LA
BAÑERA.
Antes de que empiece:
Muchas gracias por comprar este
producto.
Identifique todas las piezas y las piezas de ferretería antes de comenzar. Al
distribuir las piezas, colóquelas sobre una superficie suave para evitar que se rayen.
Si faltaran piezas, llame a nuestro número gratuito 1-800-892-3986 entre las 8:00 a.m.- 5:00 p.m., hora del este, de lunes a
viernes o contáctenos a través de nuestro sitio web en www.zennahome.com para solicitar mas información.
CONSIGNE DE SÉCURITÉ :
Assurez-vous d’installer le produit dans un endroit propre, sec et sécurisé. NE MONTEZ PAS SUR LE REBORD DE LA BAIGNOIRE.
Avant de commencer :
Merci d’avoir acheté ce produit. Veuillez identifier toutes les pièces et les accessoires de montage avant de commencer.
Lorsque vous déballez les pièces, placez-les sur une surface non rugueuse afin d’éviter les éraflures.
S’il venait à vous manquer des pièces, appelez notre numéro sans frais 1.800.892.3986 entre 8 h et 17 h (heure de l’Est des
États-Unis), du lundi au vendredi.
Assembly Instructions
/ Instrucciones de Ensamblado / Instructions de montage
Model
/ Modelo / Modèle
35635ALSSL / 35635ALBNL / 35635ALHBL
(Dual Mount Curved Rod /
Tubo curvado de doble montaje / Dual Mount Curved)
Question and Answer IconNeed help?

Do you have a question about the Zenna Home 35635ALSSL and is the answer not in the manual?

Zenna Home 35635ALSSL Specifications

General IconGeneral
BrandZenna Home
Model35635ALSSL
CategoryBathroom Fixtures
LanguageEnglish

Summary

General Safety and Preparation

Before You Begin

Identify all parts and hardware before starting assembly.

Tools and Parts Identification

Required Tools

Lists the tools required for assembly.

Assembly Parts List

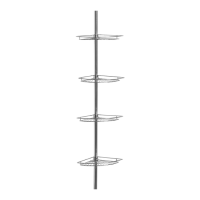
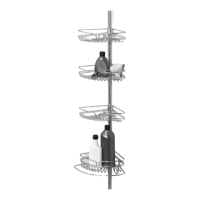
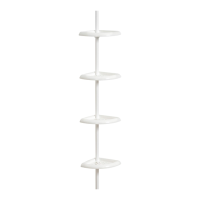
Identifies all components of the rod assembly.

Hardware Identification

Hardware Components

Details all screws, anchors, and tools provided for installation.

Permanent Installation: Step 1 - Tube Attachment

Fasten 7/8-inch Tube to Bracket

Connect the 7/8 in. tube assembly to the 7/8 in. mounting bracket.

Tighten with Large Hex Wrench

Secure the connection using the provided large hex wrenches.

Permanent Installation: Step 2 - Bracket and Cap Placement

Position Mounting Bracket

Place the mounting bracket with directional arrows as shown.

Slide End Caps onto Tubes

Slide end caps onto the respective tubes, do not attach to bracket.

Permanent Installation: Step 3 - Tube Assembly

Insert Plastic Ring

Place the plastic ring into the 1 in. diameter tube.

Join Tube Assemblies

Connect the 7/8 in. tube assembly into the 1 in. diameter tube.

Permanent Installation: Step 4 - Measure Space

Measure Wall-to-Wall Distance

Determine the distance between the bathtub or shower walls.

Permanent Installation: Step 5 - Adjust and Lock Length

Extend Rod Assembly to Fit

Extend the rod assembly to the measured space.

Lock Assembly Length with Set Screw

Secure the rod length using the set screw and small hex wrench.

Permanent Installation: Step 6 - Mark and Remove Rod

Secure Rod to Walls

Attach the rod to the walls by twisting the tube assembly.

Mark Wall Mounting Points

Mark the wall through the mounting bracket holes.

Remove Rod from Walls

Twist the tube assembly towards you to detach the rod.

Permanent Installation: Step 7 - Drill and Anchor

Drill Mounting Holes

Drill two holes at the marked locations for each bracket.

Install Drywall Anchors

Insert drywall anchors into the drilled holes.

Permanent Installation: Step 8 - Final Assembly

Secure Rod and Tighten Screws

Secure the rod and tighten mounting screws into anchors or studs.

Attach End Caps to Brackets

Align and snap the end caps onto the mounting brackets.

Tension Mount Installation: Step 1 - Tube Attachment

Fasten 7/8-inch Tube to Bracket

Connect the 7/8 in. tube assembly to the 7/8 in. mounting bracket.

Tighten with Large Hex Wrench

Secure the connection using the provided large hex wrenches.

Tension Mount Installation: Step 2 - Bracket and Cap Placement

Position Mounting Bracket

Place the mounting bracket with directional arrows as shown.

Slide End Caps onto Tubes

Slide end caps onto the respective tubes, do not attach to bracket.

Tension Mount Installation: Step 3 - Tube Assembly

Insert Plastic Ring

Place the plastic ring into the 1 in. diameter tube.

Join Tube Assemblies

Connect the 7/8 in. tube assembly into the 1 in. diameter tube.

Tension Mount Installation: Step 4 - Measure Space

Measure Wall-to-Wall Distance

Determine the distance between the bathtub or shower walls.

Tension Mount Installation: Step 5 - Adjust and Lock Length

Extend and Twist Rod Assembly

Twist the tube to extend, then lock length with the set screw.

Align and Snap End Caps

Align end cap dimples with bracket notches and snap together.

Tension Mount Installation: Step 6 - Secure the Rod

Secure Rod to Walls

Attach the rod to the walls by twisting the tube assembly.

Ensure Rod is Level and Tight

Verify the rod is level and turn the tube end until tight.

Troubleshooting: Adjusting Rod Length

Adjust Rod Length

Twist the tube assembly to adjust the rod length as needed.

Final Tightening of Assembly

After adjustment, twist the 7/8 in. tube assembly until it is tight.

Related product manuals