EasyManua.ls Logo

Zenna Home 9119W User Manual

Zenna Home 9119W
14 pages
To Next Page IconTo Next Page
Page #1 background imageLoading...
Page #1 background image
Pg 1 of 14
www.zenith-products.com IS9209
Before You Begin:
Thank you for purchasing this product. Please identify all parts and hardware pieces before you begin. When
laying out parts, place them on a soft surface to prevent scratching.
If any pieces are missing, call our Toll Free Number 1-800-892-3986 between 8:00AM-5:00PM EST Monday
through Friday.
Antes de que empiece:
Muchas gracias por comprar este
producto.
Identifique todas las piezas y las piezas de ferretería antes de comenzar.
Al distribuir las piezas, colóquelas sobre una superficie suave para evitar que se rayen.
Si faltaran piezas, llame a nuestro número gratuito 1-800-892-3986 entre las 8:00 a.m.- 5:00 p.m., hora del este, de lunes a
viernes o contáctenos.
Avant de commencer :
Merci d’avoir acheté ce produit. Veuillez identifier toutes les pièces et les accessoires de montage avant de commencer.
Lorsque vous déballez les pièces, placez-les sur une surface non rugueuse afin d’éviter les éraflures.
S’il venait à vous manquer des pièces, appelez notre numéro sans frais 1.800.892.3986 entre 8 h et 17 h (heure de l’Est des
États-Unis), du lundi au vendredi.
Doors (D) actual style may differ
Puertas (D) el modelo exacto puede diferir
portes (D) le style peut varier
Assembly Instructions / Instrucciones de Ensamblado / Instructions d'assemblage
Model /
Modelo / Modèle
9119W (White / Blanco / blanc)
9119GY (Driftwood Gray / Gris Bois de Grève / gris bois de grève)
support (F) location for
front or back
Ubicación del soporte (F) para
frente o parte de atrás
Emplacement du support (F)
pour l’avant ou l’arrière
MCS 3/25/2020
Question and Answer IconNeed help?

Do you have a question about the Zenna Home 9119W and is the answer not in the manual?

Zenna Home 9119W Specifications

General IconGeneral
BrandZenna Home
Model9119W
CategoryBathroom Fixtures
LanguageEnglish

Summary

Getting Started and Safety Precautions

Important Pre-Assembly Information

Check parts, prevent scratches, and contact for missing items.

Product Component Identification

Parts List

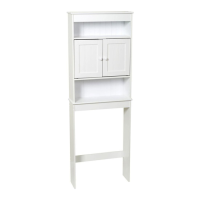
Visual identification of all furniture components.

Hardware List

Visual identification of all assembly hardware and tools.

Assembly Steps

Step 1: Bottom Support Attachment

Fasten support rail to lower side panels.

Step 2: Positioning and Second Support Installation

Place bottom assembly and attach the second support rail.

Step 3: Magnet Installation

Secure the magnet to the underside of a fixed shelf.

Step 4: Side Panel to Top Shelf Connection

Attach an upper side panel to the top shelf.

Step 5: Support to Side Panel Connection

Insert dowels and attach support to upper side panel.

Step 6: Second Upper Side Panel Attachment

Attach the second upper side panel to the support and top shelf.

Step 7: Attaching Fixed Shelves

Secure two fixed shelves to the upper side panels.

Step 8: Securing Another Fixed Shelf

Attach a fixed shelf to side panels with correct orientation.

Step 9: Back Panel Installation

Fasten the back panel to the unit.

Step 10: Cambolt Insertion

Screw cambolts into the bottom shelf.

Step 11: Joining Top and Bottom Assemblies

Place top assembly onto bottom assembly and secure with snap cams.

Step 12: Hinge Attachment to Doors

Fasten hinges to the top of each door.

Step 13: Hinge Bushing Insertion

Insert hinge bushings into the fixed shelves.

Step 14: Door Installation and Knobs

Mount doors using hinges and attach door knobs.

Step 15: Finishing Touches

Attach remaining knobs, stickers, and screw caps.

Step 16: Wall Mounting and Safety

Secure unit to wall and follow cleaning guidelines.

Cleaning and Maintenance

Care Instructions for Unit Surface

Guidelines for cleaning with damp cloth and avoiding harsh cleaners.

Related product manuals