EasyManua.ls Logo

Zip'r Roo 3 - User Manual

Zip'r Roo 3
17 pages
Print Icon
To Next Page IconTo Next Page
Loading...



Questions and Answers

  • V
    Vanessa GarrisonAug 17, 2025
    What to do if my Zip'r Roo 3 Mobility Aid is charged but does not move?
    • S
      Steve BartonAug 17, 2025
      If your Zip'r Mobility Aid is charged but won't move, it might be in free wheel mode. To resolve this, remove the key, push the free-wheel lever to the drive position (rear position), and then reinsert the key and turn the scooter on.
  • V
    Vanessa LewisAug 20, 2025
    How to fix a Zip'r Mobility Aid that will not move?
    • L
      Lori AndersonAug 20, 2025
      If your Zip'r Mobility Aid won't move, there are a few things to check: * Make sure the battery box is fully inserted and correctly in place. * Ensure the brake release lever is in the drive position (rear position). * Verify the battery is fully charged. * Confirm the key is in the ignition and turned on.
  • A
    april52Aug 22, 2025
    What to do if my Zip'r Roo 3 has no power?
    • B
      Barbara RobinsonAug 22, 2025
      If there's no power in your Zip'r Mobility Aid, try the following: 1. Check that the battery box is correctly inserted and fully pressed into position. 2. Verify the battery is fully charged. 3. Push the main circuit breaker reset button located on the battery. 4. Remove the battery case cover and replace the fuse.
  • C
    Christine GrahamAug 25, 2025
    Why does the self-diagnostic warning light indicate excessive voltage on my Zip'r Roo 3 Mobility Aid?
    • A
      Alexis ParkAug 26, 2025
      If the self-diagnostic warning light on your Zip'r Mobility Aid indicates excessive voltage, it's usually due to a poor battery connection. Check the connections and turn the key off and on.
  • H
    hughesericaAug 28, 2025
    What does it mean when the self-diagnostic warning light indicates free wheel lever not in drive position on my Zip'r Roo 3 Mobility Aid?
    • J
      Janice McconnellAug 28, 2025
      If the self-diagnostic warning light on your Zip'r Mobility Aid indicates that the free wheel lever isn't in the drive position, firmly push the lever to the rear position, then turn the key switch off and on.
  • T
    Tamara FloresAug 31, 2025
    What should I do if the self-diagnostic warning light indicates a controller fault on my Zip'r Roo 3?
    • N
      Natalie HallAug 31, 2025
      If the self-diagnostic warning light on your Zip'r Mobility Aid indicates a controller fault, check to see that all connections from the controller are secure, and then turn the key switch off and on.
  • A
    Angelica ThompsonSep 2, 2025
    What does it mean if the self-diagnostic warning light indicates a throttle fault on my Zip'r Roo 3?
    • D
      Donald MossSep 3, 2025
      If the self-diagnostic warning light on your Zip'r Mobility Aid indicates a throttle fault, verify that the throttle is not stuck in forward/reverse, and then turn the key switch off and on.
  • M
    Manuel RaymondSep 5, 2025
    What to do if the self-diagnostic warning light indicates drive inhibited mode on my Zip'r Mobility Aid?
    • D
      Dakota WolfSep 5, 2025
      If the self-diagnostic warning light on your Zip'r Mobility Aid indicates drive inhibited mode, disconnect the battery charger and turn the key off and on.
  • M
    Michael JimenezSep 7, 2025
    What to do if the self-diagnostic warning light indicates poor motor connection on my Zip'r Mobility Aid?
    • A
      Annette WeaverSep 8, 2025
      If the self-diagnostic warning light on your Zip'r Mobility Aid indicates a poor motor connection, check all connections between the motor and dashboard controller, and then turn the key switch off and on.
  • N
    Nicole BrownSep 12, 2025
    What does it mean when the self-diagnostic warning light indicates battery needs charging or poor battery connection on my Zip'r Roo 3 Mobility Aid?
    • R
      Rebecca WeaverSep 12, 2025
      If the self-diagnostic warning light indicates the battery needs charging or a poor battery connection on your Zip'r Mobility Aid, charge the battery fully, check the battery connections, and then turn the key switch off and on.

Summary

Safety Guidelines

Initial Setup and Safety Symbol Explanations

Emphasizes professional setup by authorized personnel and explains safety symbols used in the manual.

Pre-Ride Safety Checks

Pre-Ride Inspection Importance, Checklist, and Initial Charging

Advises on performing pre-ride checks for safe operation and details initial battery charging requirements.

Mobility Scooter Components and Tiller Console

Scooter Parts Overview and Tiller Console Functions

Identifies major scooter parts and describes the functions of the tiller console controls.

Batteries and Charging

Battery Requirements, Charging, and Level Indicator

Details battery specifications, initial charging needs, charging schedules, and the battery level indicator.

Charging Safety Warnings and Prohibitions

Covers warnings on grounding, extension cords, child supervision, and charger usage during charging.

Battery Safety and Handling

Battery Charger and Battery Warnings and Precautions

Addresses charger inspection, case heat, battery compatibility, mixing, and authorized servicing.

Operating Your Mobility Scooter

Mobility Scooter Operation and Safety

Care and Maintenance

Mobility Scooter Troubleshooting

Troubleshooting: Movement, Power, Battery, and Motor Issues

Addresses common issues like no movement, no power, battery problems, and motor surges.

Self-Diagnostic Warning Light Codes

Explains the diagnostic light and provides a guide to flash codes for troubleshooting.

Warranty Information, Registration, and Service

Warranty Coverage, Registration Process, and Claims

Details warranty coverage, the product registration process, and requirements for making warranty claims.

Warranty Exclusions and Contact Information

Overview

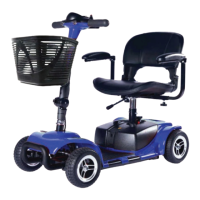
The Zip'r Roo 3 & 4 is a state-of-the-art mobility scooter designed to enhance the mobility of individuals who are limited to a seated position and capable of operating such a device. This owner's manual provides comprehensive information on its assembly, operation, maintenance, and troubleshooting.

Function Description:

The primary function of the Zip'r Roo 3 & 4 mobility scooter is to provide personal transportation for users with mobility limitations. It is an electromechanical device that converts electrical energy from its batteries into mechanical energy to propel the scooter forward and backward. The scooter is designed for daily activities, offering a means to maneuver through various environments, including doorways, elevators, and ramps.

Important Technical Specifications:

  • Battery System: The scooter requires two 12-volt rechargeable batteries. These are housed in an easy-to-remove battery pack, which also contains the main circuit breaker (reset button).
  • Charging: Batteries are recharged using an off-board charger provided with the scooter. Initial charging requires 6-8 hours, and regular charging for 6-8 hours every two weeks is recommended even when not in use.
  • Motor/Transaxle Assembly: This is an electromechanical unit responsible for converting battery power into propulsion. It is pre-lubricated and sealed, requiring no additional lubrication.
  • Braking System: The scooter features electromagnetic regenerative brakes that automatically engage when the throttle control lever is released, bringing the scooter to a stop.
  • Anti-Tip Wheels: Integral safety features bolted to the rear frame to prevent tipping.
  • Tires: Durable flat-free tires are used, and their condition should be regularly checked for wear.
  • Frame Components: Structural components include the platform, fork, seat post, and frame, all covered by a three-year limited warranty.
  • Drivetrain Components: Includes the transaxle, motor, and electronic components, covered by a one-year limited warranty.

Usage Features:

  • Tiller Console: This central control unit houses all necessary operational controls:
    • Key Switch: Used to turn the scooter on and off. It is recommended to remove the key to prevent unauthorized use.
    • Throttle Control Lever: Controls forward and reverse speeds. Pushing the right side with the right thumb moves forward, and pushing the left side with the left thumb moves in reverse.
    • Speed Adjustment Dial: Allows users to preselect and limit the scooter's top speed, with settings ranging from a tortoise (slowest) to a hare (fastest).
    • Horn Button: Activates a warning horn when the scooter is turned on, useful for preventing accidents.
    • Headlight Switch: Toggles the front lighting system on and off.
    • Battery Level Indicator: Displays approximate battery strength using a color code (green for fully charged, yellow for medium, red for immediate recharge).
    • Troubleshooting LED Indicator (Self-Diagnostic Warning Light): Flashes a specific number of times to indicate various issues, aiding in self-diagnosis.
  • Manual Freewheel Lever: Allows the scooter to be pushed manually by disengaging the drive and brake systems. It must be pushed forward to disengage and backward to re-engage. This should only be done on a level surface with the key removed and while standing to the side of the scooter.
  • Adjustable Seating:
    • Swivel Seat: The seat can be rotated to various positions using a lever on the right side of the seat base, facilitating easier boarding and dismounting.
    • Seat Height Adjustment: The seat post can be adjusted to different heights by removing a detent pin, raising or lowering the upper seat post, and reinserting the pin.
    • Armrest Width Adjustment: Armrests can be adjusted inward or outward by loosening knobs, sliding them to the desired width, aligning holes, and re-tightening. Armrests can also be lifted for easier access.
  • Tiller Angle Adjustment: The tiller's angle can be adjusted for user comfort. This adjustment should only be made when the scooter is stationary and the key is removed.
  • Pre-Ride Safety Check: Users are advised to perform a safety check before each use, including checking harness connections, battery level, brakes, tire condition, electrical connections, and ensuring the freewheel lever is in drive mode.
  • Safety Precautions: The manual emphasizes several prohibitions, such as not exposing the tiller console to moisture, not removing or modifying anti-tip wheels, not using extension cords for charging, and not allowing unsupervised children near the scooter during charging. Warnings are also provided regarding hot battery chargers, mixing old and new batteries, and the need for authorized personnel for battery servicing.

Maintenance Features:

  • Daily Maintenance:
    • Charge batteries daily if used for more than twenty minutes.
    • Store the scooter in a warm, dry, climate-controlled environment.
  • Cleaning:
    • The scooter shroud, made of durable ABS plastic, can be cleaned with a damp towel.
    • A light application of car wax can help retain the high gloss finish of the shroud.
    • Rubber conditioner can be used on tire sidewalls and on bumpers/trim pieces.
    • Prohibited: Do not spray the entire scooter with water, apply rubber conditioner to tire tread (can make them dangerously slippery), or use rubber/vinyl conditioner on the seat or floorboard.
  • Regular Checks:
    • Regularly check tires for wear and replace if needed.
    • Check seat posts for wear.
    • Keep the console, charger, battery, and electronics free of moisture.
  • Storage: For prolonged storage, it is advised to place boards under the frame to raise the scooter off the ground, which may reduce unevenness on flat-free tires.
  • Battery Protection: Always protect batteries from freezing temperatures and never charge them below freezing, as this can cause damage and personal injury.
  • Troubleshooting: The manual includes a detailed troubleshooting guide with a Self-Diagnostic Warning Light chart to help users identify and resolve common issues based on the number of flashes from the LED indicator.

The Zip'r Roo 3 & 4 is designed for user convenience and safety, with clear instructions for assembly, operation, and maintenance to ensure a smooth and reliable mobility experience.

Zip'r Roo 3 Specifications

General IconGeneral
BrandZip'r
ModelRoo 3
CategoryMobility Aid
LanguageEnglish

Related product manuals