Do you have a question about the Zoom MRS-1044 and is the answer not in the manual?
General safety advice and symbol meanings.
Precautions for electrical interference, cleaning, and handling.
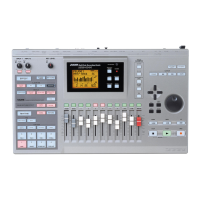
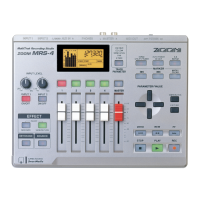
Introduction to the MRS-1044 and its key features.
Overview of the MRS-1044's main sections: Recorder, Rhythm, Mixer, Effect.
Details on the 10-track recorder with virtual tracks (V-takes).
Explanation of the rhythm section's patterns, songs, and drum/bass sound generator.
Description of the mixer channels and controllable parameters like volume, pan, EQ.
Overview of insert and send/return effects available on the MRS-1044.
Description of the device's front interface controls and displays.
Controls and indicators for audio input jacks.
Controls for selecting and editing insert and send/return effects.
Controls for rhythm pattern and song modes, and sound selection.
Explanation of the display screen and its contrast control.
Description of faders for track and master volume control.
Controls for adjusting channel parameters like EQ, pan, and effect send.
Controls for transport, punch-in/out, and A-B repeat functions.
Controls for play, record, stop, rewind, and fast-forward operations.
Description of rear panel connectors and switches.
Description of side panel slots and connectors.
Illustrates instrument, audio, and MIDI device connections with important notes.
Step-by-step guide to powering on the MRS-1044 and connected equipment.
Procedure to load and select demo songs from the internal hard disk.
Instructions on how to play back loaded demo songs.
Steps for safely powering down the MRS-1044 and peripherals.
Loading a project, setting up audio system, and understanding project data.
Procedure for loading the sample project for the introductory tour.
How to listen to the rhythm song accompaniment.
Instructions on saving the current project state.
Recording the initial track with rhythm accompaniment and insert effects.
Setting input sensitivity and recording levels for optimal signal.
Applying and selecting patches for the insert effect.
Setting up track recording and performing the recording.
Recording additional parts (overdubbing) onto new tracks.
Applying insert effects to the overdubbed track.
Setting up and performing the overdub recording.
Adjusting levels, pan, EQ, and effects for the final mix.
Adjusting channel volume, pan settings, and equalizer.
Adjusting send levels for reverb and chorus/delay effects.
Applying a mastering insert effect to the final song mix.
Finalizing the mixdown to an external recorder.
Navigating to specific points in a song using time or measure units.
Setting up to 100 marks for easy location and scene recall.
How to place a mark at a specific song location.
Procedures for removing unwanted marks.
Navigating to previously set marks.
Using Scrub/Preview for precise location finding with audio playback.
How to activate and use the Scrub/Preview features.
Adjusting scrub playback direction and length.
Repeating specific song sections for practice or analysis.
Overwriting specific song sections with new recordings.
Manual control of punch-in/out recording.
Automatic punch-in/out based on set start and end points.
Managing multiple takes (V-takes) for each track.
Selecting different recorded takes for playback.
Renaming recorded V-takes for better identification.
Mixing multiple tracks into one or two tracks (bounce recording).
Step-by-step guide for performing bounce recording.
Configuring playback/mute settings for bounce recording.
Overview of functions for editing recorded track data.
Copying parts of a track to different locations or tracks.
Copying all data from one track to another.
Moving track data segments to new locations.
Deleting specific parts of recorded track data.
Clearing all recorded data from a track.
Swapping recorded data between two tracks.
Saving track data temporarily for later use or comparison.
Procedure to capture track data.
Exchanging current track data with captured data.
Explanation of the input mixer and track mixer sections.
Parameters for adjusting input signals like sensitivity, pan, and send levels.
Parameters for adjusting track playback signals like volume, pan, and EQ.
How to assign input signals to tracks and adjust levels.
Routing input signals to specific recording tracks.
Setting send levels to control effect depth.
Adjusting stereo position and channel balance.
Adjusting volume, pan, and EQ for each channel.
Detailed steps for adjusting channel volume, pan, and EQ.
Adjusting send levels for reverb and chorus/delay effects per channel.
Enabling stereo linking for channel pairs.
Saving and recalling mixer states as scenes.
Procedure to save current mixer and effect settings.
Loading previously saved mixer settings.
Removing saved scenes from memory.
Automating scene changes based on song marks.
Changing level meter display from post-fader to pre-fader.
Introduction to rhythm section concepts like drum kits, bass programs, patterns, and songs.
Explanation of drum kits and bass programs used in the rhythm section.
Details on rhythm patterns, drum tracks, and bass tracks.
How rhythm patterns are arranged into songs for full accompaniments.
How to select, play, and control rhythm patterns.
Step-by-step guide to selecting and playing preset rhythm patterns.
Adjusting the tempo for rhythm patterns and songs.
Selecting different drum kits and bass programs.
Arranging patterns, inputting chords, tempo, and events for rhythm songs.
Sequencing rhythm patterns to create a song.
Adding chord information to influence bass phrases.
Setting fixed tempo for rhythm songs.
Adding events like tempo and volume changes to rhythm songs.
How to play back the created rhythm song.
Modifying existing rhythm songs.
Copying and inserting sections of a rhythm song.
Shifting the pitch of the bass track in a rhythm song.
Deleting the entire rhythm song data.
Creating custom rhythm patterns using the pads.
Choosing drum or bass track for pattern recording.
How to find and select an empty pattern slot.
Setting up the drum track for pattern recording.
Setting up the bass track for pattern recording.
Recording pad hits into a rhythm pattern.
Adjusting quantization for note alignment.
Defining pattern length and time signature.
Step-by-step guide for recording pad performance.
Assigning chord root and type to patterns for bass phrase transposition.
Modifying existing rhythm patterns.
Setting individual volumes for drum and bass parts within patterns.
Copying a pattern to a new pattern number.
Renaming rhythm patterns.
Deleting a rhythm pattern.
Loading patterns and songs from other projects.
Adjusting global rhythm section settings.
Setting the number of measures for recording pre-count.
Adjusting the volume of the metronome.
Configuring pad response to touch.
Displaying available memory for patterns and songs.
Overview of insert and send/return effects.
Explanation of how insert effects are routed and used.
Explanation of reverb and chorus/delay effects.
Detailed guide to using insert effects.
Explanation of patches and algorithms for insert effects.
Selecting where the insert effect is placed in the signal chain.
Routing the effect to monitor only, not the recording.
Choosing specific effect presets (patches).
Modifying effect parameters and types.
Adjusting effect modules, types, and parameters.
Saving edited or new insert effect patches.
Renaming saved insert effect patches.
Guide to selecting and editing send/return effects.
Explanation of reverb and chorus/delay effect patches.
Choosing preset patches for reverb or chorus/delay.
Modifying effect types and parameters for send/return effects.
Saving edited send/return effect patches.
Renaming saved send/return effect patches.
Loading effect patches from different projects.
Explanation of what a project is and the data it contains.
Basic procedures for managing projects.
General steps for most project operations.
Loading existing projects from the hard disk.
Creating a new, blank project.
Viewing disk space and recording time information.
Copying projects to the hard disk.
Deleting projects from the hard disk.
Renaming loaded projects.
Setting write-protection for projects.
Saving the currently loaded project to the hard disk.
Introduction to MIDI and its use with the MRS-1044.
Applications of MIDI, including playing sounds and synchronization.
Explanation of the MIDI IN and OUT ports.
Configuring MIDI transmission and reception.
General steps for accessing MIDI settings.
Assigning MIDI channels for drum and bass tracks.
Enabling or disabling MIDI Timing Clock transmission.
Controlling Song Position Pointer transmission.
Controlling transport message transmission.
Reassigning the function of the foot switch.
Instructions for using the built-in chromatic tuner.
Using SCMS to prevent digital copying.
Technical specifications of the device.
Common problems and their solutions.
Troubleshooting audio playback issues.
Troubleshooting recording issues.
Troubleshooting issues with insert and send/return effects.
Troubleshooting rhythm section playback and recording.
Troubleshooting MIDI connection and communication.
Solutions for miscellaneous operational issues.
Comprehensive list of effects, types, and parameters.
| Type | Digital Multitrack Recorder |
|---|---|
| Tracks | 10 |
| Simultaneous Recording Tracks | 4 |
| Simultaneous Playback Tracks | 10 |
| Recording Format | WAV |
| Sampling Frequency | 44.1 kHz |
| A/D Conversion | 24-bit |
| D/A Conversion | 24-bit |
| Bit Depth | 24-bit |
| Phantom Power | Yes |
| USB Interface | Yes |
| CD Burner | No |
| Power Supply | AC Adapter |
| Storage Media | CompactFlash |
| Output Connectors | TRS, RCA |
| EQ | 3-band EQ |
| Effects | Reverb, Chorus, Delay |
| Input Connectors | XLR |