38
CHECKING FOR LEAKS
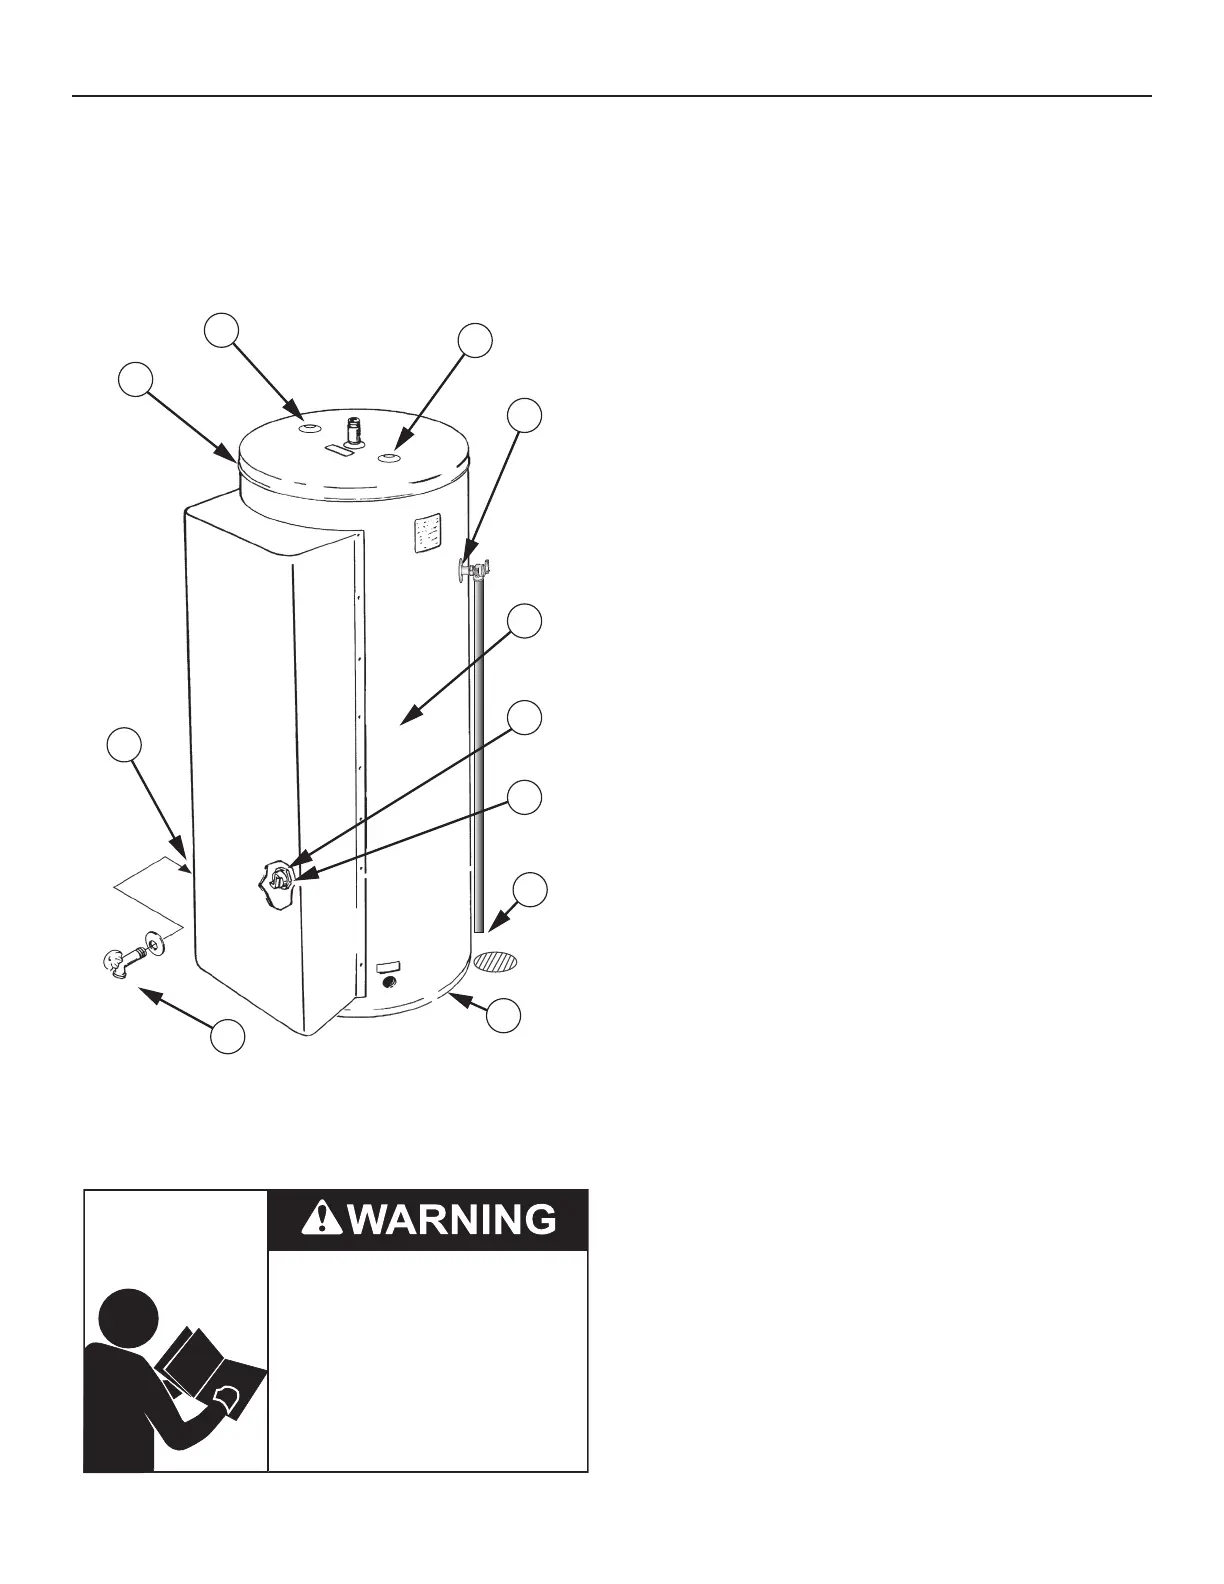
Use this illustration as a guide when checking for sources of water leakage. You or your dealer may be able to correct what appears
to be a problem.
Water leaks which appear at the water heater bottom or on the surrounding oor may be caused by condensation, loose connections
or relief valve operation and leakage. Do not replace the water heater until full inspection of all potential leak points is made and
corrective steps taken to stop the leak.
Leakage from other appliances, water lines, or ground should also be suspected until proven otherwise. See
Water Leakage Is
Suspected
(page 37).
1
2
3
5
6
7
9
10
8
4
2
Figure 15. Leakage Checkpoints
Read and understand this instruction
manual and the safety messages
herein before installing, operating or
servicing this water heater.
Failure to follow these instructions and
safety messages could result in death
or serious injury.
This manual must remain with the
water heater.
Never use this water heater unless it is completely lled with water.
To prevent damage to the tank, the tank must be lled with water.
Water must ow from the hot water faucet before turning the water
heater.
1. Where possible remove or lift top cover to examine threads of
ttings installed into tank for evidence of leakage. Correct tting
leaks as necessary.
2. *The anode rod tting may be leaking.
3. *The temperature-pressure relief valve may be leaking at the
tank tting.
4. Water on the side of the tank may be condensation due to the
panel or insulation not being in place.
5. Defective element which leaks at terminals or thru ange. Replace
element*
6. Loose element/gasket leak
a. Screw-in type: tighten with 1-1/2” socket wrench. If leak
continues, remove element*, discard gasket and clean thread
areas. Apply non-hardening Permatex Number 2 to thread
areas, install new gasket and screw element into tting until
it seats. Tighten 1/2 to 3/4 turn with wrench.
b. Flange type: tighten screw with wrench. If leak continues
remove element* and discard gasket. Clean gasket seating
areas and re-install element with new gasket. A new element
may be required where threads have become rusted or
damaged, preventing tightening.
7. Small amounts of water from temperature-pressure relief valve
may be due to thermal expansion or high water pressure in your
area.
8. All water which appears at the heater bottom or on the surrounding
oor may be caused by condensation, loose connections or relief
valve operation and leakage. Do not replace the heater until a
full inspection of all potential leak points is made and corrective
steps taken to stop the leak.
9. Water from a drain valve may be due to the valve being slightly
opened.
10. *The drain valve may be leaking at the tank tting.
Leakage from other water heaters, water lines, or ground seepage
should also be checked.
* To check where threaded portion enters tank, insert cotton
swab between jacket opening and tting. If cotton is wet,
follow instructions in
Draining the Water Heater Storage Tank
(page
34) and then remove tting. Put pipe dope or teon tape
on the threads and replace. Then follow the instructions in
Installing the Water Heater
(page 12)
and
Filling the Water Heater
(page 17) .
* Contact your dealer as it is necessary to shut o electricity
and drain tank to perform procedure.
Printed on 5/6/2022 7:17 AM CT

 Loading...