65
—
6. Assembly of the switchgear at site
6.5 Installation of the bushing
Before fixing the panels side by side (according to
the general drawings) bushings (12 - 24 kV) must
be fixed (for switchgear with busbar partitioning
only).
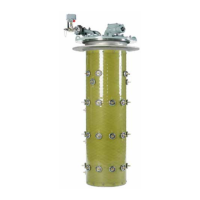
Figure 93: 12 / 17.5 kV panels - fixing bushings Figure 94: 12 / 17.5 kV panlels - fixing bushings
1 nr. 1 bushing
2 nr. 8 8x30 screws
3 nr. 8 M8 washer
4 nr. 3 Rubber partition (busbar support)
Bushing of 12 / 17.5 kV panels
Lower bus-tie system:
Insert bushing 1 for the lower rear bus-tie into
bushing plate 5 from the right side in contrast to
the procedure for the other two bushings.
1 nr. 1 bushing
2 nr. 8 8x30 screws
3 nr. 8 M8 washer
4 nr. 3 Rubber partition (busbar support)
5 nr. 12 M8 nut
6 nr. 1 bushing plate
Bushing of 24 kV panels
Upper busbar system:
Insert bushing 1 for the lower busbar into bushing
plate 5 from the right side, and for the middle and
upper busbar from the left side.
Lower bus-tie system:
Insert bushing 1 for the lower rear bus-tie into
bushing plate 5 from the right side in contrast to
the procedure for the other two bushings.
Figure 95: 24 kV panel - fixing bushings Figure 96: 24 kV panel - fixing bushings
1 nr. 1 bushing
2 nr. 8 10x25 screws
3 nr. 8 M10 washer
4 nr. 6 Rubber partition (busbar support)
5 nr. 12 M10 nut
6 nr. 1 bushing plate
1 nr. 1 bushing
2 nr. 8 10x25 screws
3 nr. 8 M10 washer
4 nr. 6 Rubber partition (busbar support)
5 nr. 12 M10 nut
6 nr. 1 bushing plate

 Loading...