5
ENGLISH
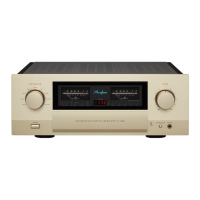
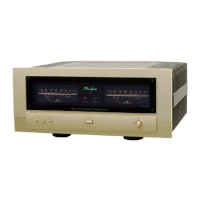
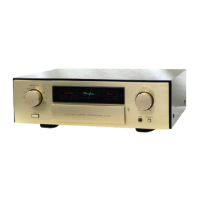
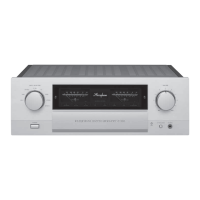
Parts and Functions
1
2
POWER – Power switch
Depress this switch to activate the amplifi er. Push once more to release
the switch and turn the amplifi er off. For an interval of about 5 seconds
after power is turned on, there will be no sound from the speakers, due
to the action of the muting circuit.
● After turning the power off, do not set the power switch immediately to ON
again (within 10 seconds).
SPEAKER – Speaker selector
Serves to select two pairs of speakers connected to the “A” and “B”
speaker terminals.
OFF
Both speaker pairs are turned off, for example for headphone listening.
A, B
The respective speaker pair is active.
A + B
Both pairs of speakers are driven simultaneously. In this case, use speakers with
a rated impedance of 4 ohms or more, as both sets are connected in parallel.
This position is also used for biwiring a single set of loudspeakers (using
separate cables for the low frequency range and mid/high frequency range).
COPY – Copy selector
When two recorders are connected to the E-350, dubbing can be carried
out in either direction by using this selector.
1 2, 2 1
To use the recorder connected to the RECORDER 1 jacks on the rear panel
as source and the recorder connected to the RECORDER 2 jacks as recorder,
set the selector to “1 2”. For dubbing in the opposite direction, use the
“2 1” position.
OFF
Set the selector to this position when dubbing is not desired.
RECORDER – Recorder selector
REC OFF
Select this position in normal operation (when not recording). The amplifi er
reproduces the selected program source, but the signal does not appear at
the REC outputs.
SOURCE
– “REC ON” LED lit
Select this position when wishing to record. The amplifi er reproduces the
selected program source, and the signal appears at the REC outputs.
1, 2
– “RECORDER” and “REC ON” LEDs lit
Select this to reproduce the signal from a recorder.
Select the position depending on the rear-panel “PLAY” input (RECORDER 1
or RECORDER 2) that is used.
MC/MM – MC/MM selector button
This function is only available when the Analog Disc Input Board
AD-20 is installed.
This selector button determines the phono stage gain for playback of analog
discs (phono records) with the AD-20.
● Button pressed (MC): “MC” LED is lit
● Button pressed once more (MM): “MC” LED is out
MC
This position should be used for moving-coil (MC) cartridges with low output.
Set the input impedance with the DIP switches on the board.
MM
This position should be used for moving-magnet (MM) cartridges. The input
impedance is 47 kilohms.
Note:
● MC/MM switching becomes available when the INPUT SELECTOR
14
is
set to the position for an option board slot where the AD-20 is installed.
● For MC/MM switching, the setting of the MC/MM selector
5
has priority.
The AD-20 has DIP switch settings for MC/MM selection, but the board
settings are overridden by the selector of the E-350.
●
The MC LOAD and FILTER settings are made only on the AD-20 board.
There are no provisions for setting these items at the E-350.
● The Analog Disc Input Board AD-9 or AD-10 can also be used, but in this
case, MC/MM selection can only be made on the board. The setting of the
MC/MM selector of the E-350 has no effect.
EXT PRE – Preamplifi er/power amplifi er separator button
This button permits using the preamplifi er section and the power amplifi er
section of the E-350 separately.
3
4
6
7
MONO – Mono/stereo mode selector button
This switch selects stereo or mono operation. When the switch is pressed,
both channels are combined and the same signal is fed to the left and
right speakers. If the listening position is at approximately equal distance
from the speakers, the sound image should be centered.
● Button pressed (monophonic operation): “MONO” LED is lit
●
Button pressed once more (stereo operation): “MONO” LED is out
Note:
When the RECORDER selector setting is changed to “SOURCE”, the
monophonic setting will automatically be canceled. To record in monophonic
mode, press the MONO button again after using the RECORDER selector.
8
METER – Meter display on/off button
● Button pressed (OFF):
Meter lights are out and meters do not operate.
● Button pressed once more (ON):
Meter lights are on and meters operate.
9
COMP – Loudness compensator button
This button serves to restore natural tonal balance at low listening levels.
The human ear becomes less sensitive for the frequency extremes as
loudness decreases. This often causes the sound to be perceived as thin or
defi cient, especially in the bass range. The COMP button makes up for this effect
by boosting the lower range (+6 dB at 100 Hz).
● Button pressed (ON): “COMP” LED is lit
● Button pressed once more (OFF): “COMP” LED is out
10
TONE (BASS, TREBLE) – Tone controls
TONE – Tone control on/off button
● Button pressed (ON): “TONE” LED is lit
● Button pressed once more (OFF): “TONE” LED is out
✽ When the button is set to ON, the BASS and TREBLE controls can be
used.
✽ When the button is set to OFF, the entire tone control circuitry is by-
passed.
BASS
– Bass control
Turning this control to the right from the center (0) position boosts the lower
frequency range and turning the control to the left attenuates it.
● Turnover frequency: 300 Hz
● Adjustment range: ±10 dB at 50 Hz
TREBLE
– Treble control
Turning this control to the right from the center (0) position boosts the upper
frequency range and turning the control to the left attenuates it.
● Turnover frequency: 3 kHz
● Adjustment range: ±10 dB at 20 kHz
11
BALANCE – Balance control
This control serves to adjust the left/right stereo balance.
● Normally, the control should be left in the center (0) position.
ATTENUATOR – Attenuator button
Pressing the ATTENUATOR button will quickly reduce the volume level
of the amplifi er to one-tenth (-20 dB attenuation).
● Button pressed (ON): “ATTENUATOR” LED is lit
● Button pressed once more (OFF): “ATTENUATOR” LED is out
12
5
● Button pressed (ON): “EXT PRE” LED is lit
Preamplifi er and power amplifi er are separated.
● Button pressed once more (OFF): “EXT PRE” LED is out
Normal operation, preamplifi er and power amplifi er not separated.
Note:
Do not operate the switch during playback. Always turn the volume fully down
before setting the switch to ON or OFF.
 Loading...