outdoorIndoor
5-10
2.
rear left
3
.
cut off
the hole
2
.
2.
2.
3.
F
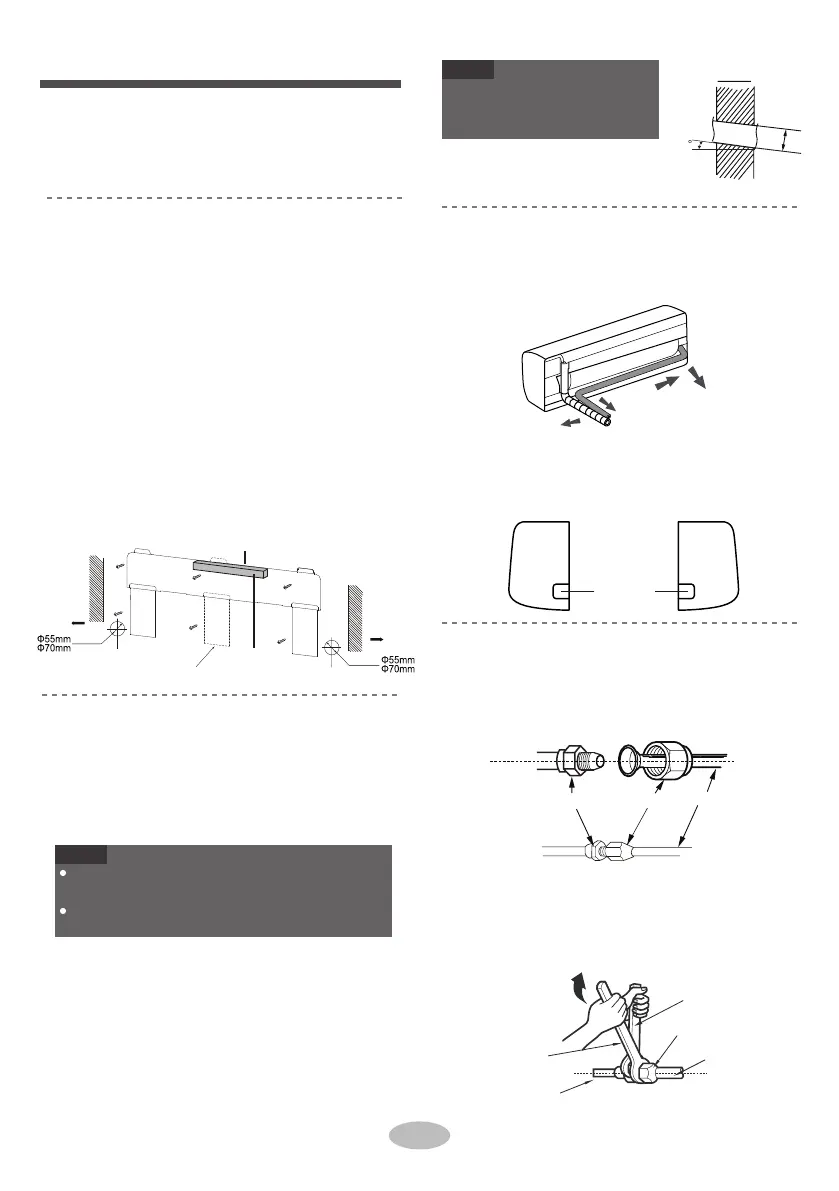
ix the wall-mounting frame on the wall with
tapping screws and then check if the frame
is firmly installed by pulling the frame. If the
plastic expansion particle is loose, please
drill another fixing hole nearby.
union nutpipe joint
pipe
3.
NOTE
●
Φ55
Install wall-mounting frame
Step 2:
Φ70
Outlet pipe
Choose installation location
Step 1:
Recommend the installation location to the client
and then confirm it with the client.
right
Step 4:
1.
Hang the wall-mounting frame on the wall; adjust
it in horizontal position with the level meter and
then point out the screw fixing holes on the wall.
Drill the screw fixing holes on the wall with im-
pact drill(the specification of drill head should
be the same as the plastic expansion particle)
and then fill the plastic expansion particles in
the holes.
Step 3:
Open piping hole
1.
Step 5:
Connect the pipe of indoor unit
Installation of indoor unit
1.
wall-mounted frame, shown as below.
A
im the pipe joint at the corresponding
NOTE
left right
left
rear right, left or rear left.
P
ay attention to dust prevention
-
aem ytefas tnav eler ekat dna
s
ures when opening the hole.
be
llmouth.
Pretighten the union nut with hand.
P
lease refer to the actual circumstances for the
n
umber of screws and the position of screws.
rear right
1
.
16
T
he pipe can be led out in the direction of right,
C
hoose the position of piping hole according
A
djust the torque force by referring to the
wrench on the union nut. Tighten the union
nut with torque wrench.
When installation is finished, pull the mounting
plate by hand to confirm whether it is fixed
tightly. The
force distribution for all screws
should be uniform.
Op
en a piping hole with the diameter of Φ55
or Φ70 on the selected outlet pipe position.
In order to drain smoothly, slan t the piping
hole on the wall slightly downward to the
outdoor side with the gradient of 5-10°.
t
o the direction of outlet pipe. The position of
piping hole should be a little lower than the
When select
ing
leading out the pipe from left
or
right, please cut off the corresponding hole
on the bottom case.
T
he wall panel is for illustrative purposes only,
please refer to the actual installation.
union nut
torque wrench
pipe
indoor pipe
open-end
wrench
f
ollowing sheet. Place the open-end wren-
ch on the pipe joint and place the torque
Wall
Wall
(Rear piping hole)
(For some models)
(Rear piping hole)
Space
to the
wall
above
150mm
Left
Space
to the
wall
above
150mm
Right
Mark in the middle of it
Level meter