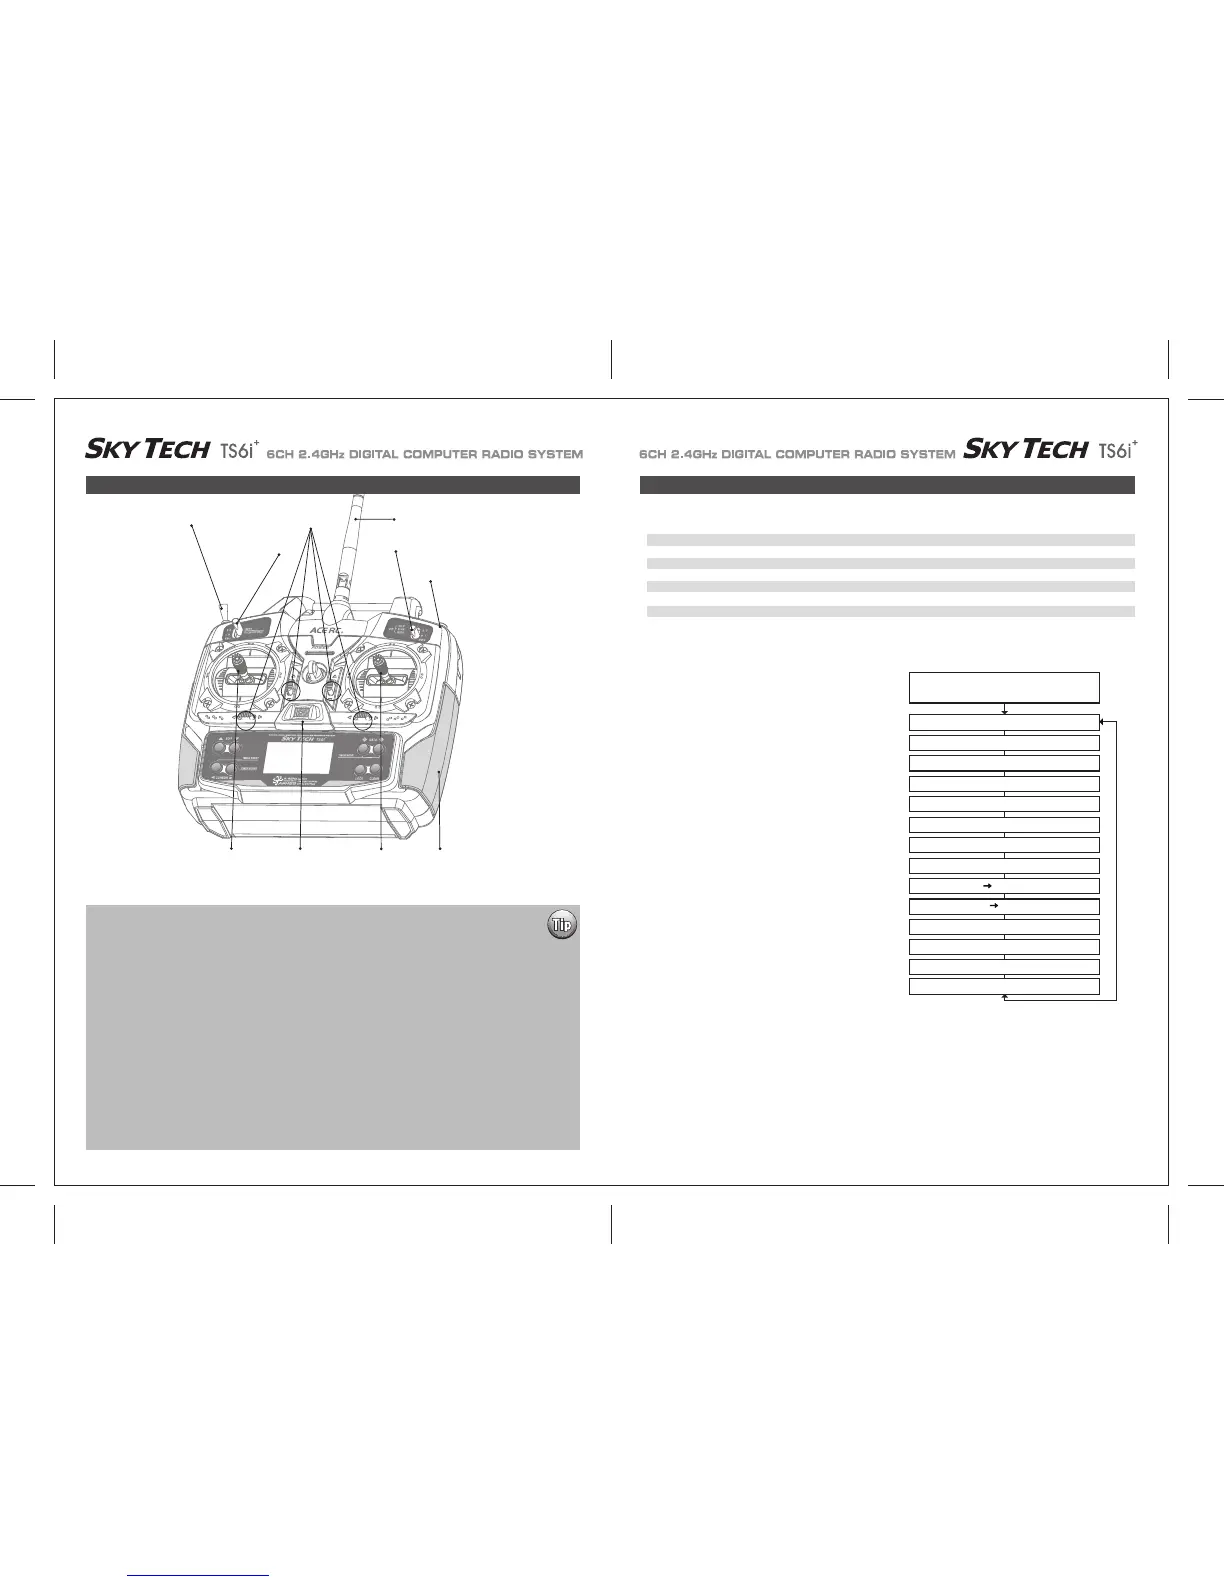
Trainer/Engine Cut Switch
SW 3
SW 1
Rudder &
Throttle Stick
Aileron &
Elevator Stick
Plastic Side Panel
SW 2
Antenna
Trim Switch
Power Switch
Sky Tech TS6i
+
Sailplane in-Flight Controls Sailplane Controls and Switch Assignments
This figure shows the assignments for a Mode 2 system as supplied by the factory.
Note that some of the functions will not operate until activated in the mixing menus.
To avoid duplication of text within the manual we suggest that if you have not already read the following you refer to this previously shown
information in the front of the manual.
The following section covers the Sky Tech TS6i
+
GLID mode programming functions specific to sailplanes.
Please refer to the Initial Setup Menu on pages 24-26 and the ACRO Main Function Menu starting on page 28-40 to reference all other
Sky Tech TS6i
+
programming instructions not specific to the GLID menu.
- Introducing Sky Tech TS6i
+
- If you are new to Computerized RC Transmitters
- Charging the Batteries
- Flying Safely
- Mode 1 Configuration
- Flying Field Info
- Frequency Control
- Sky Tech TS6i
+
Programming Switches and Buttons
- Transmitter Displays and Messages
- Initial Setup Menu Programming
EPA End Point Adjust (Servo travel) 25 D/R Dual Rates 27
EXP Exponential Settings 28 S-TRM Sub-Trim (Neutral Settings) 29
S-REV SERVO Reverse 29 P.MIX Programmable Mixer 30
31
ELVN Elevon Mixing (Tailless models) 31 FLPN Flaperon (Combined Flaps & Ailerons)
V-TAL V-tail Mixing 32 A->R Rudder Coupling 33
E->F Elevator Flap Mixing 33 CUT Throttle Cut (Engine Shut Off) 34
35
CAMB Camber (Combined Flaps & Ailerons) 34 FLT.C Flight Condition (NOR, ST1, ST2, ST3)
If this is your first Sailplane...
If this is your first model Sailplane, here are a few tips that will streamline your experience in programming it.
This will make more sense after you read through the manual.
Refer back to this section when you are ready to begin the setup:
1. Start with the correct model type, GLID, in the Initial Setup Menu.
2. Access the main programming menu, then use the REV function, and make sure all the servos are moving in the
proper direction.
3. After centering the servo arms manually as close as you can, use the S.TRM or sub-trim function to center the
servos.
4. Set your servo end points with the EPA function.
5. Program -35% EXPO values for aileron, Ch. 1 and elevator, Ch. 2.
6. After your Sailplane is all ready to fly, put it on a shelf and go get an R/C flight simulator program for your PC.
Spend quality time crashing the virtual plane in the simulator. Using a sim will save you hundreds of dollars
spent on spare parts and countless hours of rebuilding time in the long run.
7. Ready to fly your new Sailplane? If you are lucky you will know someone that is an experienced model pilot
and would be willing to check over your plane and take it up for its first flight. This is HIGHLY RECOMMENDED,
even if you have to drive a hundred miles to get to this person!
If you are on your own, start slow and conservatively.
Voltage/Timer Display
Normal Display Mode
End Point Adjust [EPA]
Press both Edit Buttons
Dual Rate Set [D/R]
Exponential [EXP]
Sub-Trims [S.TRM]
Servo Reversing [REV]
Prog.Mix [P.MIX]
Throttle Control Location
V-Tail [VTAL]
Ail → Rud Mix [A-R]
Elev → Flap Mix [E-F]
CROW (Proportional Airbrake Function)
Camber [CAMB]
ADIF Aileron Differential
noitidnoc thgilF C.TLF