13
Arm Bearing (Figure 15)
1. Lubricate the arm bearings after the first 10
hours of use. Oil them every 50 hours of use
or whenever the bearing squeaks.
2. Carefully place the saw on its side as shown
in figure 15.
3. Remove the rubber cap (1) from the upper
and the lower arm of the saw.
4. Squirt a few drops of oil (2) on the end of the
shaft and arm bearings.
5. Leave the saw in this position overnight to
allow the oil to soak in.
NOTE: Lubricate the bearings on the other
side of the saw in the same manner
Carbon Brushes (Figure 16)
The saw's motor has externally accessible
carbon brushes that should be checked
periodically for wear. When one of the two
brushes becomes worn, replace both brushes.
1. Unplug the saw from the power source.
2. Carefully place the saw on its side exposing
the underside of the saw housing.
3. Using a flat blade screwdriver, remove the
bottom brush assembly cap (1) through the
access hole in the base and the top brush
assembly cap from the top of the motor.
4. Gently pry the brush assemblies (2) out using
a small screwdriver, the pointed end of a nail
or paper clip.
5. If one of the brushes is worn down shorter
than one fourth of an inch (6 mm) in size,
replace both brushes. Do not replace one brush without replacing the other at the same time.
Make sure the curvature at the end of the brush matches the curvature on the motor and that
each carbon brush moves freely into its brush holder. Use the blunt end of something thin
(e.g. eraser end of a pencil) to push the carbon brush into its holder until it is in place.
6. Make sure the brush cap is positioned correctly (straight). Tighten the carbon brush cap using
a hand powered screwdriver only. Do not over tighten.
WARNING: To prevent accidental starting that could cause serious injury, turn off and unplug
the saw before carrying out any maintenance work on the saw.
WARNING: Failure to unplug your saw could result in accidental staring causing serious injury.
Figure 15
Figure 16
1
2
2
1
2
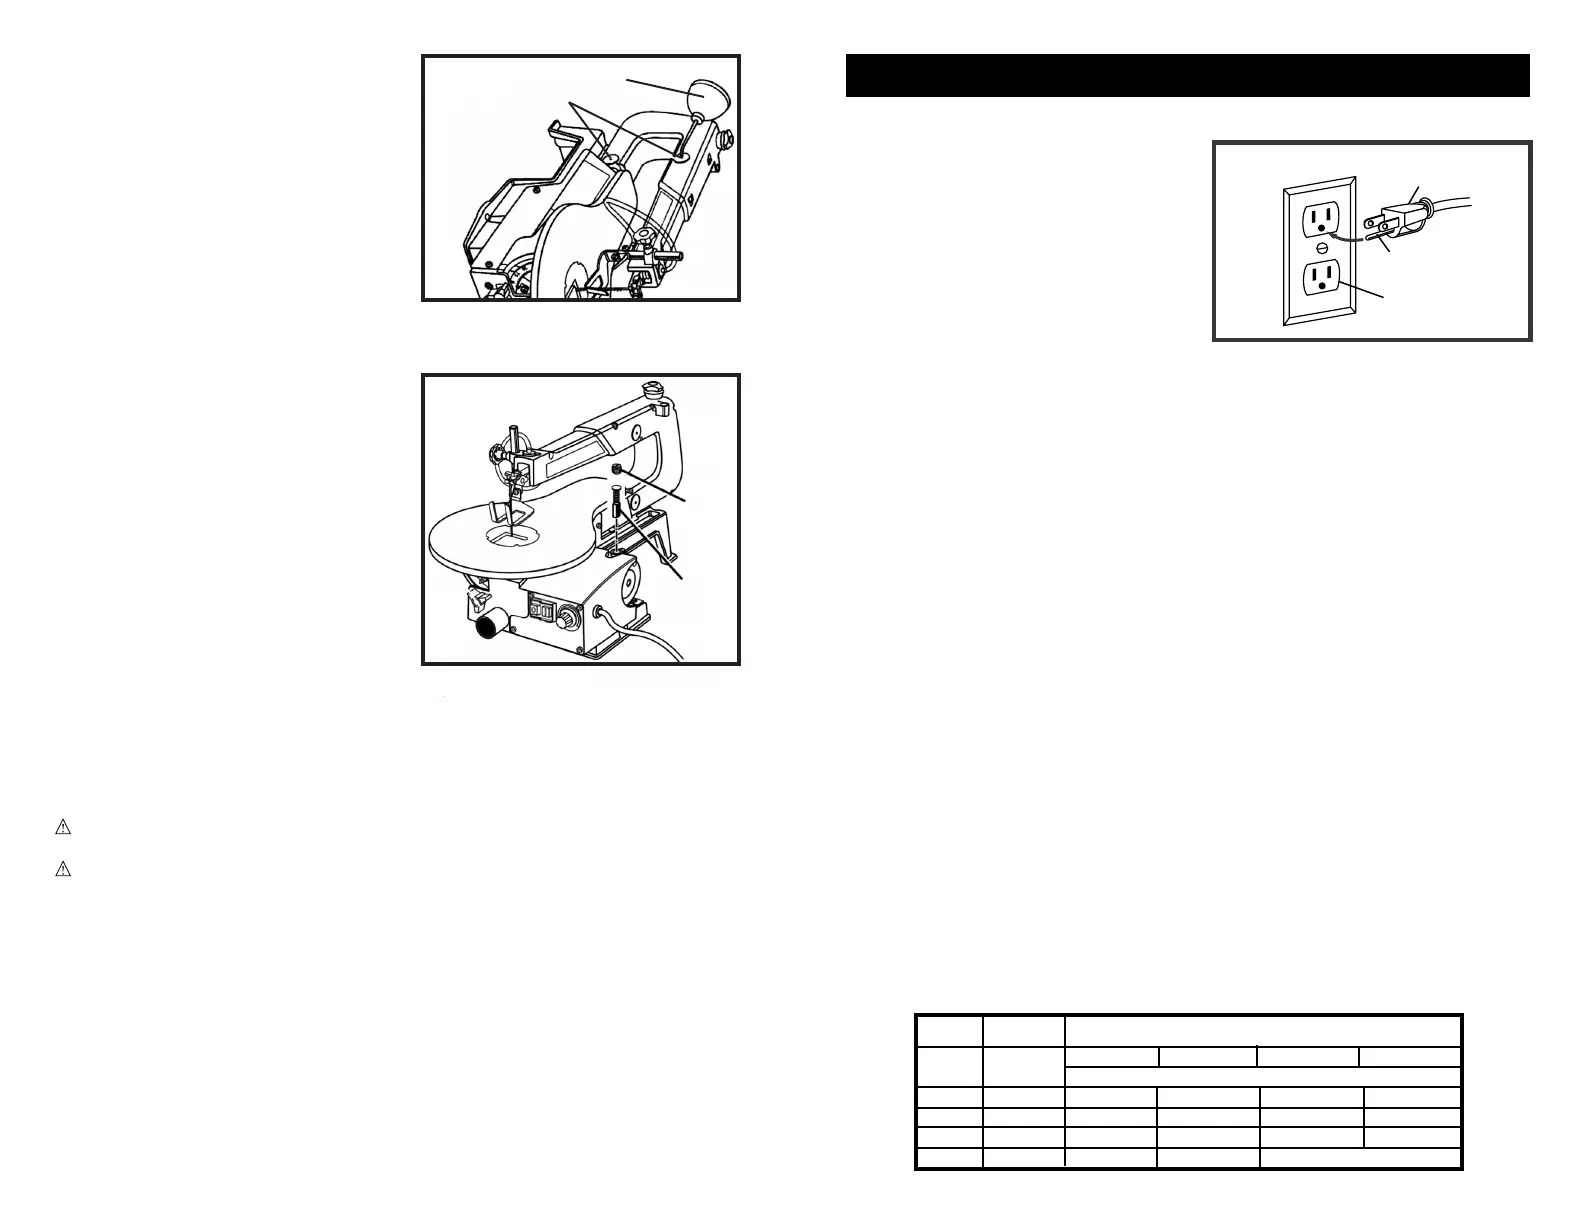
ELECTRICAL SAFETY
Grounding Instructions
1. (SEE FIGURE 1) In the event of a malfunction
or breakdown, grounding provides a path of
least resistance for electric current to reduce
the risk of electric shock. This tool is equipped
with an electric cord having an
equipment-grounding conductor and a
grounding plug. The plug must
be plugged into a matching outlet that is
properly installed and grounded in accordance
with all local codes and ordinances.
2. Do not modify the plug provided - if it will not fit the outlet, have the proper outlet installed by
a qualified electrician.
3. Improper connection of the equipment-grounding conductor can result in a risk of electric
shock. The conductor with insulation having an outer surface that is green with or without
yellow stripes is the equipment-grounding conductor. If repair or replacement of the electric
cord or plug is necessary, do not connect the equipment-grounding conductor to a live terminal.
4. Check with a qualified electrician or service personnel if the grounding instructions are not
completely understood, or if in doubt as to whether the tool is properly grounded.
5. Avoid body contact with grounded surfaces such as pipes, radiators, ranges, and refrigerator.
There is an increased risk of electrical shock if your body is grounded.
6. Repair or replace damaged or worn cord immediately.
7. Don't expose power tools to rain or wet conditions. Water entering a power tool will increase
the risk of electrical shock.
Extension Cords
1. Make sure your extension cord is in good condition. When using an extension cord, be sure to
use one heavy enough to carry the current your product will draw. An undersized cord will
cause a drop in line voltage resulting in loss of power and overheating. Table 1 (page 3) shows
the correct size to use depending on cord length and nameplate Ampere rating. If in doubt, use
the next heavier gauge. The smaller the gauge number, the heavier the cord.
2. Use only 3-wire extension cords that have 3-prong grounding plugs and 3-pole receptacles that
accept the tool's plug.
3. Do not abuse the cord. Never use the cord to carry the tools or pull the plug from the outlet.
4. Keep cord away from heat, oil, sharp edges or moving parts. Replace damaged cords
immediately. Damaged cords increase the risk of electrical shock.
5. When operating a power tool outside, use an outdoor extension cord marked "W-A" or "W".
These cords are rated for outdoor use and reduce the risk of electrical shock.
Grounding
Prong
3-Prong Plug
Properly Grounded
3-Prong Outlet
Figure 1
Amp Volts
25 ft. 50ft 100ft 150 ft
1-5 120V 18 16 16 14
6-10 120V 16 16 14 12
11-12 120V 14 14 14 12
12-16 120V 14 12 Not Recommended
Table 1.
Minimum Gage For Power Cord
Total Length of cord in feet
Rating
AWG
 Loading...