ADA MB-1 owners manual version 2
SETUP
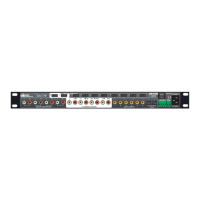
AUDIO PATCH
For best results always use high quality cables. Keep all cables as short as possible, and
route cables neatly. Keep AC, MIDI, and audio cables as far apart from each other as
possible. Note: Always use surge protected A.C. power.
1. Connect your bass guitar to the INPUT jack on the front panel.
2. If you are using a full range power amp and speaker cabinet configuration, connect
the MB-1's Full Range output to the input on your power amp. Using a 12 to 16 gauge
speaker cable, connect the power amp output to your speaker cabinet input. If your
full range system is a "combo" type (pre amp, power amp, and speaker cabinet all in
one), connect the MB-1' s Full Range output to the combo amp's effect return or
power amp in jack, if it has one. If not, use the front panel input. Note: For best signal
to noise ratio when using the MB-1 with a combo amp, bypass the combo amp's
preamp stage using the above patch configuration.
3. If you are using a Bi-amp power amp and speaker cabinet configuration, connect the
MB-1’s low output to the low input on your power amp. Connect the MB-1's Hi output
to the hi input on your power amp. Using 12 to 16 gauge speaker cable, connect the
hi and low outputs from your power amp to the corresponding inputs on your speaker
cabinets.
4. The MB-1's Balanced Direct output may be used alone or in conjunction with the Full
Range or Bi-amp outputs. It is switchable pre or post preamp and the ground is
liftable. Set the Direct output pre/post switch to the desired position, (pre = tone direct
from bass guitar, post = tone from MB-1.) The "PRE" is at line level output and
"POST" is at instrument level output. Using an XLR type cable, connect the MB-1 's
Balanced Direct output to an instrument level input on the recording or P.A. console.
If using the Balanced Direct output in the Post position, connect to a line level input. If
a ground loop buzz occurs, set the MB-1 ’s Direct out Ground Lift Switch up to
eliminate the loop.
EFFECT LOOP PATCH
The MB-1 has two effects loops, A and B. They may be used together or independently.
1. Connect the MB-1 's EFFECT SEND" A" to the input of your first or only effect device.
2. Connect the mix output of your effect device to the MB-1 's EFFECT RECEIVE" A".
3. If using booth loops, connect your second effect device to loop "B" using the above
patch.
MIDI PATCH
1. Connect the MIDI out from your optional MC-1 MIDI foot switch or other MIDI
controller to the MB-1's MIDI IN jack. If using the standard 5 pin MIDI cable make
certain the 5 pins in the cable line up with the correct 5 sockets of the MB-1 's 7 pin
MIDI IN jack.
2. If your system includes MIDI controlled effects, connect a MIDI cable from the MB-1's
MIDI THRU to the MIDI IN jack on your effects device. You may chain multiple MIDI
controlled effects using the above method.
3. If you are using the MB-1 as the first MIDI device in your system, and you are
changing programs from the front panel of the MB-1, connect the MB-1' s
MIDI OUT jack to the MIDI IN jack on your MIDI effects unit.
Page 5 of 22