MAINTENANCE
6-13
10. Reassemble the cap screws and nuts through the upper head and shell ring. Cross tighten the nuts to
approximately 75 ft./lb. torque to obtain a uniform seating, then progressively tighten the nuts to 150
ft./lb.
11. Replace the unit Cap. Close the drain valve and reopen the inlet, outlet, and recirculation valves to
refill the unit.
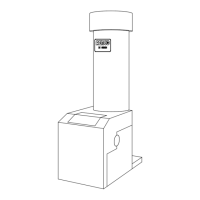
5/8-11 HEX NUT
5/8-11 X 3" CAP SCREW
KC1000 SS HEATER
5/8 EYE NUT
5/8-11 X 4-1/2" STUD
UPPER HEAD
(P.N. 18842)
UPPER HEAD LINER
RELEASE GASKET
(P.N. 18556)
SHELL GASKET
(P.N. 18532)
SHELL RING
Cleaning the Heat Exchanger
Precautions:
Please review MSDS, specifications, and our website www.aerco.com for additional information, or call
technical service at (800) 526-0288.
NOTICE
Mix the HydroSkrub with an equal volume of water to obtain a 50% concentration (11.5 gallons of each =
23 gallons total).
NOTICE
If the isolation valves are located more than one foot from the supply and return ports of the exchanger,
add in the piping volume from the exchanger to the valves.
CAUTION!
Do not drain the unit without venting the shell! A vacuum in the unit may displace the liner causing serious
damage not covered by warranty.
Carbon Water Heater Head
Configuration
Figure 6.18a
SS Water Heater Head
Configuration
MOUNTED IN THREADED
HOLE
remove
if using
a chain
hoist
remove
if using
a chain
hoist
5/8-11 x 3” BOLT
MOUNTED IN
 Loading...