For the very latest specifications visit www.aeroflex.com
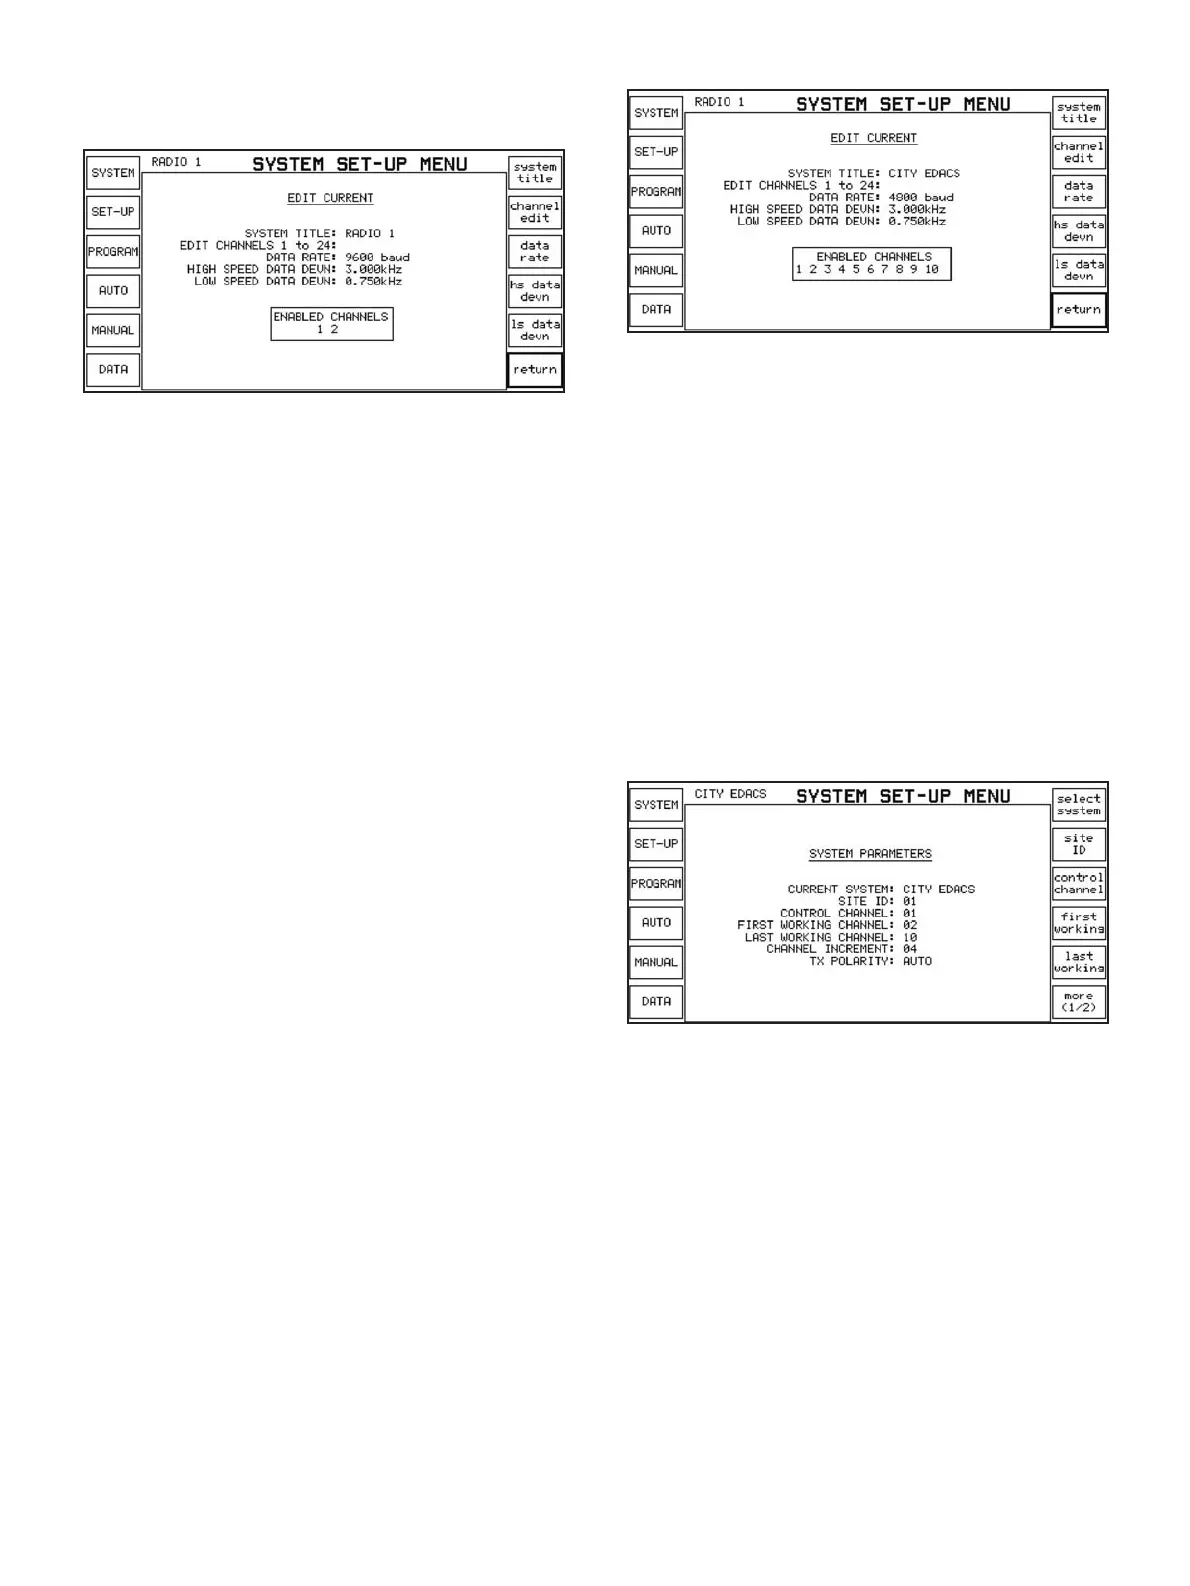
Press [select system], [edit current] to enter the menu screen to
edit the current system.
The EDIT CURRENT menu screen
Press [system title] if you want to refer to the system by a name
other than the one shown (i.e. "RADIO 1"). You can enter this title
by using the rotary control to select a letter at a time, pressing
[enter char] to enter each character into the string and pressing
[title complet] when finished. The [return] softkey will abort title
entry. The title can be up to ten characters long and will appear
in the top left hand corner of the screen. Up to the first seven
characters of the title will also appear subsequently on the softkey
used to select the system.
The [channel edit] softkey gives a list of channels to edit, from 1
to 24. Press [channel edit], [channel 1] to edit the frequencies for
channel number 1. Press [tx freq] followed by the frequency that
the radio transmits on for channel 1, terminated with one of the
orange units keys, e.g. [MHz]. Next, enter the duplex offset of the
channel, by pressing the [duplex offset] softkey. If not known
directly, the duplex offset can be determined as receive frequen-
cy minus the transmit frequency. For example, if the radio trans-
mits on channel 1 at a frequency of 810 MHz and receives at a
frequency of 855 MHz, then the duplex offset will be 45 MHz.
Pressing the [next] softkey gets you straight to the next channel to
enter frequencies and in this manner, you can enter the frequen-
cy set one channel at a time. Make sure that each channel you
want is actually included. Pressing the [include exclude] softkey
toggles between included and excluded.
When you've finished entering the frequency set, press
[return] to
return to the EDIT CURRENT screen. At the bottom of the
screen there is a box which shows a list of all the channels
currently selected as included in the frequency set. Check
that this is correct before proceeding.
Next you can change the data rate if necessary. Pressing the
[data rate] softkey toggles between 9600 baud and 4800 baud
data rates.
Finally, you can alter the high and low speed data deviations if you
know what they should be on your system. However, the default
values of 3 kHz for high speed and 750 Hz for low speed should
work on all EDACS systems.
Example system
When you've finished entering these parameters, press the
[return] key to get back to the SYSTEM PARAMETERS screen. If
you changed the system title, your new title should now be visible
in the top left hand corner of the screen.
When you changed the included channels, the 2945B
Communications Service Monitor automatically reflects the new
channels in the fields of the SYSTEM PARAMETERS screen. These
channels define the channels used to test the radios, particularly
in auto test mode. By default, the control channel is the first
included channel, the first working channel is the next included
channel, the last working channel is the last included channel and
the channel increment is half the difference between the first and
last working channels. These values can be changed if, for exam-
ple, you want to test on a different range of channels but radios
will usually work on the default values.
SYSTEM PARAMETERS screen after edit current changes
The other parameter on the SYSTEM PARAMETERS screen is Tx
polarity. The default value is AUTO, which means that the polari-
ty is selected automatically depending on the system's data rate.
The value can be AUTO, NORMAL or INVERTED and refers to the
polarity of the signalling sent by the 2945B Communications
Service Monitor. You should only change this if you know that
your system's polarity is different from the usual value.
The 2945B Communications Service Monitor has capability to
hold four different EDACS radio systems internally. These can be
selected from the SYSTEM PARAMETERS menu by pressing
[select system] then one of the systems: [radio 1], [radio 2], [radio
3] or [radio 4]. Once selected, each system can be changed as
described above.
 Loading...