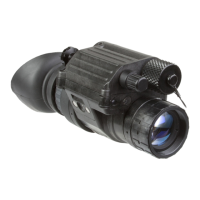
23PVS-14 USER MANUAL
NOTE:
Any adjustment for eye relief requires adjustment of the diopter.
9. While looking at an object, adjust the objective lens focus (Figure 2-1) until the image becomes
clear and sharp.
NOTE:
The sharpest image will only be visible when the objective lens and eyepiece lens are both
properly focused.
2.3.3 HELMET-MOUNTED OPERATION
CAUTION:
Take precaution when using/handling the helmet mount. Most damage occurs when the helmet
mount has been left on the helmet while not in use. Follow these precautions to protect the
helmet mount.
CAUTION:
• To prevent damage, do not use excessive force when changing the up/down position of the
PVS-14.
• Do not throw or drop the helmet while the helmet mount is attached.
• If the monocular is flipped up, do not attempt to flick the monocular down by shaking the
helmet. This places significant stress on the helmet mount.
• Return the helmet and the helmet mount to unit maintenance to have the bracket directly
mounted via the helmet screws.
NOTE:
With the head mount/helmet mount adapter, the PVS-14 can be transferred from the left to the
right eye or vice versa. It also enables the user to flip the mount up when positioned over either
eye.
NOTE:
The helmet mount allows the user to place the PVS-14 in either a flipped up or flipped down
position. When flipped down, the device will be directly in front of the eyes. When flipped up, the
unit will remain out of the line of sight. Both positions have a definitive stopping point to indicate
that the device is positioned correctly.
For helmet-mounted operation:
1. Confirm that the batteries are installed per Paragraph 2.2.2.
2. Put on the helmet mount per the instructions in Paragraph 2.2.8.
3. Place the monocular in the socket of the helmet mount.
Set your eye relief by depressing the side buttons (or, if using a metal mount, the side lever) (Figure
2-15) and carefully move the monocular until the eyecup comfortably seals around your eye. Adjust
the helmet straps vertically as needed.