EasyManua.ls Logo

Airmar TRIDUCER DST800 - User Manual

Airmar TRIDUCER DST800
4 pages
Print Icon
To Next Page IconTo Next Page
Loading...
Pretest
Connect the multisensor to the instrument and spin the paddlewheel.
Check for a speed reading and the approximate air temperature.
If there are no readings or they are inaccurate, check all the
connections and repeat the test. If there are still no readings or they
are inaccurate, return the product to the place of purchase.
Antifouling Paint
Aquatic growth can accumulate rapidly on the multisensor’s surface
reducing performance within weeks. Surfaces exposed to salt water
must
be coated with antifouling paint. Use
WATER-BASED
antifouling paint only.
Never
use ketone-based paint, since ketones
can attack many plastics possibly damaging the sensor.
It is easier to apply antifouling paint before installation, but allow
sufficient drying time.
Reapply paint every 6
months or at the
beginning of each boating
season. Paint the
following surfaces (see
Figure 1):
Outside wall of the
insert below the lower
O-ring
•Paddlewheel cavity
•Paddlewheel
Exposed end of the
insert
Exterior lip of the
housing
Bore of the housing up
30mm (1-1/4")
Blanking plug below the
lower O-ring including
the exposed end
17-355-01 rev. 05 09/06
CAUTION
:
NEVER USE SOLVENTS!
Cleaners, fuel, paint, sealants, and other products may
contain strong solvents, such as acetone, which attack
many plastics greatly reducing their strength.
Retractable TRIDUCER
®
Multisensor
Model DST800
U.S. Patents: 4,898,029; Re-issue 33, 982; 6,904,798 B2.
Australian Patent 605,281.Canadian Patent 1,313,775. Japanese Patent 1851014
Applications
Plastic
housing recommended for fiberglass or metal hulls only.
Never
install a plastic housing in a wood hull since swelling of
the wood may overstress the plastic causing a fracture.
Bronze
housing recommended for fiberglass or wood hulls.
Never
mount a bronze housing in an aluminum hull because
electrolytic corrosion will occur.
Stainless steel
housing compatible with all hull materials.
Recommended for aluminum hulls to prevent electrolytic corrosion
provided the stainless steel housing is isolated from the metal hull
.
Never
install a metal housing in a vessel with a positive ground
system.
Tools & Materials
Water-based antifouling paint (
MANDATORY IN SALT WATER
)
Safety goggles
Dust mask
Electric drill with 10mm (3/8") or larger chuck capacity
Drill bit: 3mm
or
1/8"
Hole saw: 51mm
or
2"
(plastic or bronze housing)
57mm
or
2-1/4"
(stainless steel housing in a metal hull)
Countersink tool (installing a flush housing)
Sandpaper
Mild household detergent
or
weak solvent (such as alcohol)
File (installation in a metal hull)
Marine sealant (suitable for below waterline)
Additional washer [for aluminum hull less than 6mm (1/4") thick]
Slip-joint pliers (installing a bronze housing)
Zip-ties
Installation in a cored fiberglass hull (see page 3):
Hole saw for hull interior: 60mm
or
2-3/8"
Fiberglass cloth and resin
or
Cylinder, wax, tape, and casting epoxy
Fairing
Caution
: Never use a fairing with a plastic housing; the protruding
multisensor would be vulnerable to damage from impact.
Record the information found on the cable tag for future reference.
Part No._________________Date___________Frequency________kHz
IMPORTANT
: Please read the instructions completely
before proceeding with the installation. These
instructions supersede any other instructions in your
instrument manual if they differ.
INSTALLATION INSTRUCTIONSOWNERS GUIDE &
plastic
low profile
housing
Figure 1. Antifouling paint
outside wall
paddlewheel
paddlewheel
inside bore of
exterior lip
O-ring
below lower
cavity
housing up 30mm (1-1/4")
of housing
insert
housing
exposed end
Copyright © 2006 Airmar Technology Corp.
Question and Answer IconNeed help?

Do you have a question about the Airmar TRIDUCER DST800 and is the answer not in the manual?

Summary

Safety and Preparation

Solvent Caution

Warning against using solvents like acetone that can damage plastic components.

Antifouling Paint Application

Guidance on applying water-based antifouling paint to prevent aquatic growth.

Pre-Installation Test

Instructions to connect and test the multisensor before final installation.

Installation Planning and Materials

Applications and Hull Compatibility

Specifies suitable hull materials for plastic, bronze, and stainless steel housings.

Tools and Materials List

Lists necessary tools and materials for installing the multisensor.

Hull Types and Mounting Location

Details optimal mounting locations based on different hull types.

Installation Procedures

Hole Drilling and Preparation

Steps for drilling the hull hole and preparing the surface for bedding.

Bedding and Sealing

Instructions for applying marine sealant for a watertight seal.

General Installing Steps

Steps for inserting the housing, tightening nuts, and attaching safety wire.

Cored Fiberglass Hull Installation

Specific instructions for reinforcing and sealing cored fiberglass hulls.

Post-Installation and Maintenance

Checking for Leaks

Procedure to check for leaks after the boat is placed in water.

Using the Blanking Plug

Instructions for inserting the blanking plug to protect the paddlewheel.

Servicing the Insert

Guidance on cleaning and replacing the multisensor insert and paddlewheel.

Replacement Parts

Information on ordering replacement parts and contact details.

Overview

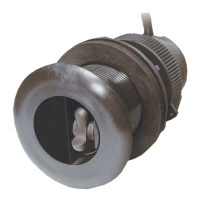
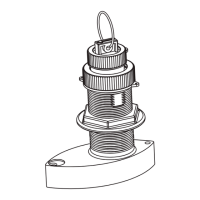
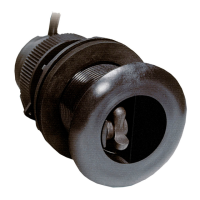
The Airmar Retractable TRIDUCER® Multisensor Model DST800 is a versatile device designed for marine applications, providing depth, speed, and temperature readings. It is engineered for through-hull installation and is compatible with various hull materials, offering different housing options to suit specific vessel types and construction.

Function Description

The DST800 multisensor integrates three key functions:

  • Depth Sensing: It uses an echosounder transducer to measure the water depth beneath the hull.
  • Speed Sensing: A paddlewheel mechanism measures the vessel's speed through water.
  • Temperature Sensing: It includes a sensor to measure the approximate water temperature.

The device transmits these readings to a compatible instrument, allowing the user to monitor crucial environmental and navigational data. Its retractable design allows for easy maintenance and replacement of the insert without hauling the boat, minimizing downtime.

Usage Features

The DST800 offers several usage features tailored for marine environments:

  • Hull Compatibility:

    • Plastic Housing: Recommended for fiberglass or metal hulls only. It should never be installed in a wood hull due to the risk of the wood swelling and fracturing the plastic.
    • Bronze Housing: Recommended for fiberglass or wood hulls. It should never be mounted in an aluminum hull to prevent electrolytic corrosion.
    • Stainless Steel Housing: Compatible with all hull materials. For aluminum hulls, it is recommended to isolate the stainless steel housing from the metal hull to prevent electrolytic corrosion.
    • Metal Housing Restriction: Never install a metal housing in a vessel with a positive ground system.
  • Mounting Location Guidelines:

    • Smooth Water Flow: The multisensor requires smooth water flow across the hull with minimal bubbles and turbulence, especially at high speeds, for accurate readings. It should not be mounted near water intake or discharge openings, or behind strakes, fittings, or hull irregularities.
    • Continuous Immersion: The multisensor must be continuously immersed in water.
    • Unobstructed Transducer Beam: The transducer beam must not be obstructed by the keel or propeller shaft(s).
    • Interference Avoidance: Choose a location away from interference sources such as propellers, shafts, other machinery, echosounders, and other cables. Lower noise levels allow for higher echosounder gain settings.
    • Deadrise Angle: Select a location with a minimum deadrise angle to ensure the transducer beam is aimed at the bottom.
    • Accessibility: An accessible spot inside the vessel is required, with adequate headroom for housing height, tightening nuts, and insert removal. A minimum of 280mm (11") is recommended.
  • Specific Hull Type Mounting:

    • Displacement Hull Powerboats: Locate amidships near the centerline, preferably on the starboard side where propeller blades move downward.
    • Planing Hull Powerboats: Mount well aft, on or near the centerline, and inboard of the first set of lifting strakes to ensure water contact at high speeds. Starboard side is preferred.
    • Outboard and I/O: Mount just forward of the engine(s).
    • Inboard: Mount well ahead of the propeller(s) and shaft(s).
    • Stepped Hull: Mount just ahead of the first step.
    • Fin Keel Sailboats: Mount on or as close as possible to the centerline and forward of the fin keel (300-600mm / 1-2').
    • Full Keel Sailboats: Locate amidships and away from the keel at the point of minimum deadrise.
    • High-Speed Boats (above 25kn / 29MPH): Review installation location and operating results of similar boats before proceeding.
  • Installation Process:

    • Hole Drilling: Requires a pilot hole, followed by cutting the main hole with an appropriate hole saw. For flush housings, a countersink tool is used.
    • Surface Preparation: The area around the hole, inside and outside, must be sanded and cleaned to ensure proper sealant adhesion. Metal hulls require burr removal with a file.
    • Bedding: A 2mm (1/16") thick layer of marine sealant is applied around the housing lip and up the sidewall, extending 6mm (1/4") higher than the combined hull, washer(s), and hull nut thickness to ensure a watertight seal.
    • Housing Alignment: The arrow on the housing lip should point forward toward the bow. If not on the centerline, angle the housing slightly toward the centerline to align with water flow.
    • Washer and Hull Nut: Proper washer placement and hull nut tightening are crucial. For aluminum hulls less than 6mm (1/4") thick, an additional rubbery, fiberglass, or plastic washer is needed. Wood hulls require allowing the wood to swell before final tightening.
    • Cored Fiberglass Hull Installation: Special care is needed to cut and seal the core to prevent water seepage and reinforce the hull against crushing. This involves cutting through the outer skin, then the inner skin and most of the core, followed by sealing the core with fiberglass cloth and resin or casting epoxy.
    • Safety Wire: A safety wire must be attached to prevent the insert from backing out, especially if the cap nut fails or is screwed on incorrectly.
    • Cable Routing: Route the cable carefully, avoiding tearing the jacket. Separate the multisensor cable from other electrical wiring and the engine to reduce interference. Coil and secure any excess cable with zip-ties.
  • Pretest: Before installation, connect the multisensor to the instrument, spin the paddlewheel, and check for speed and approximate air temperature readings. This verifies functionality.

Maintenance Features

The DST800 is designed with maintenance in mind to ensure long-term performance and reliability:

  • Antifouling Paint Application:

    • Necessity: Aquatic growth rapidly accumulates on the multisensor's surface, reducing performance. Surfaces exposed to salt water must be coated with antifouling paint.
    • Type: Only WATER-BASED antifouling paint should be used. Ketone-based paints can attack plastics and damage the sensor.
    • Application Areas: Paint the outside wall of the insert below the lower O-ring, the paddlewheel cavity, the paddlewheel itself, the exposed end of the insert, the exterior lip of the housing, and the bore of the housing up 30mm (1-1/4"). If using a blanking plug, paint it below the lower O-ring, including the exposed end.
    • Frequency: Reapply paint every 6 months or at the beginning of each boating season.
  • Blanking Plug Usage:

    • Purpose: The blanking plug protects the paddlewheel and allows for insert removal without hauling the boat.
    • When to Use: When the boat is kept in salt water for more than a week, when the boat is removed from the water, or when aquatic growth is suspected to cause inaccurate readings.
    • Procedure: Inspect and lubricate the O-rings on the blanking plug. Remove the insert by unscrewing the cap nut and pulling it out, then rapidly replace it with the blanking plug. Only minimal water (approx. 250ml / 10oz.) will enter the boat during this quick exchange. Secure the blanking plug with the cap nut and safety wire.
  • Servicing the Insert:

    • Cleaning: Aquatic growth can impede or freeze the paddlewheel. Clean the insert with a Scotch-Brite® scour pad and mild household detergent, being careful not to scratch the depth transducer. For severe fouling, remove the paddlewheel and lightly wet sand it with fine-grade wet/dry paper.
    • Paddlewheel Replacement: Paddlewheel bearings have a limited life. Paddlewheels can fracture or shafts bend due to impact or mishandling. Replacement Paddlewheel Kits are available. To replace, grasp the old paddlewheel shaft with diagonal wire cutters and pull. Place the new paddlewheel with the flat side of the blade facing the arrow on the insert, and tap the new shaft into place.
    • O-ring Maintenance: O-rings must be intact and well lubricated to ensure a watertight seal. Inspect and lubricate the O-rings on the insert and blanking plug with silicone lubricant or petroleum jelly.
  • Winterizing: After hauling the boat for winter storage, remove the blanking plug to allow water to drain, preventing freezing and potential cracking. Reinsert the blanking plug afterward.

  • Leak Checks: After placing the boat in the water, immediately check for leaks around the thru-hull multisensor. Small leaks may not be immediately obvious, so recheck after 3 hours. If a leak is found, repeat the bedding and installation procedures.

  • Replacement Parts: Lost, broken, or worn parts should be replaced immediately. Information on the cable tag (part number, date, frequency) is crucial for ordering replacement multisensors or other components like hull nuts, isolation rings, and paddlewheel kits.

Airmar TRIDUCER DST800 Specifications

General IconGeneral
FunctionsDepth, Speed, Temperature
Frequency235 kHz
RMS Power100 W
OutputNMEA 0183
Housing MaterialBronze
Max Depth100 m
Depth RangeUp to 100 m (330 ft)
Cable Length10 m
Speed Accuracy±0.2 knots

Related product manuals