21
6200 Digital Broadcast Delay
Alternate Communications Connections
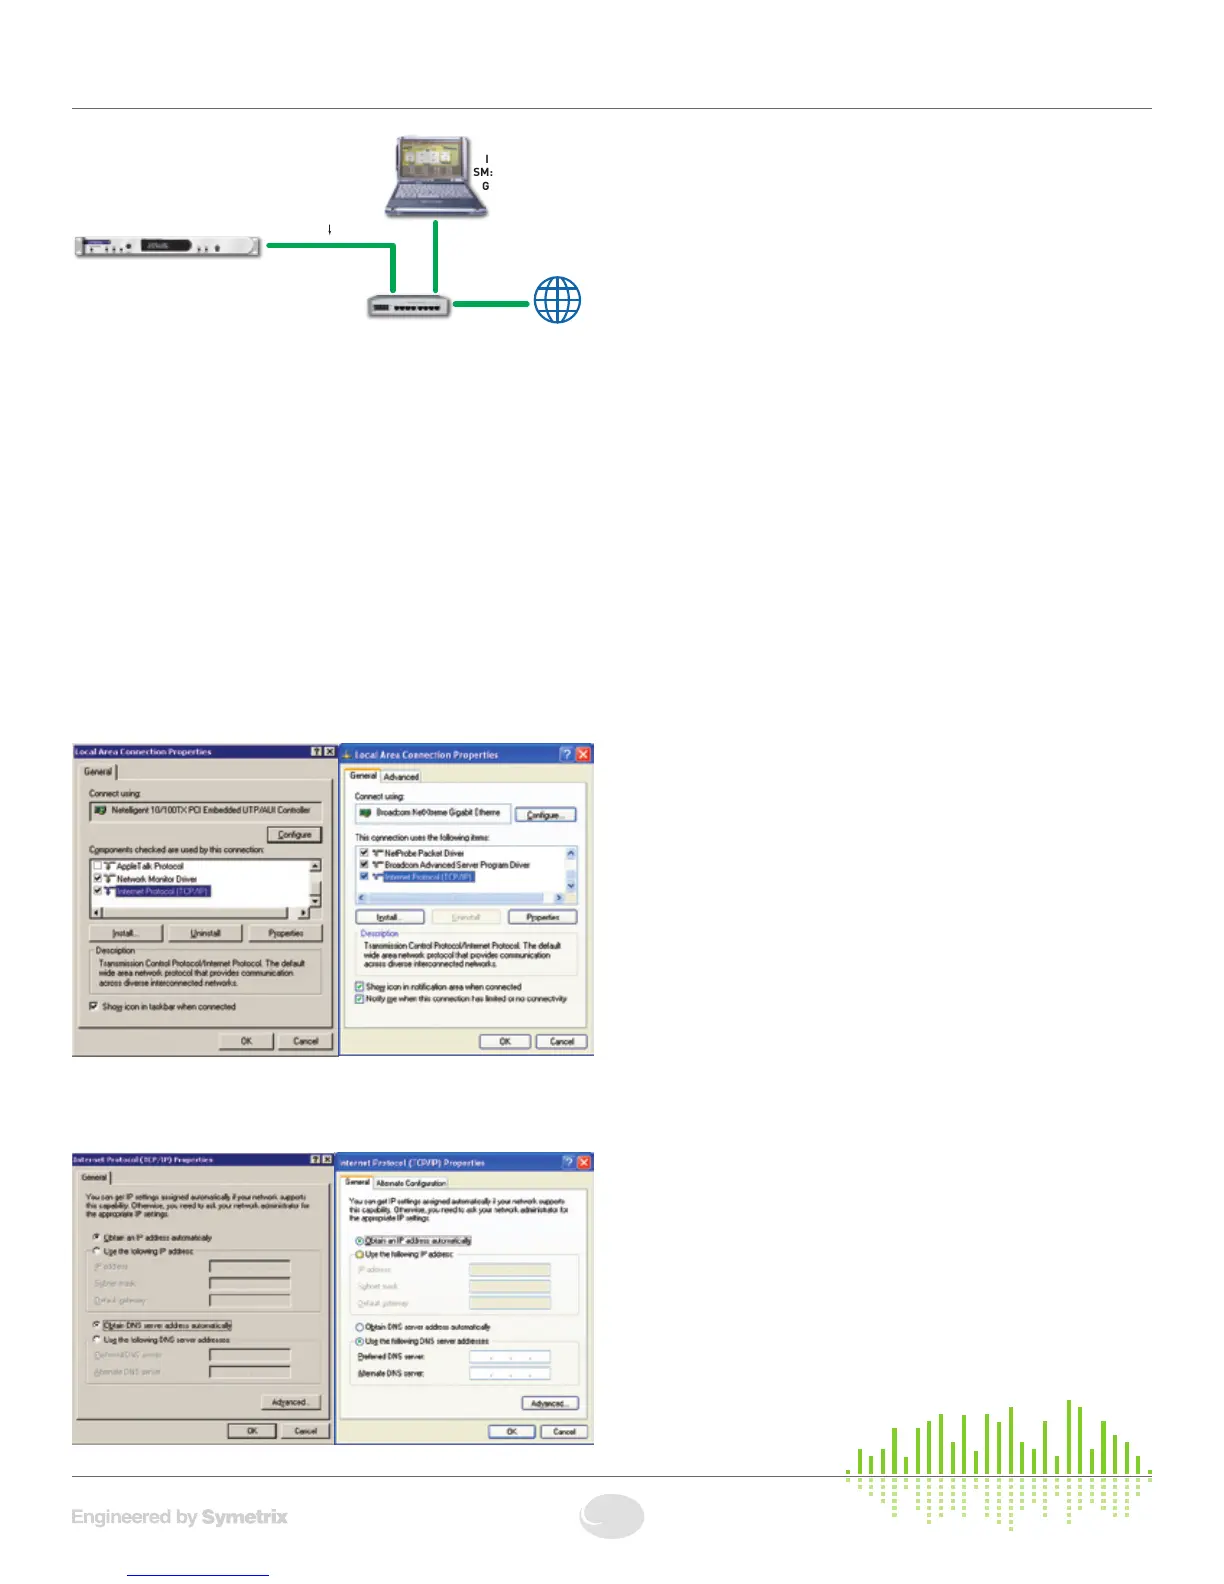
Example Network:
Connecting to the 6200 through a Firewall/VPN
Wearecurrentlytestingcontrolofa6200throughafirewallandVPN,
but are unable to guarantee performance of these types of connections
at this time. If you wish to experiment communicating with the 6200
through a firewall, note that the 6200 communicates on UDP port 6200
for network control and UDP port 6201 for auto-discovery.
Configuring your computer for a network
connection (Windows 2000 and XP):
1. Select“Start->Settings->ControlPanel”(WindowsXP“Start->Control
Panel”).
2. Openthe“NetworkandDial-upConnections”ControlPanel
(WindowsXPopenthe“NetworkConnections”ControlPanel).
3. Rightclickonyour“LocalAreaConnection”andselect“Properties”.
4. Under “This connection uses the following items”, select “Internet
Protocol (TCP/IP)” and press “Properties”.
5. On the “General” tab, you may select “Use the following IP address”
toenterintheappropriateinformation.(DNSserverisnotrequiredfor
connection to a 6200).
6. Press OK to save and “Close” to exit out of the “Local Area
Connection Properties”.
For more information about configuring the host computer, visit
www.microsoft.com.
Setting the 6200’s IP Address:
1. Press the HOME button to ensure that we are starting from the top.
2. Press the NEXT button once.
3. TurntheADJUSTknobclockwiseuntilthedisplayreads
“SectiontoEdit,-SetupMenu-”.
4. Press the NEXT button once.
5. Turn the ADJUST knob clockwise until the display reads
“-SetupMenu-,--Communication--”.
6. Press the NEXT button four times and the display should read
“IPAddress,192.168.000.002”.
7. TurntheADJUST knob clockwise to increment or counter-clockwise
to decrement the first three digits of the IP Address.
8. Whenyouhavetherstthreedigitsoftheaddresscorrectlyselected,
press the NEXTbuttononceandthenrepeatstep7toselectthenext
three digits of the IP Address. Repeat two more times in order to enter
the full address.
7. PresstheHOME button when finished.
Setting the 6200’s Subnet Mask:
1. Press the HOME button to ensure that we are starting from the top.
2. Press the NEXT button once.
3. TurntheADJUST knob clockwise until the display reads
“SectiontoEdit,-SetupMenu-”.
4. Press the NEXT button once.
5. Turn the ADJUST knob clockwise until the display reads
“-SetupMenu-,--Communication--”.
6. Press the NEXT button eight times and the display should read
“SubnetMask,255.255.255.000”.
7. TurntheADJUST knob clockwise to increment or counter-clockwise
todecrementtherstthreedigitsoftheSubnetMask.
8. Whenyouhavetherstthreedigitsoftheaddresscorrectlyselected,
press the NEXTbuttononceandthenrepeatstep7toselectthenext
threedigitsoftheSubnetMask.Repeattwomoretimesinorderto
enter the full address.
7. PresstheHOME button when finished.
IP: 10.0.0.2
SM: 255.255.0.0
GW: 10.0.0.1
IP: 10.0.0.3
SM: 255.255.0.0
GW: 10.0.0.1
Ethernet
6200
Managed Switch
(router/firewall)
IP: 10.0.0.1
to Internet