EasyManua.ls Logo

AKG C 519 M - User Manual

AKG C 519 M
10 pages
Print Icon
To Next Page IconTo Next Page
Loading...
12
AKG C 519 M / C 519 ML
Table of Contents
Page
1 Precaution/Description ...........................13
1.1 Precaution..................................13
1.2 Unpacking .................................13
1.3 Optional Accessories .........................13
1.4 Brief Description .............................13
1.5C519M ...................................14
1.6C519ML ..................................14
2 Interfacing ......................................15
2.1 Introduction ................................15
2.2C519M ...................................15
2.3C519ML ..................................15
2.3.1 B 29 L or MPA V L........................15
2.3.2 Connecting to a Bodypack Transmitter .......16
3 Using Your Microphone ...........................18
3.1 Wind Instruments ............................18
3.1.1 General Hints ...........................18
3.1.2 Saxophone.............................18
3.1.3 Clarinet................................18
3.1.4 Trumpet ...............................19
3.2 Piano......................................19
4 Cleaning........................................19
5 Troubleshooting .................................20
6 Specifications ...................................21
Question and Answer IconNeed help?

Do you have a question about the AKG C 519 M and is the answer not in the manual?

Overview

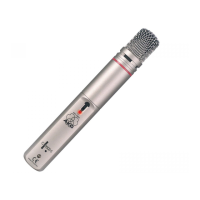
The AKG C 519 M / C 519 ML is a pre-polarized condenser microphone, specifically designed for miking wind instruments and pianos. It features a cardioid polar pattern, which helps achieve high gain before feedback, making it suitable for live performance and studio applications. The microphone's frequency response is tailored for these instruments, ensuring accurate sound reproduction.

Function Description:

The C 519 M / C 519 ML is a condenser microphone that requires a power supply to operate. The C 519 M version is designed for use with 9 to 52 V universal phantom power. It comes with a 10-ft. (3-m) plug-in connecting cable that includes a phantom power adapter with an integrated 3-pin XLR connector. This adapter also features a switchable bass rolloff (-4 dB at 100 Hz), which can be useful for reducing unwanted low-frequency rumble or proximity effect.

The C 519 ML version is intended for use with the B 29 L battery power supply, MPA V L phantom power adapter, or directly with PT 40 or PT 400 bodypack transmitters. It includes a 5-ft. (1.5-m) plug-in connecting cable with 3-pin mini XLR connectors. For attaching a PT 40 or PT 400 bodypack transmitter directly to the microphone, an A 400 adapter is supplied.

The microphone itself features a 125-mm (5-in.) gooseneck, allowing for accurate microphone alignment. A swivel joint (135°) further enhances positioning flexibility. A shock mount is integrated to reduce handling and cable noise, ensuring a cleaner signal. The microphone is designed with a clamp for secure attachment to instruments.

Important Technical Specifications:

  • Type: Pre-polarized condenser microphone
  • Polar pattern: Cardioid
  • Frequency range: 60 Hz to 20,000 Hz
  • Sensitivity at 1 kHz: 5 mV/Pa (-46 dBV re 1 V/Pa)
  • Impedance: ≤ 200 ohms
  • Recommended load impedance: ≥ 2000 ohms
  • Max. SPL for 1%/3% THD: 130/132 dB SPL
  • Equivalent noise level: 31 dB(A) to DIN 45412
  • Power requirement:
    • C 519 M: 9 to 52 V universal phantom power
    • C 519 ML: B 29 L battery power supply, MPA V L phantom adapter, AKG WMS bodypack transmitters
  • Cable length / Connector:
    • C 519 M: 10 ft. (3 m) / 3-pin XLR (with phantom power adapter)
    • C 519 ML: 5 ft. (1.5 m) / 3-pin mini XLR
  • Finish: Matte black
  • Size (microphone only): Length: 213 mm (8.4 in.), Max. width: 47 mm (1.9 in.)
  • Net weight (microphone and cable): C 519 M: 195 g (6.9 oz.), C 519 ML: 85 g (3 oz.)
  • Shipping weight: C 519 M: 430 g (15.2 oz.), C 519 ML: 310 g (11 oz.)

Usage Features:

  • General Wind Instrument Miking: The microphone is typically clamped onto the bell of the instrument and aimed at its rim. Sound can be modified by varying the microphone position. If excessive wind noise occurs, the supplied external windscreen should be used. When using a mute, the microphone should be positioned outside the bell to avoid obstruction.
  • Saxophone Miking: For subtone playing, aligning the microphone with the middle of the bell is recommended.
  • Clarinet Miking: The clarinet radiates low frequencies through the keys and high frequencies through the bell. For comprehensive sound capture, it's recommended to use a stand-mounted microphone (e.g., AKG C 5900 or C 535) aimed at the keys in addition to the C 519. Alternatively, for a single microphone setup, clamp the C 519 on the bell, pointing it at the lowest key, as this area radiates all frequencies at approximately equal intensity.
  • Trumpet Miking: Position the microphone as far away from the instrument as possible, aiming it at the bell.
  • Piano Miking (Upright): For capturing the full range of an upright piano, two C 519s are recommended. One microphone should be clamped on the frame above the bass strings, and the second on the frame strut in the octave above Middle C. Both microphones should be aligned to ensure all notes are reproduced at roughly the same level.
  • Interfacing (C 519 M): Connect the microphone's output socket (5) on the gooseneck to a balanced XLR microphone input with phantom power using the supplied cable. Ensure phantom power is switched on.
  • Interfacing (C 519 ML): Connect the output socket (4) on the gooseneck to one of the mini XLR sockets on the B 29 L or the mini XLR socket on the connecting cable of the MPA V L. The connector locks automatically. To disconnect, press the unlocking button on the mini XLR connector and pull it out. Never pull the cable itself to avoid damage. When using the B 29 L or MPA V L, connect them to the desired input and switch phantom power on for the MPA V L.
  • Attaching Bodypack Transmitter (C 519 ML): The supplied connecting cable connects the gooseneck's output socket to the bodypack transmitter's input socket. PT 40 and PT 400 bodypack transmitters can be mounted directly on the microphone using the A 400 adapter. To do this, pull the ends of the fixing clip (1) out of the adapter, slide the transmitter (2) all the way in, and reinsert the fixing clip ends into the adapter's openings to secure the transmitter. Then, slide the adapter with the transmitter onto the shaft (3) on the mounting plate (4) and press it against the plate until it locks with an audible click. Finally, coil the connecting cable and tuck it under the fixing clip.
  • Troubleshooting: The manual provides a troubleshooting guide for common issues like "No sound" and "Distortion," offering possible causes and remedies. For "No sound," check power to mixer/amplifier, fader levels, microphone connection, cable connections, cable integrity, and phantom power supply. For "Distortion," adjust gain control on the mixer (turn down CCW) or use a 10-dB preattenuation pad between the microphone cable and input if mixer input sensitivity is too high.

Maintenance Features:

  • Cleaning: To clean the microphone surface, use a soft cloth moistened with water.

Important Notes:

  • Using any power supply other than those recommended by AKG may damage the microphone and will void the warranty.
  • For the C 519 ML, it is also important to read the transmitter and receiver manuals.
  • The product conforms to the standards listed in the Declaration of Conformity.

AKG C 519 M Specifications

General IconGeneral
BrandAKG
ModelC 519 M
CategoryMicrophone
LanguageEnglish

Related product manuals