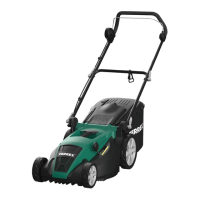
3. Place the bottom part of the handle on the handle mount
. Check whether
the serrations of the locking washer engage correctly in the handle mount.
The holes of the handle mount, the connecting pieces and the bottom part of
the handle must point towards each other.
4. Twist the quick-release levers
all the way into the handle mount
.
Do not use excessive force; it is sufficient to twist in the quick-release lever until
you feel a resistance.
5. Flick the quick-release lever
. If it is too tight, turn the quick-release lever one
turn backwards.
The bottom part of the handle is connected to the lawn mower and does not wobble.
Mounting the handle grip on the bottom part of the handle
1. Position the pull relief
on the crossbar of the handle bottom part
.
2. Place the handle grip
onto the bottom part of the handle
.
The connection cable must not lay between the handle parts and should run
beneath the handle instead.
3. Align the holes of the handle parts with each other and push the screws
from the inside through the handle.
4. Put the washers
onto the screw and turn the quick-release levers
approximately 5 to 7 turns.
5. Align the handle grip
straight on the bottom part of the handle
and
keep it in position.
6. Align the screw heads.
The screw heads are bent and latch into the handle bar.
7. Flick the quick-release levers
. If it is too tight, turn the quick-release lever
one turn backwards.
8. Check whether the handle grip
is aligned and connected to the bottom part
of the handle
without wobbling.
9. Attach the connection cable
with two cable clamps
onto the handle
frame.
The connection cable must run beneath the crossbar of the bottom part of the
handle.
The handle parts are mounted and solidly connected.
Preparing the collecting bag
The collecting bag is partially assembled on delivery.
Before
first use
12