21
AFTER SALES SUPPORT
1300 855 831
support@scheppach.com.au
MODEL: HBS20 PRODUCT CODE: 60339 04/2018
AUS
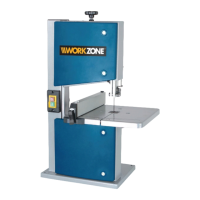
HBS20 Attachment
cover locking mechanisms (10) with the help of the screwdriver (29).
Adjusting the saw band guide (Fig. 5 - 8)
• Both the support bearing (36 + 42) and the guide pins (37 + 46) must be readjust-
ed after every saw band change.
• Open the side covers (11) by undoing the cover locking mechanisms (10) with the
help of the screwdriver (29).
Top support bearing (36) (Fig.5)
• Undo Allen screw for top support bearing (35).
• Move top support bearing (36) sufciently far that it just no longer touches the saw
band (21) (distance max. 0.5 mm).
• Retighten the allen screw for top support bearing (35).
Adjusting the bottom support bearing (42)
• Disassemble the saw table.
• Undo Allen screw for bottom support bearing (41).
• Move bottom support bearing (42) sufciently far that it just no longer touches the
saw band (21) (distance max. 0.5 mm).
• Retighten Allen screw for bottom support bearing (41).
Adjusting the top guide pins (37)
• Undo Allen screw for top retainer (40).
• Move top retainer (39), top guide pins (37), until the front edge of the top guide
pins (37) is approx. 1 mm behind the tooth base of the saw band.
• Retighten Allen screw for top retainer (40).
• AT TENTION! The saw band will be unusable if the teeth touch the guide pins with
the saw band running.
• Undo Allen screws for top guide pins (38).
• Slide the top guide pins (37) in the direction of the saw band!
• AT TENTION! The distance between the top guide pins (37) and saw band (21)
must not exceed 0.5 mm. (Saw band must not jam)
• Retighten Allen screws (38).
• Turn the top saw band roller (2) a few times in a clockwise direction.
• Check the setting of the top guide pins (37) again and adjust if necessary.
• If necessary, adjust the top support bearing (36).