@
Before startin
g
the eq u
i
pmenVAttach
me nt a nd operation HMsOMP
.
When
working
with
wood that has been
processed
before, watch out for foreign
bodies such as nails or screws, etc.
r
Before
you press
the ON/OFF switch check that the saw blade is
fitted correct-
ly. Moving
parts
must
run smoothly.
o
Before
you
connectthe equipmentto the
power
supply make sure
the
data on
the rating
plate
are identical to the mains data.
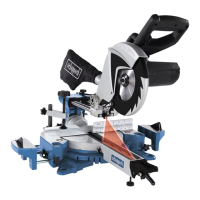
Vll. Assembling and operation
A
Warningl Prior
to any
adjustment work
disconnect
the mains
power plug!
7.1 Assembling
the
saw
(Fig.
1-6)
r
To adjusttheturntable
(16),
push
the indexed
position
lever(12)
downwards and
pull
the lower locking
lever
(13)
upwards
with
your
index
finger
r
Rotate the turntable
(16)
and
pointer
(14)
to the desired angle on
the scale
(15)
and lock in
place
by folding up the the indexed
position
lever
(12).
r
Pressing the machine head
(5)
lightly downwards and removing
the
fastening
bolt
(24)
from
the
motor
bracket at the same time disengages the saw from
the
lowest
position
o
Swing the machine head
(5)
up until the release lever
(3)
latches
into
place.
o
lt is
possible
to
secure the
clamping device
(8)
to the left or right on the fixed
saw table
(17).
Long workpieces
must
be supported
by the clamping device!
r
Attach the workpiece supports
(9)
to the fixed saw table
(17)
as shown in
Figure
6a,b,c and
push
them all the way through Secure the
shafts with the retaining
springs to
prevent
them from slipping
out
accidentally.
Then fasten them in the
desired
position
with the screw
(10)
.
lt is
possible
to tilt the machine head
(5)
a max 45' to
the
left
by loosening the
set lever
(22).
7.2
Sawdust bag
(Fig.2)
The saw is equipped with a sawdust
bag (21)
for sawdust and chips.
Squeeze together
the metal
ring on the dust bag and attach it to the outlet open-
ing in the motor area.
The sawdust bag
(21)
can
be emptied by
means
of a
zipper
at the bottom.
7.3 Using the laser
(Fig.
16,17)
o
To switch on: Move the
ON/OFF switch of the laser
(35)
to the
"l"
position.
A
laser line
is
projected
onto the
material
you
wish to
process, providing
an
exact
guide
for
the cut.
r
To switch off: Move the ON/OFF
switch
of
the laser
(35)
to the
"0" position
o
Replacing the battery: Switch off the laser
(34).
Remove
the battery com-
partment
cover
(37).
Remove the
batteries and replace with new
batteries
(3
x
LR44) Check that the battery terminals are
positioned
correctly when inserting
new
batteries Close the battery compartment
(36)
again.
20
AFTER
SALES
SUPPORT
E support@scheppach.com.au
t
*;
1300 855
831
MODEL: HM8OMP PRODUCT
CODE: 53666 06/2017
 Loading...