Configurable NAT Router 5
Rockwell Automation Publication 1783-PC017B-EN-P - May 2016
Configure Internet Protocol Settings
Configure Internet Protocol (IP) settings, such as the IP address, in one of these ways:
• Use the default IP address of the 1783-NATR router, 169.254.1.1 for the Public port or 192.168.1.1 for the
Private ports, by connecting the 1783-NATR router directly to a computer. To establish communication
between a computer and the default IP address of the 1783-NATR router, enter a unique IP address in the
local area connection properties for your computer. The IP address of the computer must be on the same
subnet as the default IP address of the 1783-NATR router, such as 169.254.1.2 for the Public port or
192.168.1.2 for the Private ports.
• Use IP settings that are configured in RSLinx Classic communication software or Studio 5000 Logix
Designer programming software.
• Acquire IP settings from a DHCP server.
1
Use the DIP switches on the 1783-NATR router to choose the configuration method to use for IP settings. See Set
the DIP Switches on page 5.
Use the DHCP Server
If your network infrastructure does not provide DHCP/BOOTP functionality, you can download our DHCP/BOOTP
server software to a personal computer that uses a Microsoft Windows operating system. You can use this
computer as the DHCP server.
To set the network address of the Private ports by using the Rockwell Automation DHCP/BOOTP server, follow
these steps.
1. Access the DHCP/BOOTP utility from your Studio 5000 Logix Designer application software installation CD.
2. Extract the zipped files to a temporary directory.
3. In the temporary directory, double-click setup.exe to install the DHCP/BOOTP utility.
4. Run the utility.
5. See the following chart, which describes what happens next, depending on whether DHCP is enabled on the
1783-NATR router.
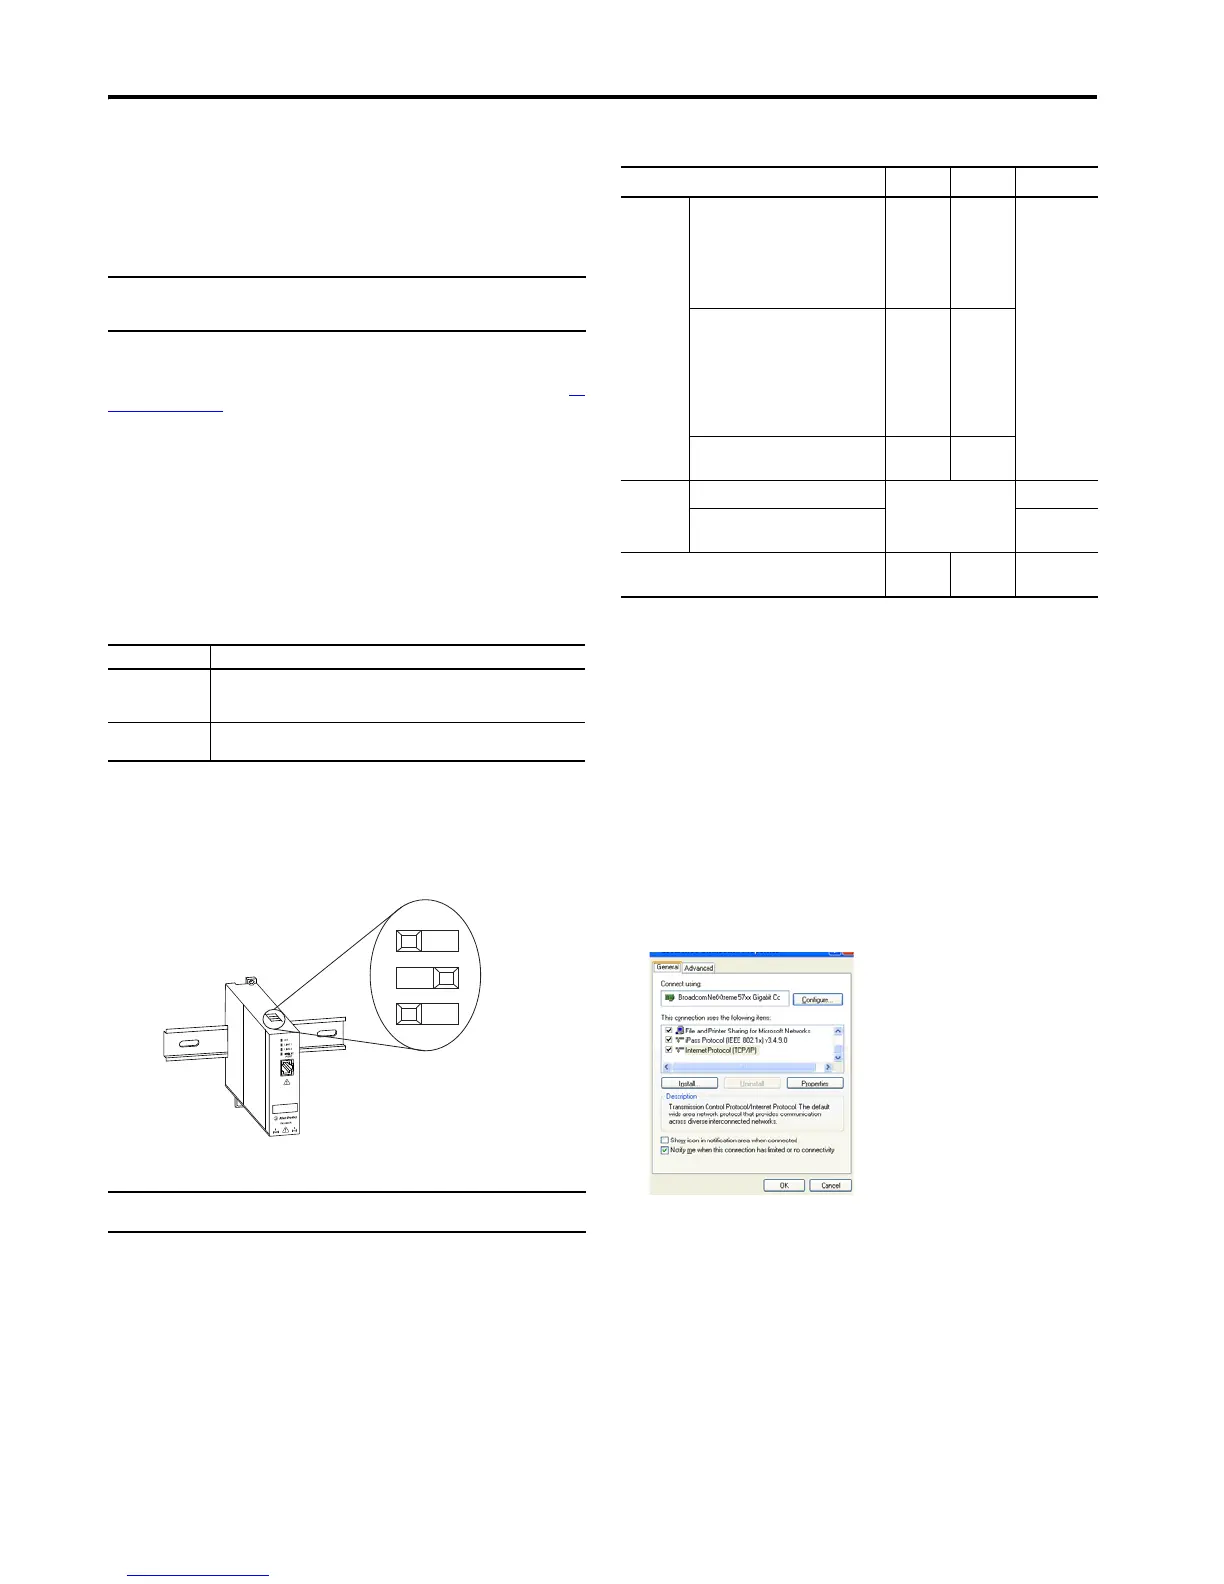
Set the DIP Switches
Use the DIP switches on the 1783-NATR router to do the following:
• Specify the method to configure Internet Protocol (IP) settings for the Private ports, such as the IP
address.
• Enable the Ring Supervisor mode with its current parameters.
• Restore the default configuration.
See the following figure to understand DIP switch On and Off positions.
Use this procedure to set the DIP switches.
1. Move the switches to the desired position, and cycle power to the 1783-NATR router.
2. Observe these guidelines for use of the DIP switches:
• Out-of-the-box, all three switches are in the Off position. In this state, the 1783-NATR router is configured
to be a non-supervisor ring node, the Public port responds to the default IP address of 169.254.1.1, and
the Private ports are configured for DHCP.
• When a switch is pushed to the left, it is in the Off position.
• When a switch is pushed to the right, it is in the On position.
• To configure the Private ports with a static address, move switch 1 to the Off position and switch 2 to the
On position.
• To enable Ring Supervisor mode with the current supervisor-related parameters, move switch 3 to the On
position.
• To restore the factory default settings and suspend operation, move switch 1 and 2 to the On position.
When switches 1 and 2 are in the On position, the position of switch 3 is ignored.
• When operation is suspended, the OK status indicator blinks red. To resume normal operation, move the
switches to the desired positions and cycle power to the 1783-NATR router.
Use the Device
To start using your device, follow this procedure. For information about the status indicators on the device, refer
to the status indicator functions on page 17.
1. Connect the Private port of the 1783-NATR router to the LAN card of your computer by using an Ethernet
patch cable or cross-over cable and follow these steps.
2. Choose Start>Network>Network and Sharing Center>Change Adapter Settings.
a. From the Local Area Connection Properties menu, check Ethernet Protocol (TCP/IP), and click Properties.
IMPORTANT At least one of the Private ports must be connected with an assigned IP address to
another device before the Public port communicates. For this reason, we recommend
that you use the Private ports for initial configuration.
1
The DHCP server is supported only on the private port.
DHCP Status Result
Enabled 1783-NATR router asks for the IP address of the Private ports from a DHCP/BOOTP
server. Consult the online help available in the BOOTP/DHCP application to configure
the server to provide the desired IP address for your 1783-NATR router.
Not enabled 1783-NATR router uses the IP settings that are stored in nonvolatile memory. The
default IP address that is stored in memory for the Private ports is 192.168.1.1.
IMPORTANT The switch settings take effect only at powerup. Switch changes do not modify the
behavior of the 1783-NATR router until the 1783-NATR router is power cycled.
Switch 3
Switch 2
Switch 1
Off
On
Powerup Behavior Switch 1 Switch 2 Switch 3
Internet
Protocol
settings
Use DHCP for Private port IP address by
default, changeable by software.
The Public port configured by software
(Default configuration for the Public port is
169.254.1.1, subnet mask 255.255.255.0,
Gateway 0.0.0.0. )
Off -
factory
default
Off -
factory
default
The position of
switch 3 does
not affect IP
settings.
Uses the IP settings configured by
software. (Default configuration for the
Public port is 169.254.1.1, subnet mask
255.255.255.0, Gateway 0.0.0.0.
Default configuration for the Private ports is
IP address 192.168.1.1, subnet mask
255.255.255.0, Gateway 0.0.0.0)
Off On
Loads module configuration from SD card
suspends operation
On Off
Ring
Supervisor
mode
Enables Ring Supervisor mode The positions of switches 1
and 2 do not affect Ring
Supervisor mode.
On
Lets Ring Supervisor mode to be enabled
via software
Off - default
configuration
Restores the default configuration and then suspends
operation
On On On or Off
 Loading...