EasyManua.ls Logo

Allen-Bradley FLEX 5000 User Manual

Allen-Bradley FLEX 5000
16 pages
To Next Page IconTo Next Page
Page #1 background imageLoading...
Page #1 background image
Installation Instructions
Original Instructions
FLEX 5000 EtherNet/IP Adapters with RJ45 Ports
Catalog Numbers
5094-AENTR, 5094-AENTRXT, 5094-AEN2TR, 5094-AEN2TRXT
Product Overview
The FLEX 5000™ EtherNet/IP Adapters with RJ45 Ports perform the following functions:
Facilitate high-speed data transfer across an EtherNet/IP network between FLEX 5000 I/O modules and a Logix 5000™ controller.
Provide system-side power to FLEX 5000 I/O modules.
The 5094-AENTR and 5094-AENTRXT adapters support as many as 8 FLEX 5000 I/O modules.
The 5094-AEN2TR and 5094-AEN2TRXT adapters support as many as 16 FLEX 5000 I/O modules.
The adapters are configured with the Studio 5000 Logix Designer® application. For more information on how to use FLEX 5000 EtherNet/IP
Adapters with RJ45 Ports, including the compatible Logix 5000 controllers and Logix Designer application versions, see the publications that are
listed in Additional Resources
on page 15.
Topic Page
About the Adapter 5
Before You Begin 5
Adapter Dimensions 6
Set the Network Internet Protocol (IP) Address 7
Install the Adapter onto the DIN Rail 8
Connect Power to the Adapter 9
Connect the Adapter to an EtherNet/IP Network 11
Install the End Cap 12
Power the Adapter 13
Remove or Replace the Adapter 13
Specifications 14
Additional Resources 15
Question and Answer IconNeed help?

Do you have a question about the Allen-Bradley FLEX 5000 and is the answer not in the manual?

Allen-Bradley FLEX 5000 Specifications

General IconGeneral
BrandAllen-Bradley
ModelFLEX 5000
CategoryAdapter
LanguageEnglish

Summary

Product Overview

Environment and Safety Approvals

North American Hazardous Location Approval

Approval for use in Class I, Division 2 hazardous locations.

European Hazardous Location Approval

Compliance with ATEX directive for Zone 2 explosive atmospheres.

IEC Hazardous Location Approval

IECEx certification for Zone 2 explosive atmospheres.

Safety and Handling Precautions

Special Conditions for Safe Use

Specific requirements for ATEX/IECEx Zone 2 certified enclosures and environments.

Electrostatic Discharge Prevention

Guidelines to prevent damage from static discharge to sensitive equipment.

Electrical Safety Considerations

Compliance with installation requirements, wiring, and safe operating temperatures.

About the FLEX 5000 EtherNet/IP Adapter

Before You Begin: Components Needed

Lists necessary components, tools, and software for adapter installation.

System Planning and Physical Design

System Planning Rules

Rules for adapter and I/O module placement and configuration.

Spacing Requirements

Recommended spacing for ventilation and proper mounting.

Adapter Dimensions

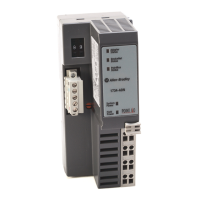
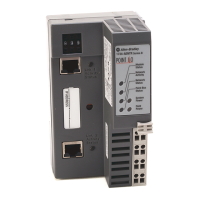
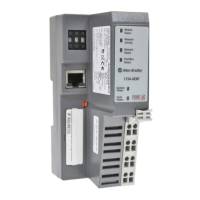
Physical dimensions of the FLEX 5000 EtherNet/IP Adapter.

Installation Considerations

Grounding and DIN Rail Requirements

Guidelines for proper grounding using specific DIN rail types.

Power Supply Requirements

Details on power source compliance, voltage, and current ratings.

Setting the Network IP Address

Instructions for configuring the adapter's IP address using rotary switches or software.

Installing the Adapter

Setting the Network IP Address (continued)

Further details on IP address configuration and reset procedures.

Mounting the Adapter on the DIN Rail

Step-by-step guide for attaching the adapter to a DIN rail.

Connecting Power

Install the Power RTB

Procedure for installing the removable terminal block (RTB).

Connect Power to the Power RTB

Steps for connecting the external power supply to the Power RTB.

Network Connection

Connecting the Adapter to EtherNet/IP

How to connect the adapter to an EtherNet/IP network using RJ45 cables.

Module and Enclosure Installation

Install FLEX 5000 I/O Modules

Instructions for installing I/O modules to the right of the adapter.

Install the End Cap

Procedure for installing the end cap on the last terminal base.

Install End Anchors onto the DIN Rail

How to use end anchors to secure modules on the DIN rail.

Adapter Operation and Removal

Power the Adapter

Turning on power to the adapter after installation.

Remove or Replace the Adapter

Step-by-step guide for removing and replacing the adapter.

Specifications

Additional Resources

Related product manuals