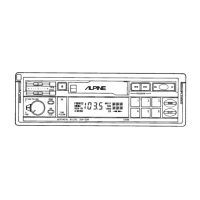
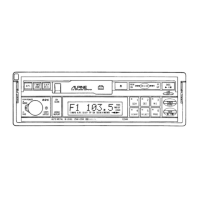
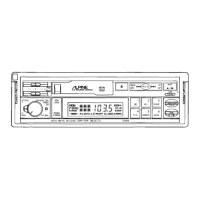
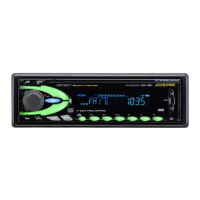
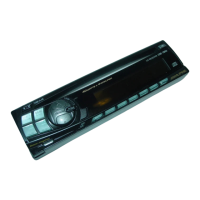
The Alpine 7281M is a car audio system that integrates an FM/MW/LW/SDK tuner with a cassette receiver. This device is designed to provide a comprehensive in-car entertainment experience, offering both radio reception and cassette playback capabilities.
Function Description:
The 7281M features a "FULL FRONT DIN™" design, which allows for a clean and integrated look in the car's dashboard. A key feature is the "QUICK RELEASE BRACKET (Q.R.B.)", Alpine's exclusive design that enables easy removal of the unit for security and theft prevention. This bracket also facilitates easy re-installation.
The unit incorporates an "IGNITION “KEY-OFF” PAUSE" function, which disengages the tape head, capstan, and pinch roller when the ignition is turned off, retracting them inside the cassette compartment. This prevents wear and tear on the tape mechanism. For cassette playback, "AUTO METAL" detection automatically adjusts to metal tape equalization, ensuring optimal sound quality for different tape types. The "AUTO TUNE SELECT SWITCH" allows users to choose between SEEK and MANUAL Tuning modes for radio reception.
The "AUTO UP/DOWN SEEK" feature automatically tunes to the next higher or lower frequency and locks on that station. "PRESET ADDRESS" displays the preset number in the LCD, corresponding to an assigned station frequency in radio mode. The "BI-LEVEL CAPABILITY" offers both speaker level outputs and pre-amp level outputs, making it compatible with Alpine signal processors and amplifiers. This flexibility allows for two different types of outputs, simplifying system expansion.
The radio tuner benefits from a "DIGITAL PLL FREQUENCY SYNTHESIZER" for stable and accurate tuning. Cassette playback includes "CASSETTE AUTO REVERSE" for continuous playback without manually flipping the tape. Users can fine-tune the audio with "SEPARATE BASS & TREBLE CONTROLS". The "A. MEMO (AUTO MEMORY)" function automatically stores up to 6 of the strongest MW, LW, or FM stations. "PRESET SCAN" allows for quick scanning through stored presets, and "D.A.P. (DIRECT ACCESS PRESET)" provides direct access to specific preset stations.
Additional features include "LITETOUCH™ 30-STATION PRESETS" (FM1: 6, FM2: 6, MW: 6, LW: 6, D.A.P.: 6), a "36-DETENT VOLUME CONTROL" for precise volume adjustments, a "TAPE DIRECTION INDICATOR", "STEREO INDICATOR" for radio reception, "MEMORY LOGIC ELECTRONICS", and a "POWER ANTENNA LEAD" for controlling a motorized antenna.
Important Technical Specifications:
FM TUNER:
- Tuning Range: 87.5 – 108.0 MHz
- Sensitivity: 1.5 µV
- Alternate Channel Selectivity: 80 dB
- S/N (signal-to-noise ratio): 60 dB
- Stereo Separation: 35 dB
MW TUNER:
- Tuning Range: 531 – 1,602 kHz
- Sensitivity: 10 µV
LW TUNER:
- Tuning Range: 153 – 281 kHz
- Sensitivity: 20 µV
TAPE:
- Tape Speed: 1-7/8 ips (4.8cm/sec) ±1%
- Wow and Flutter: 0.09% WRMS
- S/N (signal-to-noise ratio): 55 dB
- Frequency Response:
- With NORMAL (120µs) tape: 40 – 14,000 Hz ±3 dB
- With METAL/CrO2/FeCr (70µs) tape: 40 – 16,000 Hz ±3 dB
GENERAL:
- Power Requirement: 14.4V DC (11 – 16V allowable)
- Max. Power Output: 25W x 2 (50W total)
- Output Voltage: 500mV/10k ohms
- Bass: ±12 dB at 100 Hz
- Treble: ±12 dB at 10 kHz
- Loudness Contour (at 100 Hz): +10 dB
- Speaker Impedance: 4 ohms
- Weight: 2.0 kg (4 lbs. 7 oz.)
CHASSIS SIZE:
- Width: 178mm (7")
- Height: 50mm (2")
- Depth: 153mm (6")
NOSEPIECE SIZE:
- Width: 171mm (6-3/4")
- Height: 48mm (1-7/8")
- Depth: 21mm (13/16")
Usage Features:
The operation of the 7281M is straightforward, with controls for both tape player and radio functions.
Tape Player Operation:
- Power On/Off and Volume: Turn the power on by rotating the Volume control/Power switch clockwise. Insert a cassette into the loading slot. The tape direction indicators (19 & 20) will light up, and the tape will start playing.
- Tape Type Detection: If a metal or CrO2 cassette tape is inserted, the tape mechanism automatically sets itself for 70µs equalization.
- Audio Adjustment: Adjust the Volume (29), BASS (1), TREBLE (2), BALANCE (29), and FADER (29) controls to suit listening preference. Tape reverses automatically at the end of the tape or by pressing the PROGRAM switch (13).
- Tape Side Change: To change from side A to play side B or vice versa before the end of the tape is reached, press the PROGRAM switch (13).
- Stop Tape: To stop tape play, press the Eject switch (3).
- Power Off: To turn the power OFF, fully rotate the Volume control counterclockwise.
Winding the Tape Rapidly (Forward or Reverse Direction):
- Press the PROGRAM switch (13) or (14) switch until it locks, and the tape will run rapidly in the designated direction.
- Lightly press the other switch to stop the Fast Winding mode. The tape will start playing again.
- When the Fast Winding operation reaches the end of the tape, the mode will automatically switch to playback.
Key-off Pause:
If the ignition is turned off while a cassette is playing, the tape disengages from the tape head, capstan, and pinch roller, but the cassette remains in the cassette compartment with the cassette door completely closed. When the ignition switch is turned on again, playback will begin from the point where it was left off.
Radio Operation:
Manual and Automatic Seek Tuning:
- Power On/Off and Volume: Turn on the power by turning the VOLUME control/Power switch (29) clockwise. Continue to rotate it until the desired volume level is reached.
- Band Selection: Push the BAND select switch (16) for selection of FM1, FM2, MW, or LW. The Radio Band indicator (6) will be on, and the ST indicator (10) will also be on during FM stereo reception.
- Audio Adjustment: Adjust the BASS (1), TREBLE (2), BALANCE (29), and FADER (29) controls to suit listening preference.
- Automatic Tuning: To automatically tune, press the TUNE switch (14) and then either UP (15) or DN (14) tuning switch. The SEEK indicator (26) appears on the display, and the frequency changes to indicate that the radio is in the auto SEEK tuning mode and ready to stop at every strong station. Repeat the procedure until the desired station is obtained. When the radio reaches the upper or lower end of the tuning range, it automatically starts scanning in the opposite direction. To return to manual tuning, press the TUNE switch a second time. The SEEK indicator disappears.
- Manual Tuning: To manually tune, press the Tuning switch (UP) (15) for higher frequency broadcasts, and press the tuning switch (DN) (14) for lower frequency broadcasts.
- Audio Adjustment: Adjust the VOLUME (29), BASS (1), TREBLE (2), BALANCE (29), and FADER (29) to suit your listening preference.
- Band Switching: To switch from FM to MW/LW or vice versa, press the BAND select switch (16).
Manual Memory Preset:
- Select Band: Select the tuning band (FM1, FM2, MW or LW) (16) with the BAND select switch (16).
- Tune Station: Tune to your desired station by manual tuning or Auto SEEK tuning.
- Preset Storage: Press any Preset switch (17) for more than two seconds. The preset indicator (12) in the display will begin to blink. Press that switch a second time while the indicator is blinking for five seconds.
- Display: The preset number will be memorized and will then show in the display (12).
- NOTE: If a preset memory has already been set in the same address, it will be cleared, and the new station will be memorized.
Auto Memory Preset:
- Activate A. MEMO: Press the TUNE switch (14) and light up the A. MEMO indicator (25).
- Select Band: Select the desired tuning band (FM1, FM2, MW or LW) (16) with the BAND switch (16).
- Activate SEEK: Press the SEEK UP (15) or DN (14) switch. It will automatically seek 6 strong stations in each band and memory the stations in order of the signal strength from the strongest station for the Address No. 1 to the 6th strong station for the Address No. 6. When the station is memorized, the address indicator (No. 1 – 6) (12) will appear. First, it seeks the stations in the local tuning. If the stations memorized are less than 6, it seeks the stations in the distance (DX) tuning.
- After Finishing Auto Memory Preset: If no station is memorized, it returns to the original station you were listening to before the Auto memory preset procedures.
Preset Tuning:
After the preset stations have been memorized, you can tune in your desired station with just a touch of a switch.
- Select Band: Select the tuning band (FM1, FM2, MW or LW) (16) with the BAND select switch (16).
- Select Preset: Press any one of the preset switches (17), and the number (1 – 6) will illuminate in the display (12).
D.A.P. (Direct Access Preset):
This feature allows the storage of FM, MW, and LW presets on the same band. Press the D.A.P. switch (18) to light up the D.A.P. indicator (5). To memorize stations into D.A.P., follow the same procedures as in Manual Memory Preset on page 10.
To Access the D.A.P. Presets:
- Press the D.A.P. switch (18). The D.A.P. indicator (5) will illuminate in the display.
- Press any one of the preset switches (17), and the number (1 – 5) will illuminate in the display.
FM Stereo/Monaural Selection (MONO Switch):
During stereo reception, should the signal level become weak (the ST indicator (10) in the display blinks), select monaural reception by pressing the MONO switch (28) to decrease noise level.
- NOTE: Monaural mode has been set initially. Push the MONO switch (28) when a stereo broadcast is being received.
Local/Distance Switch Operation:
You may select local or distance mode during SEEK tuning. When it is in the local mode (Distance (DX) indicator (21) is off), it allows you to tune in strong signal stations only (stations C, F, H and L as shown below). When it is in the distance mode (Distance (DX) indicator (21) is on), weak and strong signal stations (stations from A through M) will be tuned in. Once a station is tuned in by SEEK in local mode, the mode will automatically switch to distance mode for optimum reception.
- NOTE: DX (Local/Distance) switch (20) functions only in SEEK tuning.
P. SCAN (Preset Scan):
Press the P. SCAN switch (27) for 2 seconds or more to activate Preset Scan function. The stations memorized in advance by the preset switches are scanned for ten seconds each. Press the switch for the station of your choice to stop scanning.
This model is equipped with traffic information receiving apparatus to be used in West Germany where the traffic information is broadcast in FM. The following is how to use this unit to receive traffic information broadcasting.
- Select FM Position: Select the SDK switch (23) and tune to a station. If the station is a traffic information station, the SK Indicator (23) will glow and show the reception of a broadcast from a traffic information station.
- NOTE: SK Indicator: When SK signal is received irrespective of the SDK position, the SK indicator will illuminate.
- SDK Mode: In the SDK mode, stations other than traffic information stations are muted and cut out. Therefore, it is easy to select a traffic information station.
- Weak SK Signal: As the signal of the tuned traffic information station becomes weak, the SK indicator will extinguish. Then after the lapse of 25 seconds, a rhythmical alarm will sound to urge retuning to another stronger station. If the reception of further traffic information is required, tune in the desired traffic information station. When received, the alarm will stop, and the SK indicator illuminates. Since the alarm will continue if no signals from any other traffic stations can be received, release SDK switch for reception of normal broadcasting.
- Cassette Playback with SDK: When the unit is playing a cassette with the SDK switch pushed in and tuned to a traffic information station, the cassette play is interrupted and changed to FM radio if the pre-tuned station begins a traffic information message. When the message is over, the unit reverts to cassette play automatically.
- Volume Control: Even if the VOLUME control is set to the minimum position, the volume of the traffic information will be automatically adjusted to proper level. After the message, the sound volume returns to the previously adjusted level.
- Release SDK Switch: If traffic information reception is no longer necessary, release SDK switch for normal radio reception.
- NOTE: When the SDK switch is pressed, and there is no SK signal, ALARM will sound after the lapse of 25 seconds. Press the SDK switch again to stop it.
Maintenance Features:
Precautions:
- Hearing Safety: Use of this equipment at high volumes could damage your hearing.
- Heat Dissipation: The heat sink on the rear of the unit will become hot after operation. Exercise caution when the unit is removed from the Q.R. Bracket.
Cleaning:
- Playback Head: When playback sound begins to deteriorate, it is time to clean the playback head. Insert a special head cleaning cassette into the tape-loading slot and allow it to run for a few minutes to remove any foreign matter.
Handling of the Unit When Removed From Quick Release Bracket:
When the 7281M is removed from the in-dash bracket, remember these care tips:
- Avoid Damage: Do not drop or apply shock to the unit. It might cause permanent damage.
- Storage Conditions: Keep the unit away from:
- Water and moisture
- Direct sun and heat
- Excessive dust
- Strong magnetic field such as an audio speaker, magnet, or TV.
- Carrying Case: Your authorized Alpine dealer carries an optional carrying case for transporting the player when it is out of the vehicle.