EasyManua.ls Logo

Alpine i209-WRA User Manual

Alpine i209-WRA
22 pages
To Next Page IconTo Next Page
Page #1 background imageLoading...
Page #1 background image
Jeep Wrangler
WRANGLER 1/22
Jeep Wrangler
i209-WRA
i209-WRASXM
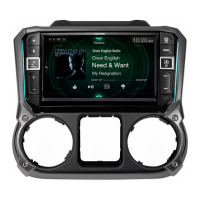
9” Restyle Installation Manual
Model: Wrangler
Model Year: 2011-2018
Note:
Design and specifications are subject to change without notice for improvement.
To Ensure Safe Use, Always Follow These Precautions
The installation of this product requires specialized skills and experience. We recommend that you have the
product installed by an Alpine authorized dealer.
Before you use this product, be sure to carefully read this installation manual and the separate user's manual
so that you can use the product correctly. Alpine Electronics bears no responsibility for problems that arise as
a result of failure to follow the instructions in the manuals.
This manual includes a number of symbols that are intended to help you use the product safely, to prevent
harm to you and others, and to protect against damage to property. These symbols and their meanings are
listed below. Make sure you fully understand these symbols before you begin reading the main text.
Explanations of Injury and Damage That May Result from Incorrect Use
Warning
Ignoring the content marked by this indication and using the product incorrectly is
expected to lead to death or serious injury.
Caution
Ignoring the content marked by this indication and using the product incorrectly is only
expected to lead to injury or property damage.
Jeep
Model Year
Wrangler 2011 - 2018
* The specified vehicles have been tested and have met compatibility specs at the time of testing. Compatibility is
not guaranteed if the manufacturer has made production changes to the listed vehicles above.
Warning: Before you begin wiring, remove the ground wire from the negative
terminal of the battery. Failing to do so can lead to electric shock, injury or damage
to equipment.
Introduction
Congratulations on purchasing the i209-WRA. This installation manual is designed to take you through the
step-by-step installation of the i209-WRA into a 2011-2018 Jeep Wrangler. Please familiarize yourself with the
owners manual and if you still have additional questions please call 1-800-TECH-101.
Questions and Answers:

Alpine i209-WRA Specifications

General IconGeneral
Display Size9-inch
TouchscreenYes
GPS NavigationYes
BluetoothYes
Apple CarPlayYes
Android AutoYes
USB Ports1
SiriusXM-ReadyYes
HD RadioYes
Rearview Camera InputYes
Specifically designed forJeep Wrangler
AM/FM RadioYes
Satellite Radio ReadyYes
Steering Wheel Control CompatibleYes
Resolution800 x 480 pixels
Power Output50W x 4

Summary

Introduction and Safety Precautions

To Ensure Safe Use, Always Follow These Precautions

General safety guidelines and precautions for product installation and use.

Explanations of Injury and Damage

Defines warning and caution symbols and their implications for user safety.

Types of Precautions

Forbidden Actions

Indicates actions that must not be performed during installation or use.

Mandatory Actions

Indicates actions that must be performed for correct installation and use.

General Warning

Highlights critical safety warnings requiring full user attention.

Tools Required for Installation

Essential Installation Tools

Collection of specialized tools needed for the installation process.

Accessory List: Installation Kit Parts

Key Installation Components

Includes dash bezel, harnesses, brackets, and microphone for installation.

Accessory List: Head Unit Box Parts

i209 Display and Source Units

Includes i209 Display Unit and i209 Source Unit.

Cables and Accessories

Includes USB, AUX, GPS, Document, Camera, Display, Power Harness, Foam, Screws, SXM Tuner.

Accessory List: iDatalink Maestro Box Parts

Maestro Module and Cables

Includes Maestro Flashing Cable, Main Harness, and Maestro Module.

Maestro Adapters

Includes Antenna Adapter, SAT Radio Adapter, OEM USB Adapter.

Programming the iDatalink Maestro Module

Install Weblink Plug-In

Download and install the Weblink plug-in from idatalinkmaestro.com/plugin.

Register Weblink Account

Create an account on idatalinkmaestro.com/register for module programming.

Connect Maestro Module to PC

Connect the Maestro module to your PC for programming.

Log Into Weblink

Access your Weblink account at idatalinkmaestro.com/login.

Program Your Module

Follow the on-screen steps to program the module for your vehicle.

Programming Completion

Confirmation of programming completion and next steps.

Component Locations

Add-on Microphone Location

Location for the external microphone.

iDatalink Maestro Module Location

Location of the iDatalink Maestro module within the vehicle.

SiriusXM Tuner Location

Location for the optional SiriusXM tuner.

GPS Antenna Installation

GPS Antenna Placement

Placement of the GPS antenna on the driver side roof frame.

Wire Hook Usage

Tool used to guide wires during antenna installation.

Factory Unit Disassembly Process

Remove Top Center Cover

Removing the top center storage area cover and screw.

Remove Knee Cover Panel

Removing the knee cover panel and related screws.

Remove Window Switch Pod

Removing the window switch pod and its screw.

Remove Dash Panel

Procedure for removing the main dash panel.

Remove Factory Radio

Removing screws to detach the factory radio.

Remove Factory Radio Bracket

Removing screws to detach the factory radio bracket.

Installation Instructions

Trim Factory Dash Panel

Trimming the factory dash panel for bezel fitment.

Remount Dash Vents

Removing and remounting vents onto the new bezel.

Trim Highlighted Area

Trimming a specific highlighted area of the dash.

Mount Microphone and Route Cable

Mounting the microphone and routing its cable.

Connect OBDII Port and Route Cable

Connecting the OBDII port and routing the extension cable.

Connect Maestro to Main Harness

Connecting the Maestro module to the main wiring harness.

Further Installation Steps

Attach Modified Panel

Securing the modified panel using factory screws.

Mount Display Monitor Brackets

Attaching display monitor brackets and connecting cables.

Apply Insulating Pad

Applying an insulating pad as per diagram.

Attach Display and Source Unit

Mounting display and source units and connecting harnesses.

Route USB Extension and Main Harness

Routing USB extension and connecting main harness.

Route Key Harness and Mount Source Unit

Routing key harness and mounting the source unit.

Connecting the Uconnect® USB Port

Remove Factory Climate Control Panel

Removing the climate control panel to access Uconnect module.

Disconnect OEM Connector

Disconnecting the OEM connector from the Uconnect module.

Connect OEM Connector to USB Adaptor

Connecting the OEM connector to the USB adaptor.

Use USB Extension for Radio Input

Connecting USB adaptor to radio via extension cable.

Secure Uconnect Module

Securing the Uconnect module in its original location.

Connecting a SiriusXM Module

SiriusXM Antenna Integration

Connecting the SiriusXM antenna for vehicles with/without factory SiriusXM.

Mounting Brackets and Adjustments

Adjust Rear Bracket

Adjusting rear bracket for proper fitment when protruding.

Adjust Side Brackets

Adjusting side brackets for proper fitment when protruding.

Exploded-View Diagram Components

Dash Bezel and Source Unit Identification

Component identification for the dash bezel and source unit.

Bracket and Factory Part Identification

Component identification for mounting brackets and factory parts.

Dashboard Reference

Reference view of the vehicle's dashboard.

Bezel Wiring Diagram

8 Pin Harness Connection

Identification of the 8-pin harness connection.

20 Pin Harness Connection

Identification of the 20-pin harness connection.

i209-WRA Wiring Diagram Overview

Main Unit Connections

Overview of wiring connections for the i209-WRA source and display units.

iDatalink Maestro Module Integration

Wiring for integrating the iDatalink Maestro module.

Vehicle-Specific Wiring Considerations

Specific wiring instructions for manual transmission and amplified vehicles.

Camera and Accessory Connections

Wiring for rear view camera and other accessories.

i209-WRA With Optional HDMI Interface Wiring

Phone Connectivity via HDMI

Connecting iPhones and Android phones using HDMI adapters.

Optional HDMI Selector Interface

Wiring for the KCX-630HD HDMI selector interface.

Optional DVD Player Connection

Connecting the DVE-5300 DVD player.

USB Power Source Requirement

Requirement for a 2A USB power source for phone connectivity.

Detailed i209-WRA Wiring Diagram

Interface Cable Connections

Detailed pin-out for the interface cable.

Power and Ground Connections

Wiring for ACC, BATT, and GND terminals.

Audio Output and Remote Connections

Wiring for PRE OUT, SUBW, FRONT OUT, REAR OUT, and remote signals.

Speaker Output and Microphone Input

Wiring for front and rear speakers and microphone input.

Wire Harness Pin Out Details

Main and Remote Harness Pin Outs

Pin assignments for main radio and remote harnesses.

Camera, Data, and SWC Harness Pin Outs

Pin assignments for camera, auxiliary data, and SWC harnesses.

Power, Audio, and iDatalink Pin Outs

Pin assignments for power, audio, and iDatalink connections.

Vehicle and Speaker Harness Pin Outs

Pin assignments for Wrangler vehicle harness and speaker harnesses.

Connection of HCE-TCAM1-WRA

Rear View Camera Wiring

Wiring connections for the HCE-TCAM1-WRA rear view camera.

Connection of an External Amplifier

Subwoofer Output Connections

Connecting the subwoofer output to an amplifier.

Front and Rear Speaker Output Connections

Connecting front and rear speaker outputs to an amplifier.

Remote Turn-On Lead Connection

Connection for the remote turn-on lead for amplifiers.

Connection of KAC-001

KAC-001 Power and Interface Connections

Connecting power and interface cables to the KAC-001.

Output Harness Connections

Connecting the 8-channel output harness.

Maestro Module Data Connection

Connecting the KAC-001 to the Maestro Module's data interface.

Accessory Output Connection

Connecting output terminals to accessories via relay.

Steering Wheel Configuration

Volume Controls Configuration

Configuration of volume up and down buttons.

Seek and Track Controls Configuration

Configuration of seek up/down for track selection.

Source and Preset Controls Configuration

Configuration of source selection and preset functions.

Voice and Phone Controls Configuration

Configuration of voice commands and phone call functions.

Set Up Guide

Ignition to ACC

Initial step: set ignition to Accessory position.

Power On i209-WRA

Powering on the i209-WRA unit.

Select User Language

Selecting the preferred user interface language.

Parking Brake Engagement

Procedure for parking brake engagement for setup.

Enable Camera Input

Enabling camera input in the system menu.

Audio Mute on Reverse

Configuring audio mute behavior when in reverse.

Enable HDMI Selector

Enabling the HDMI selector in setup menu.

Configure DVD Player

Configuring the DVD player source.

Enable External Accessory Module

Enabling the external accessory control module.

Set Vehicle Information

Setting vehicle information and gauge displays.

Troubleshooting Guide

iPhone HDMI Connectivity Issues

Troubleshooting iPhone HDMI connectivity issues.

Android HDMI Connectivity Issues

Troubleshooting Android HDMI connectivity issues.

iDatalink Invalid Serial Number

Resolving invalid serial number errors with iDatalink.

No RCA Audio Output

Troubleshooting lack of audio output from RCA connections.

Continued Troubleshooting

Headunit Not Turning On

Resolving issues where the headunit fails to power on.

Cannot Enter Settings Menu

Troubleshooting inability to access the settings menu.

Sound Mutes When Shifting to Reverse

Resolving unexpected audio muting during reverse.

SXM Radio Front Speaker Only

Troubleshooting front-only speaker output for SXM Radio.

Navigation Display Positioning Errors

Resolving GPS positioning inaccuracies on the navigation display.

CarPlay/Android Auto Map Positioning

Troubleshooting map positioning for CarPlay and Android Auto.

Navigation Icon Direction Error

Resolving incorrect vehicle icon direction for navigation.

Phone Not Recognized via USB

Troubleshooting phone recognition via USB cable.

Related product manuals