April 1998 59 RS5290000 Rev. 0
To avoid risk of electrical shock, personal injury, or death, disconnect electrical power source to unit and discharge
capacitor through a resistor before attempting to service, unless test procedures require power to be connected.
Ensure all earthing wires are connected before certifying unit as repaired and/or operational.
WARNING
NOTE: On electronic models when replacing bottom
door bushing, hinge pin, or door extract low
voltage wiring from connector at high voltage
board. The wiring colors and corresponding pin
connector numbers are shown below.
#12
#1
BLUE/WHITE
YELLOW
GRAY
PINK
VIOLET
TAN
ORANGE
#8 SPACE IS OPEN
G REEN/YELLOW
LT. BLUE
GRAYWHITE
BLUE
A straightened standard size paper clip can be
used to push pins down and out of connector to
release wires.
When reinstalling pins, make certain pins lock
into connector. It may be necessary to gently
pry up on pin before reinstalling to assure it
locks into connector when reinstalled.
Refrigerator Door Handle (Built-in and Electronic
Models)
1. Remove top and bottom caps by pulling away from
door handles.
2. Remove plastic insert by sliding insert up and out
of door handle.
3. Remove seven mounting screws from handle and
lift handle away from door.
NOTE: On electronic models, carefully disconnect
control ribbon connector from low voltage board.
Refrigerator or Freezer Handle (Free Standing
Models)
1. Unsnap top and bottom door handle trim by
carefully prying up under outside edge of trim to
release trim from retainer.
NOTE: Be careful to catch trim pieces located between
trim strips and door handle.
2. Remove door handle by removing two screws,
exposed after trim is removed.
Freezer Door Wiring Harness (All Non-electronic
Dispenser Models)
NOTE: Freezer door wiring harness on electronic
models is foamed into place at factory and is not
replaceable as a separate part.
1. After removing door, remove inner door liner,
cavity styrofoam cavity liner and insulation around
cavity.
2. Locate wiring harness inside place sleeve along
handle flange of door.
3. Attach a string or wire to wiring harness going
through top hinge. Pull string through as harness is
removed.
NOTE: For reassembly, pull new harness into place
through plastic sleeve using string to guide new
harness.
Freezer Door Water Tube
1. Remove freezer door.
2. Remove inner door liner
3. Locate water tube next to left flange of door. Water
tube runs inside large plastic sleeve.
4. Free tube from cavity and slide water tube down
and out through hole in door closure.
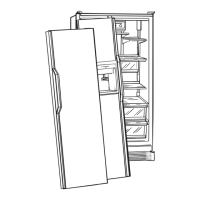
Refrigerator Door
Refrigerator door wiring harness on some models is
foamed into place in door and is not replaceable.
1. Remove toe grille.
2. Disconnect 12-pin connector from high voltage
board.
3. Remove refrigerator door top hinge cover and
unplug wire connector.
4. Remove earthing wire screw.
5. With refrigerator door open, remove single screw
mounting door closure to top of bottom hinge.
6. With refrigerator door closed, remove three top
hinge screws and pull wiring harness through
hinge.
7. Lift door about 3 inches to allow lower door closure
to clear hinge pin.
8. Carefully rest bottom edge of door on protective
pad wile removing hinge pin which press fits into
refrigerator bottom hinge bracket.
 Loading...