8
Fig. 3
sharp setting
normal setting
forward direction
Fig. 4
1
6
7
3
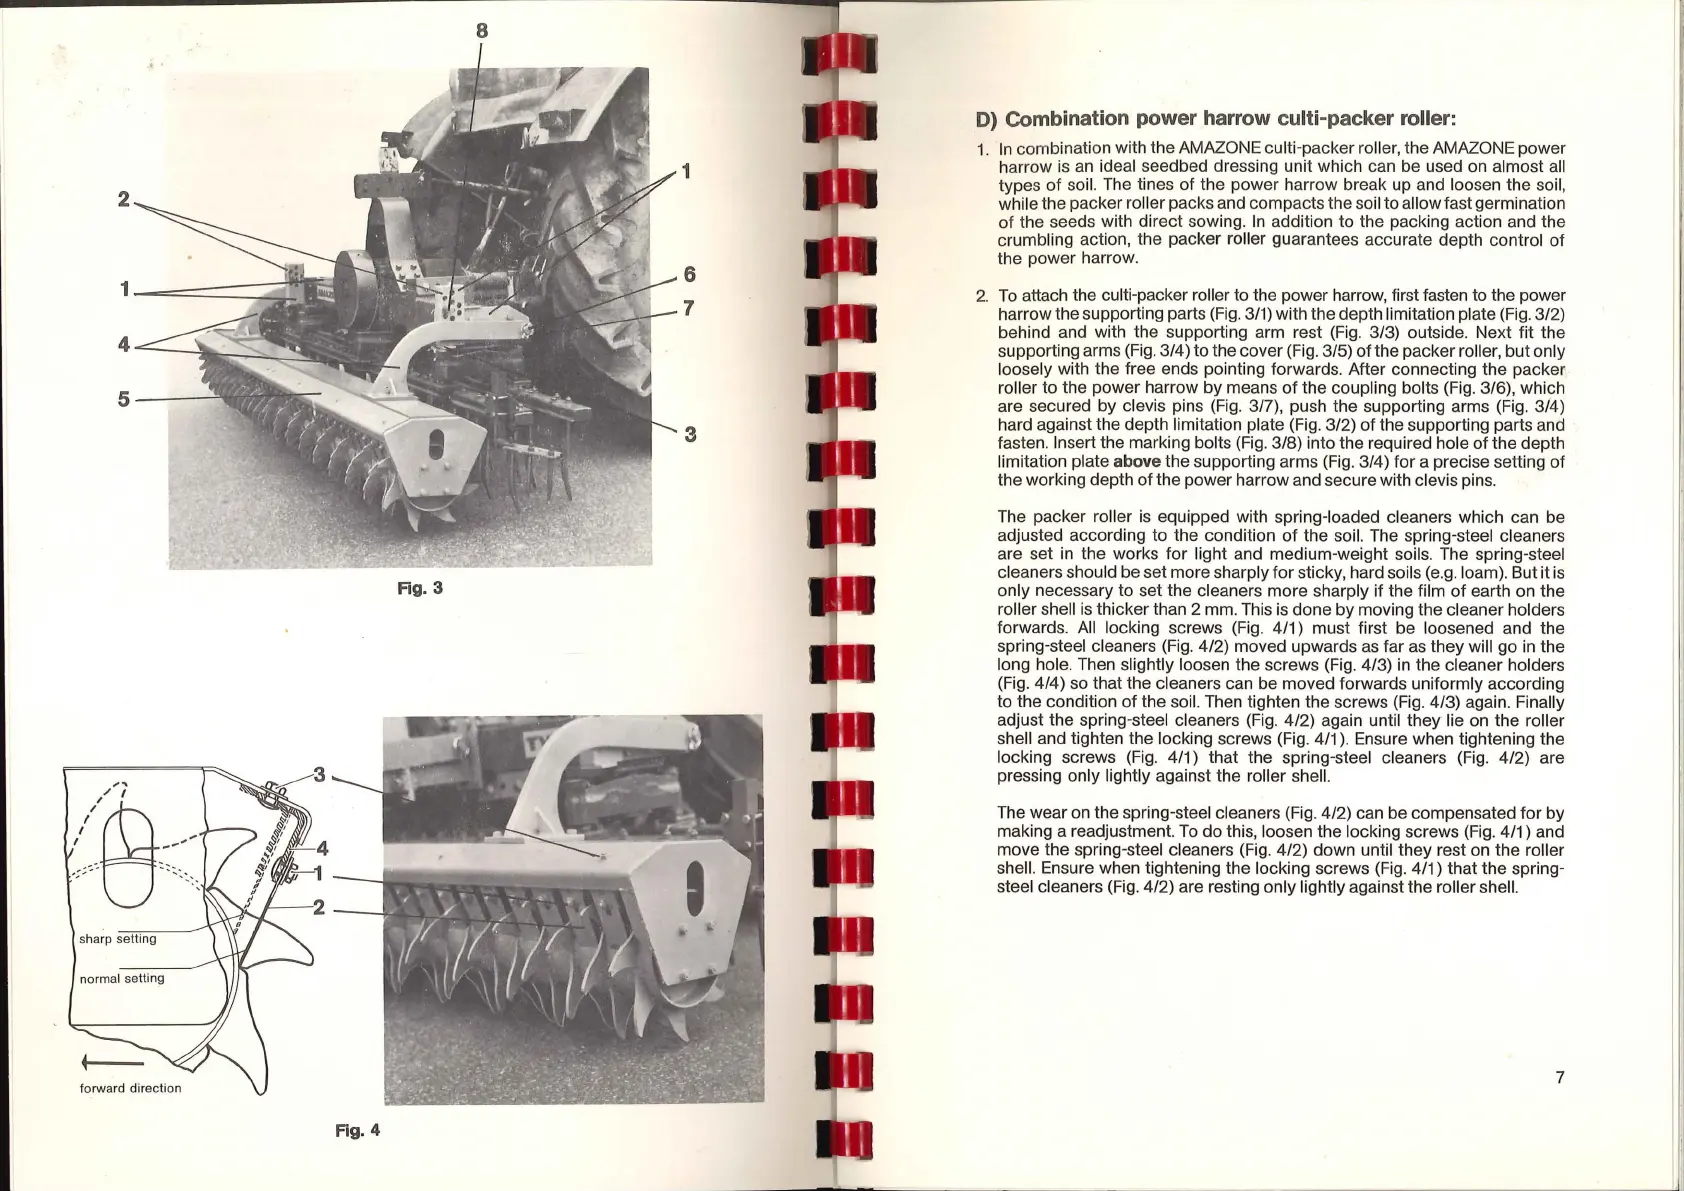
D) Combination power harrow culti-packer roller:
1.
·
In
combination with the AMAZONE culti-packer roller, the AMAZONE power
harrow
is
an
ideal seedbed dressing unit which can be used on almost all
types
of
soil. The tines
of
the power harrow break up and loosen the soil,
while the packer roller packs and compacts the soil to allow fast germination
of
the seeds with direct sowing.
In
addition to the packing action and the
crumbling action, the packer roller guarantees accurate depth control
of
the power harrow.
2.
To
attach the culti-packer roller to the power harrow, first fasten to the power
harrow the supporting parts
(Fig.
3/1)
with the depth limitation plate (Fig. 3/2)
behind and with the supporting arm rest (Fig. 3/3) outside. Next fit the
supporting arms
(Fig.
3/4) to the cover (Fig. 3/5)
of
the packer roller, but only
loosely with the free ends pointing forwards. After connecting the packer
roller to the power harrow
by
means
of
the coupling bolts (Fig. 3/6), which
are secured by clevis pins (Fig. 3/7), push the supporting arms (Fig. 3/4)
hard against the depth limitation plate (Fig. 3/2)
of
the supporting parts and
fasten. Insert the marking bolts
(Fig.
3/8) into the required hole
of
the depth
limitation plate
above the supporting arms
(Fig.
3/4)
for
a precise setting
of
the working depth of the power harrow and secure with clevis pins.
The packer roller
is
equipped with spring-loaded cleaners which can be
adjusted according to the condition
of
the soil. The spring-steel cleaners
are set
in
the works for light and medium-weight soils. The spring-steel
cleaners should be set more sharply
for
sticky, hard soils (e.g. loam). But it
is
only necessary to set the cleaners more sharply if the film
of
earth on the
roller shell
is
thicker than 2 mm. This
is
done
by
moving the cleaner holders
forwards.
All
locking screws (Fig. 4/1) must first be loosened and the
spring-steel cleaners (Fig. 4/2) moved upwards
as
far
as
they will go
in
the
long hole. Then slightly loosen the screws (Fig. 4/3)
in
the cleaner holders
(Fig.
4/4) so that the cleaners can be moved forwards uniformly according
to the condition
of
the soil. Then tighten the screws (Fig. 4/3) again. Finally
adjust the spring-steel cleaners (Fig. 4/2) again until they lie
on
the roller
shell and tighten the locking screws (Fig.
4/1
).
Ensure when tightening the
locking screws
(Fig.
4/1) that the spring-steel cleaners
(Fig.
4/2) are
pressing only lightly against the roller shell.
The wear on the spring-steel cleaners (Fig. 4/2) can be compensated for
by
making a readjustment.
To
do this, loosen the locking screws (Fig. 4/1) and
move the spring-steel cleaners (Fig. 4/2) down until they rest on the roller
shell. Ensure when tightening the locking screws
(Fig.
4/1) that the spring-
steel cleaners (Fig. 4/2) are resting only lightly against the roller shell.
7
 Loading...