EasyManua.ls Logo

American Standard Tropic 7038.801 User Manual

American Standard Tropic 7038.801
6 pages
To Next Page IconTo Next Page
Page #1 background imageLoading...
Page #1 background image
4
6
14
5
SLOT
MOUNTING
SURFACE
Turn off hot and cold water
supplies before beginning.
CAUTION
Insert SPOUT (1) and CABLE CONNECTOR (14) through center hole, making sure
the SPOUT ESCUTCHEON (2) and SEAL WASHER (3) are properly seated.
Assemble RUBBER WASHER (4), BRASS WASHER (5) and LOCKNUT (6) onto SPOUT
SHANK (7) from under side of sink . Make sure SPOUT (1) is centered in the mounting
hole and the slot in the BRASS WASHER (5) faces toward the rear of the sink.
Tighten LOCKNUT (6) firmly. Fig. A.
Tighten LOCKNUT (11) with WRENCH (8) (supplied) to secure VALVE
BODY (13). Repeat above steps for opposite VALVE BODY (13A).
Install LOCKNUT (11) and RUBBER WASHER (12) onto VALVE BODY (13).
From under side of mounting surface, install VALVE BODY (13) through valve
mounting holes. Threads of VALVE BODY (13) should extent at least 5/16
of a inch above mounting surface top. Fig. B. Thread ADAPTER (10)
onto VALVE BODY (13) until snug against internal stop. If necessary, adjust
LOCKNUT (11).
1
1A
7038.801
Certified to comply with ANSI A112.18.1
Installation
Instructions
TROPIC
Spread Lavatory Faucet with
INSTALL SPOUT
INSTALL VALVE BODY
1
2
1
8
10
9
12
11
13
13a
10
9
12
11
3
Place RUBBER RING (9) into ADAPTER (10).
13
5/16'' MIN.
7
Speed Connect™ Drain
Adjustable Wrench Screwdriver Channel Locks
Recommended tools
Tubing Cutter
Fig. A.
Fig. B.
1
M968892 Rev. 1.1
Congratulations on purchasing your American Standard
faucet with Speed Connect drain, a feature found only on
American Standard faucets.
*Your new American Standard faucet is designed to work only with the Speed Connect drain.
To ensure that your installation proceeds smoothly-please read these instructions carefully before you begin.
Speed Connect™ Drain*
• Fewer parts, installs in less time
• Never needs adjustment
• Guaranteed to seal properly the first time, every time.
Question and Answer IconNeed help?

Do you have a question about the American Standard Tropic 7038.801 and is the answer not in the manual?

American Standard Tropic 7038.801 Specifications

General IconGeneral
BrandAmerican Standard
ModelTropic 7038.801
CategoryPlumbing Product
LanguageEnglish

Summary

Installation Instructions

Install Spout

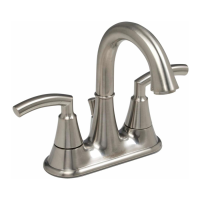
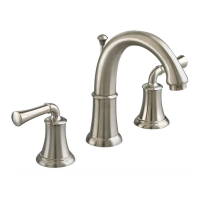
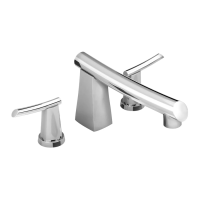
Step 1: Securely attach the faucet spout to the sink's mounting hole using the provided hardware.

Install Valve Body

Step 1A: Mount the valve body to the sink, ensuring proper alignment and tightening the locknut.

Pop-Up Drain Assembly

Step 2: Assemble and prepare the pop-up drain components, including the drain body and tailpiece.

Remove Drain Flange

Step 3: Remove the existing drain flange and gasket from the sink for replacement.

Install Drain from Below Fixture

Step 4: Insert the new drain body through the sink's drain outlet from underneath.

Tighten Drain Locknut

Step 5: Firmly tighten the drain's locknut using an appropriate wrench or pliers.

Flange Gasket and Pop-Up Knob

Step 6: Ensure the drain flange gasket is compressed and the pop-up knob is fully down.

Attach Cable Connector

Step 7: Connect the drain's control cable to the drain body connection securely.

Check Pop-Up Operation

Step 8: Test the pop-up drain's lift knob to confirm the stopper opens and closes correctly.

Water Supply and Waste Connections

Step 9: Connect hot/cold water supply lines and the drain tailpiece to the waste outlet.

Install Handles

Step 10: Attach the faucet handles to the valve stems, ensuring correct orientation and secure fit.

Test Installed Fitting

Step 11: Turn on water supplies, flush lines, and check all connections for leaks.

Check Drain Connections

Step 12: Verify the drain stopper seals properly and check all drain plumbing for leaks.

Care Instructions

Step 13: Guidelines for cleaning and maintaining the faucet's finish.

Service and Adjustments

Step 14: Procedures for handle rotation adjustment and fixing spout drips.

Speed Connect Drain Troubleshooting

Cable Adjustment Procedure

Procedure to adjust the drain cable for proper stopper lift and sealing.

Stopper Removal Procedure

Steps to safely remove the drain stopper from the drain body.

Stopper Installation Options

Locked Mode Installation

Install the stopper for 'Locked' mode, making it non-removable.

Unlocked Mode Installation

Install the stopper for 'Unlocked' mode, allowing for easy removal.

Related product manuals