This document describes the Angelo Po 0G1CP1G Pasta Cooker, a professional catering appliance designed and constructed for cooking pasta in water for human consumption. The manual is divided into two parts: the first part provides information for general users, while the second part is for skilled operators authorized to handle, transport, install, service, repair, and scrap the appliance.
Function Description
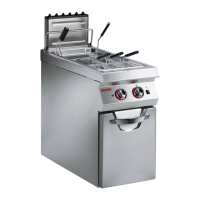
The pasta cooker's primary function is to efficiently cook pasta in a professional catering environment. It features a stainless steel cooking well (A) where the pasta is prepared. The appliance is equipped with a burner for heating the water, and a fume exhaust vent (Type A) (B) to remove the fumes generated during operation. Water flow is controlled by an adjustable water spout (D) and a water tap (F). Ignition of the burner is facilitated by a piezoelectric ignition (E).
Usage Features
The pasta cooker is designed for ease of use and safety in a professional kitchen.
- Controls: The main functions are managed via a burner control knob (C) and a piezoelectric ignition knob (E). The burner control knob (C) is used for lighting, turning off, and regulating the relative burner and pilot light. The piezoelectric ignition knob (E) is specifically for lighting the pilot light. The water tap (F) regulates the flow of water into the cooking well, and the adjustable water spout (D) directs this flow.
- Lighting the Burner: To light the burner, first turn on the gas supply tap. Then, press and turn the burner control knob (C) anti-clockwise (position 'a' in the diagram) while repeatedly pressing the piezoelectric ignition knob (E) to light the pilot light. Hold the burner control knob (C) pressed for approximately 15 seconds to prime the thermocouple. Once the pilot light is stable, turn the burner control knob (C) further anti-clockwise (position 'b' in the diagram) to light the main burner. The knob can be gradually turned anti-clockwise to adjust the flame power down to the minimum setting.
- Turning Off the Burner: To turn off the main burner, turn the burner control knob (C) clockwise (position 'c' in the diagram). The pilot light will remain on, allowing for quick re-ignition of the main burner. To turn off the pilot light, turn the burner control knob (C) further clockwise (position 'd' in the diagram). Finally, turn the knob completely off to ensure safety.
- Water Level Management: Before filling the well, ensure the drain tap (A) is turned off. It is crucial to maintain the water level above the minimum level marked (B) in the well. The appliance should never be operated without water in the well, as this can cause structural damage. Constant boiling of water should be maintained, and proper starch overflow drainage should be ensured.
- Accessories: The appliance can be equipped with optional accessories such as a well lid (CV26), and various baskets (C3011, C3023) to facilitate cooking different types of pasta or other items.
- Safety Devices: The appliance incorporates essential safety devices, including a gas supply tap (A) to turn the gas connection on and off, and a safety thermocouple (B) that cuts off the gas supply if the flame goes out. Users are advised to perform a daily check to ensure these devices are properly installed and in good working order.
- Troubleshooting: The manual provides a troubleshooting guide for common issues. For instance, if there's a smell of gas, turn off the gas supply and ventilate the room. If the pilot light doesn't ignite, check the ignition devices or light it manually. If the pilot light goes out or ignites but the burner remains off, make more attempts to light the flame and check the thermocouple/thermostat. Yellow flames or a stiff burner control knob indicate issues that require contacting after-sales service.
Maintenance Features
Regular maintenance is crucial for the appliance's efficiency, longevity, and safety.
- Cleaning: Given its use in food preparation, strict hygiene is paramount. All parts in direct or indirect contact with foodstuffs, as well as surrounding areas, must be thoroughly cleaned.
- Daily Cleaning: At the end of each use session, clean the well, the burner, and the appliance's internal and external parts, along with the surrounding environment.
- Cleaning Procedure: Before cleaning, always turn off the gas supply tap and allow the appliance to cool. Use warm water, food-approved detergents, and non-abrasive materials only. Rinse surfaces with drinking water and dry; avoid pressurized water jets. Take care not to damage stainless steel surfaces; do not use corrosive products, abrasive materials, or sharp tools. Remove food residues immediately to prevent them from setting. Remove limescale deposits as they form.
- Lengthy Downtimes: If the appliance is to be out of use for an extended period, turn off the gas supply tap, clean the appliance and surrounding areas thoroughly, spread a film of edible oil over stainless steel surfaces, carry out all servicing procedures, and leave the appliance uncovered with cooking chambers open.
- Scheduled Servicing: Every 100 working hours, skilled and authorized personnel should perform the following:
- Check gas pressure and system tightness.
- Check the efficiency of the safety thermocouple.
- Check the efficiency of the flues and clean them if necessary.
- Grease the gas tap (detailed procedure provided in the manual).
- Gas Pressure Checking: This involves turning off the gas supply, removing the knob and control panel, undoing a screw on the pressure connection, connecting a pressure gauge, filling the well with water, lighting the burner to full flame, checking the pressure reading against specified values, then turning off the burner and disconnecting the gauge.
- Adjustments: Adjustments, such as the gas control valve minimum setting and burner primary air, are typically required after gas supply conversion. These operations involve specific steps like turning off the gas supply, removing knobs and panels, and adjusting screws or injectors while monitoring gas pressure. After adjustments, the screw should be sealed with paint.
- Replacing Parts: When replacement parts are needed, only original spare parts should be used. Any replacement procedure must be carried out by skilled operatives after activating all safety devices and informing staff. The manufacturer disclaims responsibility for damage resulting from the use of non-original parts or unauthorized modifications. Specific instructions are provided for replacing the burner nozzle and the pilot light injector, which involve turning off the gas supply, opening the door, unscrewing and replacing the respective components, and then reassembling.
- Decommissioning: This operation must be carried out by skilled operatives in compliance with legal safety requirements. Non-biodegradable materials, lubricating oils, and non-metallic components must be disposed of according to relevant legal requirements and not dumped into the environment.