Do you have a question about the Angelo Po 1G0GRG and is the answer not in the manual?
This document outlines the operation, maintenance, and safety procedures for a gas chargrill, designed for professional catering. The manual is divided into two parts: the first part provides general information for users, while the second part is for skilled operators involved in handling, transport, installation, servicing, repair, and scrapping the appliance.
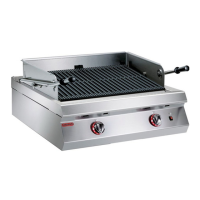
The gas chargrill is designed for cooking food in direct contact with a griddle. It features a cast iron cooking plate, a splashguard frame to prevent splashes, and ceramic heating stones held by a grid clearance reduction. Gas supply to the burner is controlled by a burner control knob, and a piezoelectric ignition button is used to light the burner. An inspection slit allows users to check if the pilot light is lit. The cooking plate can be adjusted to three preset angles using a plate adjuster lever, and a drip tray collects cooking residues. The appliance is equipped with a gas supply tap and a safety thermocouple, which cuts off the gas supply if the flame goes out.
Before using the appliance, it is crucial to ensure all safety devices are properly installed and in working order. The necessary connections for water, electricity, and gas must be set up by specialized staff according to local requirements. Users should familiarize themselves with the controls and main functions through trial operations if necessary. The appliance should only be used for its intended purpose, which is cooking.
To light the burner, first turn on the gas supply tap. Press and turn the burner control knob anti-clockwise while repeatedly pressing the piezoelectric ignition button to light the pilot light. Keep the knob pressed for about 15 seconds to prime the thermocouple. Then, turn the knob further anti-clockwise to light the burner. The flame power can be adjusted down to the minimum setting by gradually turning the knob anti-clockwise. To turn off the burner, turn the knob clockwise. The pilot light will remain on, allowing for re-ignition. To turn off the pilot light, turn the knob further clockwise. Always turn off the knob completely to ensure safety.
During use, the operator's constant presence is required. It is recommended to set the cooking plate to an angle that allows residues to flow into the drip tray, which should be filled with a small amount of water to facilitate cleaning.
Regular maintenance is essential for optimal performance, extended lifespan, and continuous safety. After each use, and whenever necessary, the cooking plate, burner, and surrounding environment should be cleaned.
For cleaning the cooking plate, switch off the appliance and allow it to cool. Remove the grid and use the provided brush to remove cooking residues. Spread a suitable degreaser on the plate, leave it for a few minutes, then clean thoroughly with a sponge, rinse with plenty of water, and dry.
For cleaning the burner, remove the plate, splashguard frame, and grid clearance reduction. Lift and remove the burner, then clean it, ensuring its holes are not blocked. Clean the interior of the device, draining all residues into the drip tray. Remove, drain, and clean the drip tray. It is crucial to prevent water or dirt from falling into the burner to avoid malfunction. Also, check that the burner bushing is not blocked.
Every 100 working hours, skilled and authorized personnel should perform specific operations: check gas pressure and system tightness, verify the efficiency of the safety thermocouple, grease the gas tap, and clean the burner.
For lengthy downtimes, turn off the gas supply tap, thoroughly clean the appliance and surrounding areas, spread a film of edible oil on stainless steel surfaces, perform all servicing procedures, and cover the appliance, leaving gaps for air circulation.
When cleaning, use only food-approved detergents and non-abrasive materials. Avoid corrosive or flammable cleaning products. Wear personal protection equipment such as rubber gloves, protective masks, and safety goggles. Do not use pressurized water jets on internal parts. Remove food residues immediately and address limescale deposits.
The appliance features various safety and information signs. The nameplate provides manufacturer and appliance data. Burn hazard signs warn about hot surfaces. General hazard signs instruct users to read the manual carefully, avoid pointing pressurized water jets at internal parts during washing, and comply with all relevant regulations, including installation in well-ventilated premises. The CE marking indicates compliance with applicable laws. A general hazard sign also specifies using only ceramic heating stones supplied by the manufacturer.
During handling and installation, adhere to the manufacturer's instructions on packaging and the appliance. If necessary, a "safety plan" should be organized to protect personnel. The packaging is designed to reduce space and protect components during transport. All components should be checked for presence and damage upon unpacking. Packaging materials must be disposed of according to legal requirements.
The appliance can be handled with fork-lift or hook equipment, ensuring the load's center of gravity is checked before lifting. When engaging lifting equipment, be mindful of the gas supply pipe.
Installation must consider the general layout. The installation site must have all necessary connections, be well-lit, and meet health and hygiene requirements to prevent food contamination. Appliances must be at least 5 cm from walls not resistant to temperatures of 150°C. Installation must comply with national legislation and regulations.
The room where the appliance is installed must have adequate, unobstructed air inlets to ensure proper air exchange.
To assemble appliances side-by-side, remove the knob and control panels. Apply masking tape and food-approved sealant to the edges to be joined. Place the appliances together and connect them using screws and nuts. Remove excess sealant and masking tape. Apply sealant to the inside of the lid and fit it to cover the fixing zone. Replace control panels and knobs. Optional installation kits are available for "over cupboard" and "bridge" configurations.
Gas connection must be performed by authorized and certified personnel, adhering to proper standards and regulations. A general check for gas leaks must be performed before operation. Connect the mains line to the appliance's connection pipe, fitting an easily accessible shut-off tap. The gas supply pipe must comply with national requirements and be periodically examined and replaced.
If the gas type to be connected differs from the factory-tested gas, the following steps are required: turn off the gas supply tap, change the burner nozzle, change the pilot light nozzle, adjust the minimum settings of the gas control valves, and if necessary, replace the primary air bushing of the burner. Remove the old sticker from the nameplate and apply a new one to identify the gas in use. After conversion, ensure there are no gas leaks or malfunctions.
Before service, the system must be tested to check operating conditions and identify malfunctions. This includes checking that all health and safety requirements are met. Turn on the gas supply tap and check connections. Verify the mains gas matches the commissioning gas, performing conversion if needed. Check burner ignition and combustion, safety thermocouple function, and for gas leaks. Ensure nameplates specify the correct gas for the country. After testing, instruct the user on safe operation.
Any adjustments must be carried out by authorized, qualified staff according to legal requirements. Before making adjustments, activate all safety devices and inform staff. Turn off the gas supply tap, cut off electricity, and prevent access to devices that could cause hazards.
Adjusting the gas control valve minimum setting is only required if the gas type differs from the testing gas after conversion. Before this adjustment, ensure the gas supply pressure matches the rated pressure for the gas type in use.
For natural gas, turn off the gas supply, remove the knob and control panel. Undo the pressure connection screw, connect a pressure gauge, and turn the gas supply back on. Light the burner and turn the knob to the minimum flame setting. Remove the minimum flame injector and replace it with the correct one, screwing it fully down. Slowly unscrew the injector until the pressure reading complies with the table values. Check flame stability. Seal the screw with paint. Switch off the burner, turn off the gas supply, disconnect the pressure gauge, and replace the control panel and knobs.
For liquid gas, the procedure is similar, involving replacing the minimum flame injector with the one suitable for liquid gas and sealing the screw with paint.
To grease the gas tap, turn off the gas supply, remove the knob and control panel. Undo the screws, extract the cap, and pull off the cone. Clean the cone and its seat. Coat the cone with grease, fit it, and turn it a few times. Pull off the cone again to remove excess grease. Replace the cone, cap, control panel, and knobs.
Before any replacement procedure, activate all safety devices and inform staff. Turn off the gas supply tap, cut off electricity, and prevent access to devices that could cause hazards. Use only original spare parts. The manufacturer disclaims responsibility for damage from non-original parts or unauthorized work. Order components using the parts catalogue.
To replace the burner nozzle, turn off the gas supply, remove the knob and control panel. Unscrew the nozzle and replace it with the correct one for the gas type. Replace the control panel and knobs.
To replace the burner air bushing, turn off the gas supply, remove the knob and control panel. Undo the screw, extract the bushing, and replace it with the correct one for the gas type. Replace the control panel and knobs.
To replace the pilot light injector, turn off the gas supply. Access the pilot light through the bottom opening. Unscrew the union, remove the nozzle, and replace it with the correct one for the gas type. Retighten the union.
When decommissioning, ensure the appliance and its components are not a hindrance and are inaccessible. Disconnect and render unusable all energy sources, drain any liquids, and place the appliance in a suitable, inaccessible area with barriers. When scrapping, sort all components by chemical characteristics and dispose of them separately according to legal requirements. Do not dump non-biodegradable products, lubricating oils, and non-metallic components in the environment; dispose of them in compliance with relevant laws.
| Category | Commercial Food Equipment |
|---|---|
| Model | 1G0GRG |
| Brand | Angelo Po |
| Oven | Yes |
| Power Source | Gas |
| Manufacturer | Angelo Po |