Do you have a question about the Antelope Discrete 8 and is the answer not in the manual?
Steps to configure the audio interface for Windows 10.
Steps to configure the audio interface for macOS.
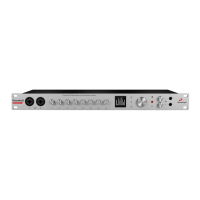
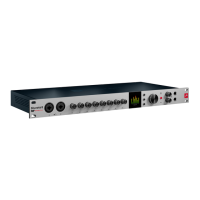
Description of the two microphone/line/Hi-Z combo XLR connectors.
Explanation of the 8 gain adjustment knobs for the combo inputs.
Details on the display showing meter, menu, and firmware update status.
Explanation of the three function buttons and their roles.
Explains the submenus accessible via the system menu.
Displays serial number, hardware, and firmware revision for troubleshooting.
How to switch between USB and Thunderbolt connections manually.
Allows selection of the time until the screen saver appears.
Allows selection of the screen saver type to prevent burn-in.
Describes sending talkback to headphone output 1 (HP1).
Describes sending talkback to headphone output 2 (HP2).
Describes sending talkback to monitor output 1 (MON).
Describes sending talkback to monitor output 2 (MON2).
Describes selecting the talkback microphone input source.
Resets the device to factory default settings, losing all presets.
Explains the functions accessed by pressing the middle button.
Explains muting headphone output 2 (HP2) and accessing the control menu.
Details the various settings configurable via the control menu.
How to turn off the device using the main rotary control.
Options for selecting the clock source (Internal, ADAT, S/PDIF, USB).
How to select the sample rate and ensure OS/DAW consistency.
How to select the audio source for the peak meter display.
Adjusts monitor output signal trim in dBu.
Adjusts line output signal trim in dBu.
Switches analog outputs between Monitor Output 2 and REAMP modes.
Adjusts the display brightness.
Description of the main rotary control for precise adjustment.
How to activate talkback and adjust gain using the main rotary control.
Description of the two stereo headphone outputs with gain knobs.
Details on the power input connection for the unit.
Explains the word clock input and three outputs via BNC connectors.
How to send and receive S/PDIF digital audio via coaxial RCA cables.
Connecting a footswitch to enable talkback or mute functions.
Transmits up to 16 I/O audio channels via Toslink fiber optic cable.
Description of the Thunderbolt 2 port for computer connection.
Description of the USB 2.0 Type-B port for computer connection.
DB-25 connector for 8 channels of analog audio output.
Describes the monitor speaker outputs (1/4 inch jacks) with high dynamic range.
Describes mono outputs for instrument-level signals, ideal for re-amping.
Details the 6 mic/line inputs (combo XLR connectors) and their limitations.
Steps to perform key tasks quickly using the control panel.
Lists shortcuts for efficient control panel operation.
Describes the overall layout and components of the control panel.
Details the top section of the control panel interface.
Describes the second strip of controls in the panel.
Explains the settings menu accessed via the button.
Details the controls for the input preamplifier channels.
Explains how to route audio inputs to output channels.
Explains how to connect the Edge Quadro microphone.
Using the Edge Quadro as a single-membrane microphone.
Using the Edge Quadro as a dual-membrane microphone.
Using the Edge Quadro as a quad-membrane microphone.
Describes the Verge mic emulation window and its controls.
Explains how to record and monitor with the Verge microphone.
Steps to purchase, download, and install the AFX2DAW plugin.
Guide on using the device as a master clock for digital audio devices.
Information on reaching customer support online.
Phone numbers and operating hours for customer support.
Information on using the live chat support option.
Links to YouTube channel and knowledge base for help.
Information about the user Facebook group.
Description of the Knowledge Base as a troubleshooting resource.
General advice when the product is not working.
Explanation of what a Return Merchandise Authorization (RMA) number is.
Steps to obtain an RMA number for service or repair.
Details the warranty period and coverage for material and workmanship defects.
Details the warranty for refurbished or open-box products.
Outlines the available remedies under the warranty.
Explains how obsolete or discontinued products are handled.
Steps to obtain an RMA number for product returns.
Essential safety guidelines for operating the device and avoiding hazards.
Lists the types and number of analog inputs.
Lists the types and number of analog outputs.
Details the specifications for the microphone preamplifiers.
Specifications for the digital-to-analog and analog-to-digital converters.
Details digital input/output, USB, Thunderbolt, and Word Clock connections.
Describes the clocking system technology used in the device.
Lists the supported sample rates in kilohertz.
| Sample Rate | Up to 192 kHz |
|---|---|
| Phantom Power | Yes |
| Preamps | 8 |
| A/D Resolution | 24-bit/192 kHz |
| DSP | Yes |
| Rack Spaces | 1U |
| Bit Depth | 24-bit |
| Analog Inputs | 8 |
| Digital Inputs | ADAT, S/PDIF |
| Digital Outputs | ADAT, S/PDIF |
| Type | Audio Interface |
| Analog Inputs (Hi-Z) | 2 |
| Analog Outputs (monitor out) | 2 |
| Clock I/O | 1 x Word Clock In, 2 x Word Clock Out |
| Thunderbolt | 1 x Thunderbolt |
| Software | Control Panel |
| OS Requirements - Mac | macOS 10.10 or later |
| OS Requirements - PC | Windows 7 or later |
| Clock Technology | 64-bit AFC |
| USB Version | USB 2.0 |
| DSP Processing | Yes |
| USB | 1 x USB Type B |