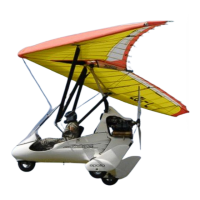
6.3 Wing Assembly Procedure
The following procedural descriptions are not intended to be a substitute for the
familiarization procedure of your dealer at the time the wing is delivered.
The aircraft is advised to be assembled by two persons, however even one person
can setup the wing and the complete aircraft, also, if necessary
The set up procedure should be carried out on a clean, not abrasive surface,
however if such a surface is not available a canvas or folia can be laid onto the
ground.
Place the glider on its back, zip upwards, and nose into the wind. In this position the
package is supported by the leading edge strengthening foam.
Undo the zip, untie the Velcro straps, remove the sack with the battens and put
aside. Open the A-frame and assemble it. At the A-frame corners secure the bolt
and the pushpin. Securings are to look towards the tail. Set the A-frame into
standing position by fitting the lower longitudinal wires with the nose wire stretcher
into the rail on the nose plate. Stretch the lower wires with the handle on the
stretcher and secure it with the pushpin.
With the sack of the sail still on rotate the wing into prone position so that the wing
now stands on the control bar. Remove the sack, carefully open the two half wings to
a small extent and assemble the struts. Unfold the sail along the leading edges,
open the wing to its maximum extent and secure the strut attachment mountings.
Select the right and left hand battens from the batten sack according to their color of
the end of the batten and row them on the ground according to their length behind
the trailing edge. Carefully slide the upper sail bent battens in their respective
pockets from the center towards the wing tips and tension the sail with the batten
stretcher strings along the trailing edge. Fit the wash out tips into their fittings on the
end of the wing spar and secure them. Fit the D-stick into its place and push the
cross battens into their sack. Stretch the sail with the sail stretcher handle by pulling
the handle backwards and fitting it’s mounting onto the rail on the back of the keel
and secure it. Lean the wing with its nose on the ground or mount it onto the trike.
Push the lower battens on their sack. Control the nose batten and adjust it if
necessary. Fix the nose cone with its Velcro fittings. The wing is now completely
mounted, however a control by walking around it is advised to eliminate possible
shortcomings discovered.
6.4 Fitting the wing to the trike.
Turn the wing precisely in front of the wind. Push the trike behind the wing.
Dismantle the nose bar and bend down the main beam. Roll with the nose wheel
across the control bar and lay the nose bar onto the ground behind the rear wheels
of the trike in order to prevent the trike to move backwards. Lift the vertical main
beam up, fit the head of it into the bracket of the trike-wing universal joint and push
the cross bolt into the hole of the bracket.
 Loading...