This appliance is only intended for use with Aqua Optima
Evolve+ filters.
1. Drain the water from the tanks and remove the tank lid.
2. Take out the inner water tank and remove the filter
cartridge by rotating it anti-clockwise.
3. Insert the new filter cartridge as described previously.
4. Reinsert the inner water tank into the water tank. Fill the
water tank up to the max line and refit the water tank into
the appliance.
5. Dispense water to remove any unfiltered water in the
appliance and top up.
6. Press and hold the filter warning symbol for 3 seconds to
reset the filter timer.
7. The appliance is now ready to use.
To ensure the best performance, the filter cartridge should
be changed after 100 litres (filter icon will light up), which
is approximately 30 days of typical use. The filter must be
replaced as a minimum every 60 days if the filter icon has
not presented.
CARE & MAINTENANCE
• Water is a foodstu. We recommend using the filtered
water within 3 days. If the appliance is not used for more
than 72 hours the water system will need draining. Unplug
the appliance and take it to the sink. Unscrew both the
drainage caps located on the underside of the appliance
and remove the silicon bungs over a sink. Allow all water to
drain out of the system. Re-insert the drainage bungs and
screw on the caps. Repeat the process in section 3. first
use, to refill the appliance to continue use.
• Should the appliance not be used for an extended period
of time (for example a holiday) we recommend that the
filter is removed and placed in a clean plastic bag and
stored in the fridge. This will help to maintain the filter when
not in use. Before using the filter after storage, follow the
preparation and fitting instructions for use as normal.
• Do not overfill the water tank, do not fill above the “MAX” fill
to avoid risk of water overflow in the inner water tank.
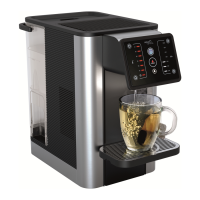
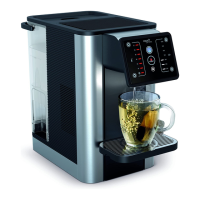
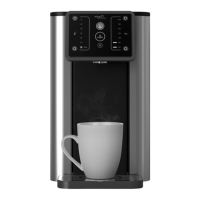
4. How to use
1. Fill water tank to the “MAX” mark; water
will flow through the filter at a set rate and
may take some time due to the action of
the filter cartridge.
2. Adjust the height of the drip tray to
accommodate the size of the mug used.
To reposition the drip tray use two hands
to lift it vertically before removing from
the unit. Keep the drip tray horizontal,
rotation or twisting may damage the
hooks that connect the drip tray to the
appliance. Ensure the drip tray is fully
engaged with the appliance. There are 3
height options (A).
3. Place mug or glass on drip tray (B).
4. Press the On/O button (C).
5. Press the up or down button to select the
desired temperature and volume settings
(D).
6. Press the dispense button to start
dispensing. One beep at the start. (E)
7. The dispense button will fade in and out
whilst dispensing and beep twice once
complete.
8. To engage the child lock, press and hold
the lock button for 3 seconds. The lock
button will change from white to red (F).
Note:
• To stop the cycle at any time press the dispense button.
Once the cycle has stopped it cannot be continued. A
new cycle must be started.
• The user interface will automatically lock after 60
seconds if no actions are performed or can be manually
locked by holding lock button for 3 seconds.
• Sound - all button sounds can be turned o (not sound
in 6. & 7.) in How to use guide, section 4.) by pressing and
holding the temperature down arrow and the volume up
arrow for 3 seconds in the locked mode.
• Lock – the automatic lock can be turned o by pressing
and holding the temperature up arrow and the volume
down arrow for 3 seconds in locked mode. Manual locking
will still be active.
• Chiller mode is on by default every time the appliance is
plugged in. It can be turned o by pressing and holding
the temperature up arrow and temperature down arrow
for 3 seconds in the locked mode. The appliance will beep
twice to confirm. Chiller mode can be turned back on
by pressing and holding the temperature up arrow and
temperature down arrow for 3 seconds in the locked mode.
The appliance will beep once to confirm.
• The chilled temperature setting
will light up red
when the appliance is chilling the water and will light up
white when the water is chilled. At first use the chiller takes
around 40 minutes to fully cool down the water (can
vary depending on the incoming water temperature and
ambient room temperature).
• The refill icon will turn orange when the water tank needs
refilling or if the tank is not fitted correctly.
• The filter icon will turn orange when the filter needs
replacing, at 100L usage, follow the filter preparation and
replacement instructions in this manual.
5. Rinsing Cycle
5.1 Heater rinse
To ensure your Aurora appliance always dispenses the
highest quality water it is important to rinse it regularly. The
appliance will display the Rinse/Descale warning symbol
when the appliance requires the heater rinsing process. All
other functions will be blocked until the heater rinsing cycle
is completed.
1. When the Rinse/Descale light is constantly illuminated
ensure the machine is topped up with a minimum of 1 liter
of clean water and an empty jug is positioned under the
dispensing outlet.
2. Press the Rinse/Descale button.
3. The machine will now dispense water. The dispense
amount will vary depending on usage of the appliance.
4. Once the heater rinsing cycle has finished the Rinse/
Descale light will turn o.
5. Discard the water dispensed.
6. Your machine is now ready to use
A
B
C
D
E
F
4