EasyManua.ls Logo

Aquasana OptimH2O - User Manual

Aquasana OptimH2O
16 pages
Print Icon
To Next Page IconTo Next Page
Loading...
Whole House
Water Filter
OptimH2O
®
Owner’s Manual

Questions and Answers

  • B
    barroyoAug 7, 2025
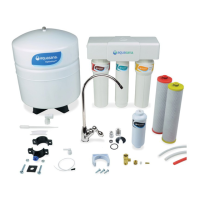
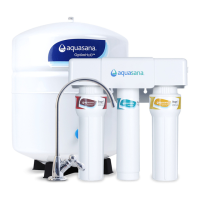
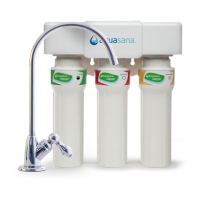
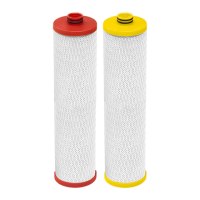
    Why is there reduced water pressure after installing my Aquasana Water Filtration System?
    • D
      Diane TaylorAug 7, 2025
      If you experience reduced water pressure after installing your Aquasana Water Filtration System, it may be time to replace the sediment pre-filter. It is generally recommended to replace this filter every 6 months, depending on the sediment amount in your water supply. Inspect the sediment filter, and if it appears clogged, replace it.
  • M
    Mr. Brian ColeAug 13, 2025
    What to do if I see a water leak from the fittings of my Aquasana Water Filtration System?
    • A
      Amy MccoyAug 13, 2025
      If you notice a water leak from the fittings of your Aquasana Water Filtration System, first ensure the connection is tight, but be careful not to overtighten it, as this could cause cracks and further leaking. Before addressing the leak, close the shut-off valve. Then, unscrew the closest union and the threaded connection. Remove any old sealing tape from the fitting and apply new sealing tape, and tighten the connection properly. Use a wrench to ensure all connections are properly tightened, but avoid overtightening. If the leak persists, contact customer service with a pre-recorded video of the issue.
  • M
    Michael RoyAug 25, 2025
    Why taste/odor of water did not improve after installing Aquasana Water Filtration System?
    • L
      Larry ButlerAug 26, 2025
      If the taste or odor of your water has not improved after installing your Aquasana Water Filtration System, make sure that the bypass loop is turned off and that the system shut-off valves are open.
  • M
    Marilyn PetersonAug 31, 2025
    Why does the water from my Aquasana Water Filtration System appear gray or cloudy?
    • R
      Rachel FletcherAug 31, 2025
      If the water from your Aquasana Water Filtration System appears gray or cloudy, allow air to flush from the water lines. This cloudiness will dissipate over time, potentially taking from a week to a month, and is completely harmless.
  • J
    Jane ChanSep 10, 2025
    What to do if there is a water leak from the pre/post filter housing of my Aquasana Water Filtration System?
    • C
      Crystal RichardsonSep 12, 2025
      If you notice a water leak from the pre/post filter housing of your Aquasana Water Filtration System, first ensure the connection is tight, being careful not to overtighten, which could cause cracks and further leaking. Use the included wrench to further tighten the housing. If the leak continues, close the shut-off valve before the leak, then remove the housing and filter. Clean the o-ring, inside the housing, and all threaded connections. Re-lubricate the o-ring and reassemble with a new filter. If you see a crack or other methods don't stop the leak, contact customer service.

Summary

Box Contents & System Configuration

Installation Steps

Tools and Materials for Installation

Gather necessary tools and materials like PVC primer, glue, plumber's tape, and grounding clamps.

Installation Site and Preparation

Select an appropriate indoor location, prepare for additional parts, and ensure proper system layout.

Installation Precautions and Safety

Follow safety guidelines regarding pressure limits, water temperature, unit orientation, and electrical grounding.

Select Location and Prepare System

Cleaning the System Exterior

Clean the system exterior with warm, soapy water; rinse with fresh water. Avoid chemical cleaners.

System Specifications

Details on model, replacement tank, and pre-filter, emphasizing genuine Aquasana parts.

Assemble and Connect System Components

Assemble Tank Components

Connect drain valve, flow meter, bypass manifold, and connectors to the filter housing.

Copper Pipe Installation Precautions

Specific instructions for installing on metallic plumbing, including grounding clamps and copper wire.

Install Shut-off Valve and Configure System

Install Shut-off Valve and Ensure Spacing

Cut water line, fit shut-off valve, measure spacing for components, and mark pipe for cutting.

Cut Pipes and Configure System

Cut pipes cleanly, fit shut-off valve, and connect system components ensuring correct water flow direction.

Prepare Filter and Final Checks

Remove Top Cap and Prepare Filter

Remove the top cap and snap ring, then place the filter cartridge correctly into the housing.

Reattach Top Cap and Final System Check

Reattach the top cap, check for leaks after depressurization, and flush the system.

Operation and Troubleshooting

Water Meter and Power Monitoring

Understanding the water meter, totalizer, power monitoring, and LED indicators for system status.

Troubleshooting Common Issues

Resolutions for common problems like leaks, low pressure, cloudy water, and taste/odor issues.

Performance and Warranty Information

Performance and Certifications

Details on model, capacity, pressure, temperature, flow rate, and IAPMO R&T certification.

Water for Life Program

Benefits of the program including extended warranty, discounted replacements, free shipping, and no contract.

Limited Warranty Coverage

Defines what is covered, what is not covered, and the manufacturer's responsibilities.

Aquasana OptimH2O Specifications

General IconGeneral
BrandAquasana
ModelOptimH2O
CategoryWater Filtration Systems
LanguageEnglish

Related product manuals