18-11-2022 Page 2 of 51 ARB Copyright 2022 37801205
If you have any queries regarding the installation of this product, please contact the distributor from whom it was purchased, or alternatively the ARB office in your state.
Head Office – ARB Corporation Ltd VIC: 42-44 Garden Street, Kilsyth, Victoria, 3137 Tel: (03) 9761 6622 Fax: (03) 9761 6807
WA:(08) 9244 3553 NSW: (02) 9821 3633 ACT: (02) 6280 7475 SA: (08) 8244 5001 QLD: (07) 3872 3872 NT: (08) 8947 2262 TAS: (03) 6331 4190
HAVE AVAILABLE THESE SAFETY ITEMS WHEN FITTING PRODUCT:
NOTE: ‘WARNING’ notes in the fitting procedure relate to OH&S situations. To avoid a potentially
hazardous situation it is suggested that protective safety gear be worn or a safe work procedure be
employed. If these notes and warnings are not heeded, injury may result.
TOOL LIST FOR FITMENT:
• Torque Wrench 0-25Nm
• Sockets 7, 8, 10 & 13mm sockets
• Socket extension bar and driver
• Spanners, ratchet type, 10 and 13mm.
• Tape measure
• T20, T27, T30, T40, Torx Drive alun keys
and bits for socket drives.
• Electric or pneumatic drill
• Pneumatic rivet gun.
• Drill bits: 5.2, 6,16, 21mm
• Drill stop for 6mm drill bit
• Step drill to 21mm diameter
• 25mmm hole saw
• Caramel wheel
• Engineer’s scribe
• Silicon Caulking Gun
• Neutral cure Clear Non-Acetic Silicon
• Spray trigger bottle with soapy water
• Phillips head screwdrivers
• Flat blade screwdrivers
• Side Cutters
• Cleaning cloths / rags
• Knife
• Sharp Scissors
• Prepsol/ Silicon remover.
• Deburring tool
• Rubber printing roller.
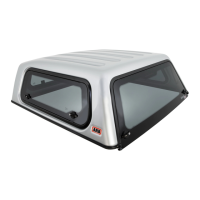
FITTING THE CANOPY IS UNDERTAKEN THE FOLLOWING STAGES:
1. Removing any sports bars, cabin guards, side bed rail plastic caps and roll top
tonneau covers. (For Wildtrack vehicles - please read and undertake fitting
instruction part no 37801115 first).
2. Fitting the tailgate door sealing stop assembly.
3. Fitting the tub sealing blocks.
4. Fitting the tub mounting brackets.
5. Fitting canopy wiring.
6. Fitting the canopy to the vehicle
7. Operational checks and adjustment options for doors and windows.
8. Recording of key code and owner’s manual supplement.
9. Check list and sign off.
NOTE: DURING THE INSTALLATION IT IS NECESSARY TO DRILL SOME HOLES THROUGH THE
VEHICLE’S TUB SHEET METAL. IT IS RECOMMENDED THAT THESE ARE DE-BURRED
AND THE RUST INHIBITOR PROVIDED BE USED TO AVOID CORROSION.
ANY SWARF LEFT OVER SHOULD BE CLEANED FROM TUB
!! IMPORTANT !! other than specifically specified in this instruction
REQUIRED SCREW TORQUES: M6=9Nm M8=20Nm
SCREW TORQUES: These must be adhered to avoid warranty issues and should be
checked at vehicle service intervals.
 Loading...