Do you have a question about the ARB AIRLOCKER RD168 and is the answer not in the manual?
Essential preparatory steps and considerations before beginning the installation process.
Comprehensive list of necessary tools and supplies required for the installation.
Safe and proper methods for supporting the vehicle during differential removal.
Procedure for draining the differential oil and inspecting for wear indicators.
Detailed steps for safely disconnecting the axle shafts from the differential assembly.
Critical step for marking bearing caps to ensure correct reassembly and alignment.
Measuring the existing ring and pinion backlash for comparison with specifications.
Techniques for safely removing the differential center using a housing spreader.
Checking differential housing for proper oil drainage, with modification guidance.
Measuring original components to calculate correct shim thickness for backlash.
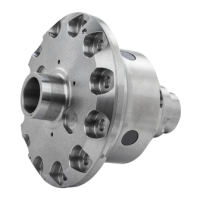
Proper procedure for cleaning, heating, and securing the ring gear to the Air Locker.
Creating a port in the differential housing for the air line bulkhead fitting.
Assembling the seal housing, O-rings, and shim pack onto the Air Locker carrier.
Determining and applying correct shim thickness for bearing pre-load and end float.
Correctly reinstalling bearing caps and tightening bolts to specified torque values.
Verifying the backlash measurement after installation and shimming.
Assembling the bulkhead fitting, seal housing tube, O-rings, and compression nut.
Gently bending the seal housing tube to ensure proper clearance inside the housing.
Performing initial air pressure tests on the Air Locker for engagement and leaks.
Connecting the solenoid valve to the air source and the air line.
Guidelines for routing and securing the air line to prevent damage and snagging.
Attaching the air line to the differential's bulkhead fitting using compression fittings.
Selecting an appropriate location and mounting the Air Locker control switch.
Wiring the actuator switch, solenoid, and compressor for system operation.
Comprehensive leak testing of the entire air system, including fittings and seals.
Procedure for reinstalling the axle shafts and securing them with the cross shaft and C-clips.
Operational test to confirm the Air Locker engages and disengages correctly.
Replacing the differential cover and refilling with the correct type and amount of fluid.
A final checklist to ensure all critical installation steps have been completed accurately.
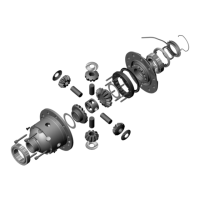
Visual diagram showing the exploded view of the Air Locker components.
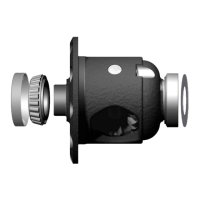
Key technical specifications for the RD168 Air Locker model.
A detailed list of all included parts, quantities, and part numbers.
| Brand | ARB |
|---|---|
| Model | AIRLOCKER RD168 |
| Category | Automobile Accessories |
| Language | English |