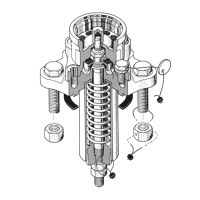
Valve Body
The area around the valve seat must be free of debris, corrosion and foreign objects. Cleaning can be
accomplished with a light brush off blast using glass bead media. The seating surface must be free
of nicks, burrs and gouges. The area should be cleaned and lightly polished with 400 grit emery cloth.
Any discontinuity that would prevent the valve from sealing is grounds for replacement. Machining,
grinding, welding or other alterations are not permitted.
Turn the valve body over to inspect the mounting flange and gasket groove. The gasket groove must
be free for residual gasket material, corrosion, nicks, burrs and gouges. Any discontinuity that would
prevent sealing is grounds for replacement.
Valve Spring
Remove all scale, residue and other foreign material from the spring with a wire brush. Inspect the spring
for signs of corrosion or pitting. Any evidence of corrosion or pitting is grounds for replacement.
The spring must be inspected for cracking using either magnetic particle or dye penetration inspection
methods. Cracking is unacceptable. If found, the spring must be replaced.
Stand the spring upright on a level surface. Place a straight edge against the outside and measure for
straightness. Turn the spring 90 degrees and measure again. The spring must straight within ¼”. If out
of tolerance, the stem must be replaced.
Aluminized springs cannot be inspected with magnetic particle or dye penetration methods. After
cleaning, visually inspect the coating. Any evidence of peeling or flaking of the aluminum is grounds for
replacement.
Spring Guide
Remove all scale, residue and other foreign material from the guide with a wire brush. Inspect the guide
for signs of corrosion or pitting. If any is found, the guide must be replaced.
Inspect the interior of the guide for signs of wear caused by the spring follower. Wear could be an
indication of a bowed spring, misassembled spring or misalignment of the valve with the safety valve
nozzle. If wear is noted, measure the outside diameter in the affected area then at 90 degrees. Compare
the readings. If the difference exceeds 0.030” replace the spring guide.
Spring Follower
Remove all scale, residue and other foreign material from the stem with a wire brush. Inspect the
follower. Any evidence of corrosion or pitting is grounds for replacement.
Visually inspect the outside diameter of the follower for signs of significant wear. Wear could be an
indication of a bowed spring, misassembled spring or misalignment of the valve with the safety valve
nozzle. If wear is noted, measure the inside diameter in the affected area then at 90 degrees. Compare
the readings. If the difference exceeds 0.030” replace the spring follower.
O-Rings
O-rings must be replaced any time the retainer is removed from the stem.
American Railcar Industries, Inc.