EasyManua.ls Logo

Ariens HYDROSTATIC S-12 - Dwell Angle

Ariens HYDROSTATIC S-12
42 pages
Print Icon
To Next Page IconTo Next Page
To Previous Page IconTo Previous Page
Loading...
Ariens
dealers
will
provide
any
service
which
may
be
required
to
keep
the
tractor
operating
at
peak
efficieriey.
The
tractor
is
equipped
with
the
finest
quality
engine
obtainable.
However,
shouid
servicing
be
required,
it
can
be
obtained
from
an
Ariens
dealer
or
an
authorized
ertgine
manufacturer's
service
station.
Consult
your
Ariens
dealer
for
details.
SEAT
ADJUSTMENT
The
Seat
is
adjustable
forward
and
backward
to
seven
positions.
To
adjust
seat
position,
grasp
seat
back
and
raise
røat.
Slide
the
seat
forward
or
backward
as
required
to
the
most
comfortable
position.
CAUTION;
REAR
AXLE
MUST
BE
RAISED
AND
BLOCKED
SECURELY
SO
THAT
REAR
WHEELS
ARE
FREE
TO
REVOL
VE.
2.
Loosen
damp
bolt
B,
Figure
18
and
rotate
the
eccentric
until
the
flåts
on
the
eccentric
are
parallel
to
the
cam
slot
as
shown
in
Figure
18.
Retighten
bolt
B.
This
will
assure
a
maximum
fine
adjustment
range,.
3.
With
the
Control
fork,
Figure
19,
move
the
cam,
Figure
18,
until
the
cam
follower
roller
is
lined
up
with
the
cam
dwell
center
mark.
DO
NOT
adjust
the
hydrostatic
control
fork,
Figure
19,
if
the
control
lever
is
not
in
the
neutral
slot
HYDROSTATIC
CONTROL
ADJUSTMENT
If
the
tractor
creeps
when
the
hydrostatic
control
lever
is
in
the
neutral
(N)
position
on
the
control
console,
make
the
following
adjustment:
The
hydrostatic
Controls
shouid
be
adjusted
so
the
tractor
dOes
not
creep
forward
or
backward
when
the
control
lever
is
in
the
neutral
(N)
slot
in
the
control
console
as
shown
in
Figure
2.
In
addition,
the
control
lever
shouid
automatically
be
shifted
to
this
position
from
either
"forward"
or
"reverse*'
when
the
neutralizer
pedal
is
fuHy
depressed.
'
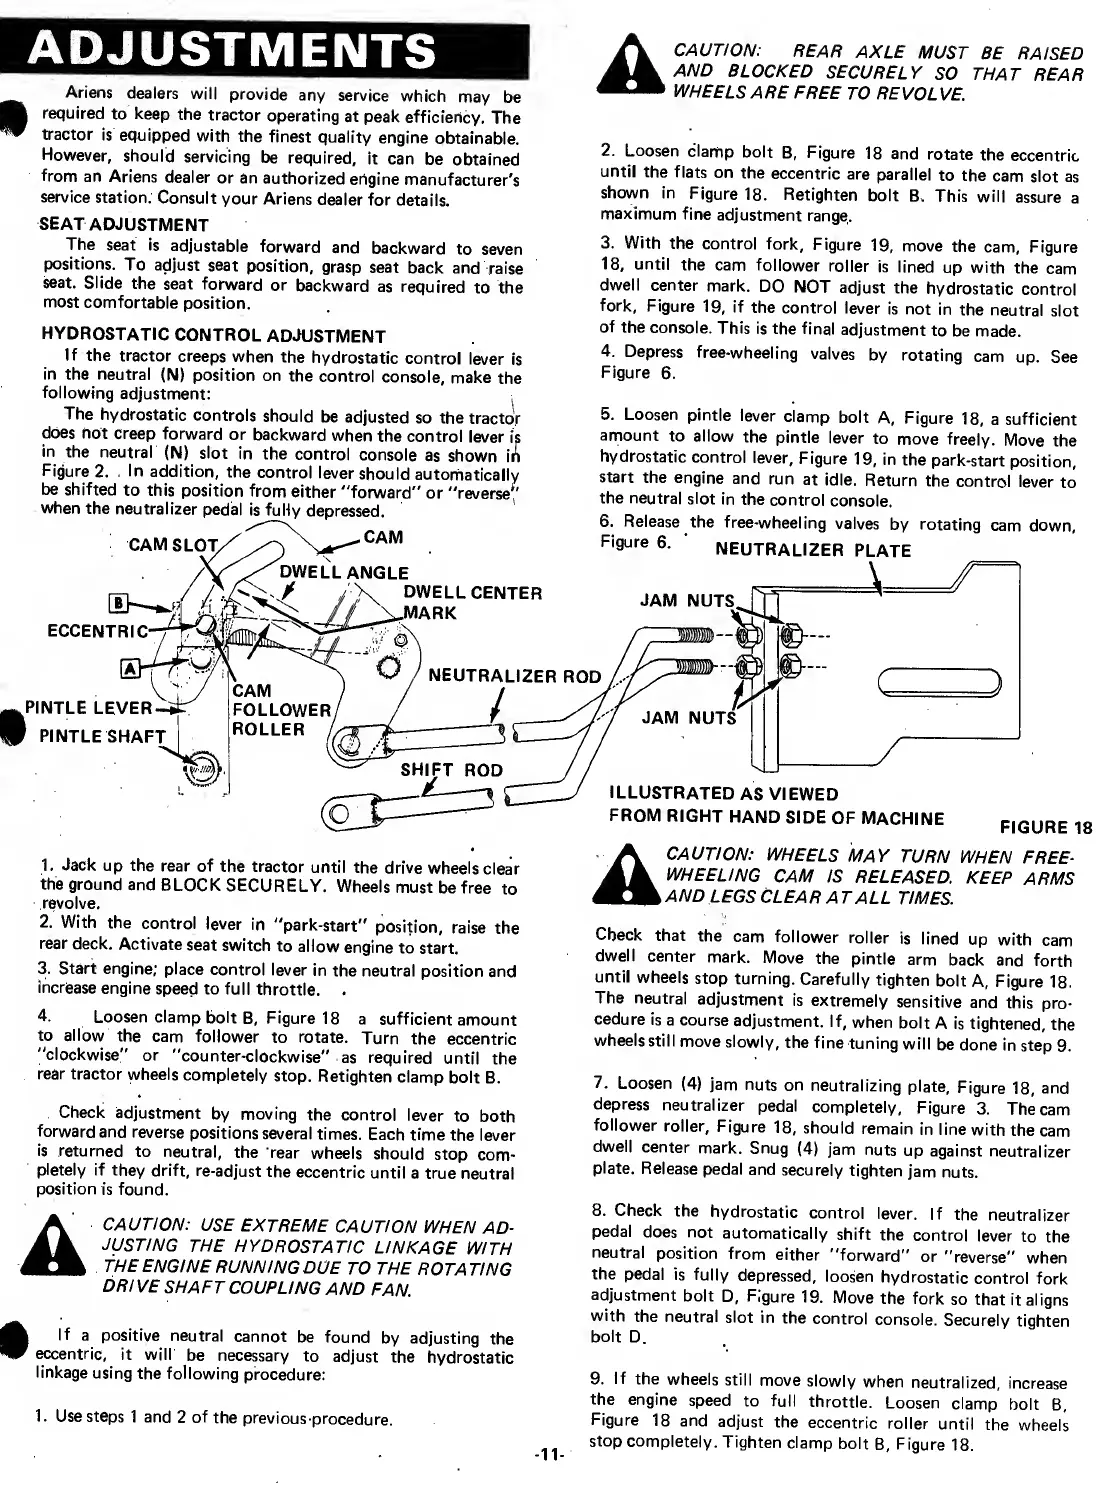
CAM
DWELL
ANGLE
m
/
/K
dwell
CENTER
//\.MARK
ECCENTRIC-
PINTLE
LE
VER-
PINTLESHAFT
of
the
console.
This
is
the
final
adjustment
to
be
made.
4.
Depress
free-wheeling
valves
by
rotating
cam
up.
See
Figure
6.
5.
Loosen
pintle
lever
damp
bolt
A,
Figure
18,
a
sufficient
amount
to
allow
the
pintle
lever
to
move
freely.
Move
the
hydrostatic
control
lever,
Figure
19,
in
the
park-start
position,
start
the
engine
and
run
at
idle.
Return
the
control
lever
to
the
neutral
slot
in
the
control
console.
6.
Release
the
free-wheeling
valves
by
rotating
cam
down,
Figure
6.
NEUTRALIZER
PLATE
JAM
NUTS
CAM
FOLLOWER/
ROLLER
/,
O
NEUTRALIZER
y
SHIFT
ROD
JAM
NUTS
ILLUSTRATED
AS
VIEWED
FROM
RIGHT
HÅND
SIDE
OF
MACHINE
FIGURE
18
1.
Jack
up
the
rear
of
the
tractor
until
the
drive
wheels
clear
the
ground
and
BLOCK
SECURELY.
Wheels
must
be
free
to
revolve.
2.
With
the
control
lever
in
"park-start"
position,
raise
the
rear
deck.
Activate
seat
switch
to
allow
engine
to
start.
3.
Start
engine;
place
control
lever
in
the
neutral
position
and
increase
engine
speed
to
full
throttle.
.
4.
Loosen
damp
bolt
B,
Figure
18
a
sufficient
amount
to
allow
the
cam
follower
to
rotate.
Turn
the
eccentric
"clockwise"
or
"counter-clockwise"
as
required
until
the
rear
tractor
wheels
completely
stop.
Retighten
damp
bolt
B.
Check
adjustment
by
moving
the
control
lever
to
both
forward
and
reverse
positions
several
times.
Each
time
the
lever
is
returned
to
neutral,
the
rear
wheels
shouid
stop
com¬
pletely
if
they
drift,
re-adjust
the
eccentric
until
a
true
neutral
position
is
found.
A
CAUTION:
USE
EXTREME
CAUTION
WHEN
AD-
JUSTING
THE
HYDROSTATIC
UNKAGE
WITH
THE
ENGINE
RUNNINGDUE
TO
THE
ROTATING
DRIVE
SHAFTCOUPLING
AND
FAN.
k
If
a
positive
neutral
cannot
be
found
by
adjusting
the
r
eccentric,
it
will
be
necessary
to
adjust
the
hydrostatic
linkage
using
the
following
procedure:
1.
Use
steps
1
and
2
of
the
previous
procedure.
CAUTION:
WHEELS
MAY
TURN
WHEN
FREE-
WHEELING
CAM
IS
RELEASED.
KEEP
ARMS
AND
LEGS
CLEAR
AT
ALL
TIMES.
Check
that
the
cam
follower
roller
is
lined
up
with
cam
dwell
center
mark.
Move
the
pintle
arm
back
and
forth
until
wheels
stop
turning.
Carefully
tighten
bolt
A,
Figure
18.
The
neutral
adjustment
is
extremely
sensitive
and
this
pro¬
cedure
is
a
course
adjustment.
If,
when
bolt
A
is
tightened,
the
wheels
still
move
slowly,
the
fine
tuning
will
be
done
in
step
9.
7.
Loosen
(4)
jam
nuts
on
neutralizing
plate,
Figure
18,
and
depress
neutralizer
pedal
completely,
Figure
3.
The
cam
follower
roller,
Figure
18,
shouid
remain
in
line
with
the
cam
dwell
center
mark.
Snug
(4)
jam
nuts
up
against
neutralizer
plate.
Release
pedal
and
securely
tighten
jam
nuts.
8.
Check
the
hydrostatic
control
lever.
If
the
neutralizer
pedal
does
not
automatically
shift
the
control
lever
to
the
neutral
position
from
either
"forward"
or
"reverse"
when
the
pedal
is
fully
depressed,
loosen
hydrostatic
control
fork
adjustment
bolt
D,
Figure
19.
Move
the
fork
so
that
italigns
with
the
neutral
slot
in
the
control
console.
Securely
tiahten
bolt
D.
9.
If
the
wheels
still
move
slowly
when
neutralized,
increase
the
engine
speed
to
full
throttle.
Loosen
damp
bolt
B,
Figure
18
and
adjust
the
eccentric
roller
until
the
wheels
stop
completely.
Tighten
damp
bolt
B,
Figure
18.
-11-