EasyManua.ls Logo

Ariens HYDROSTATIC S-12 - Brake Adjustment; Steering Gear Adjustment; Steering Stop Adjustment

Ariens HYDROSTATIC S-12
42 pages
Print Icon
To Next Page IconTo Next Page
To Previous Page IconTo Previous Page
Loading...
tf
the
steering
develops
a
wandering
characteristic
or
if
excessive
tire
wear
develops,
the
toe-in
of
the
front
wheels
should
be
checked.
If
the
toe-in
is
incorrect,
adjust
as
follows:
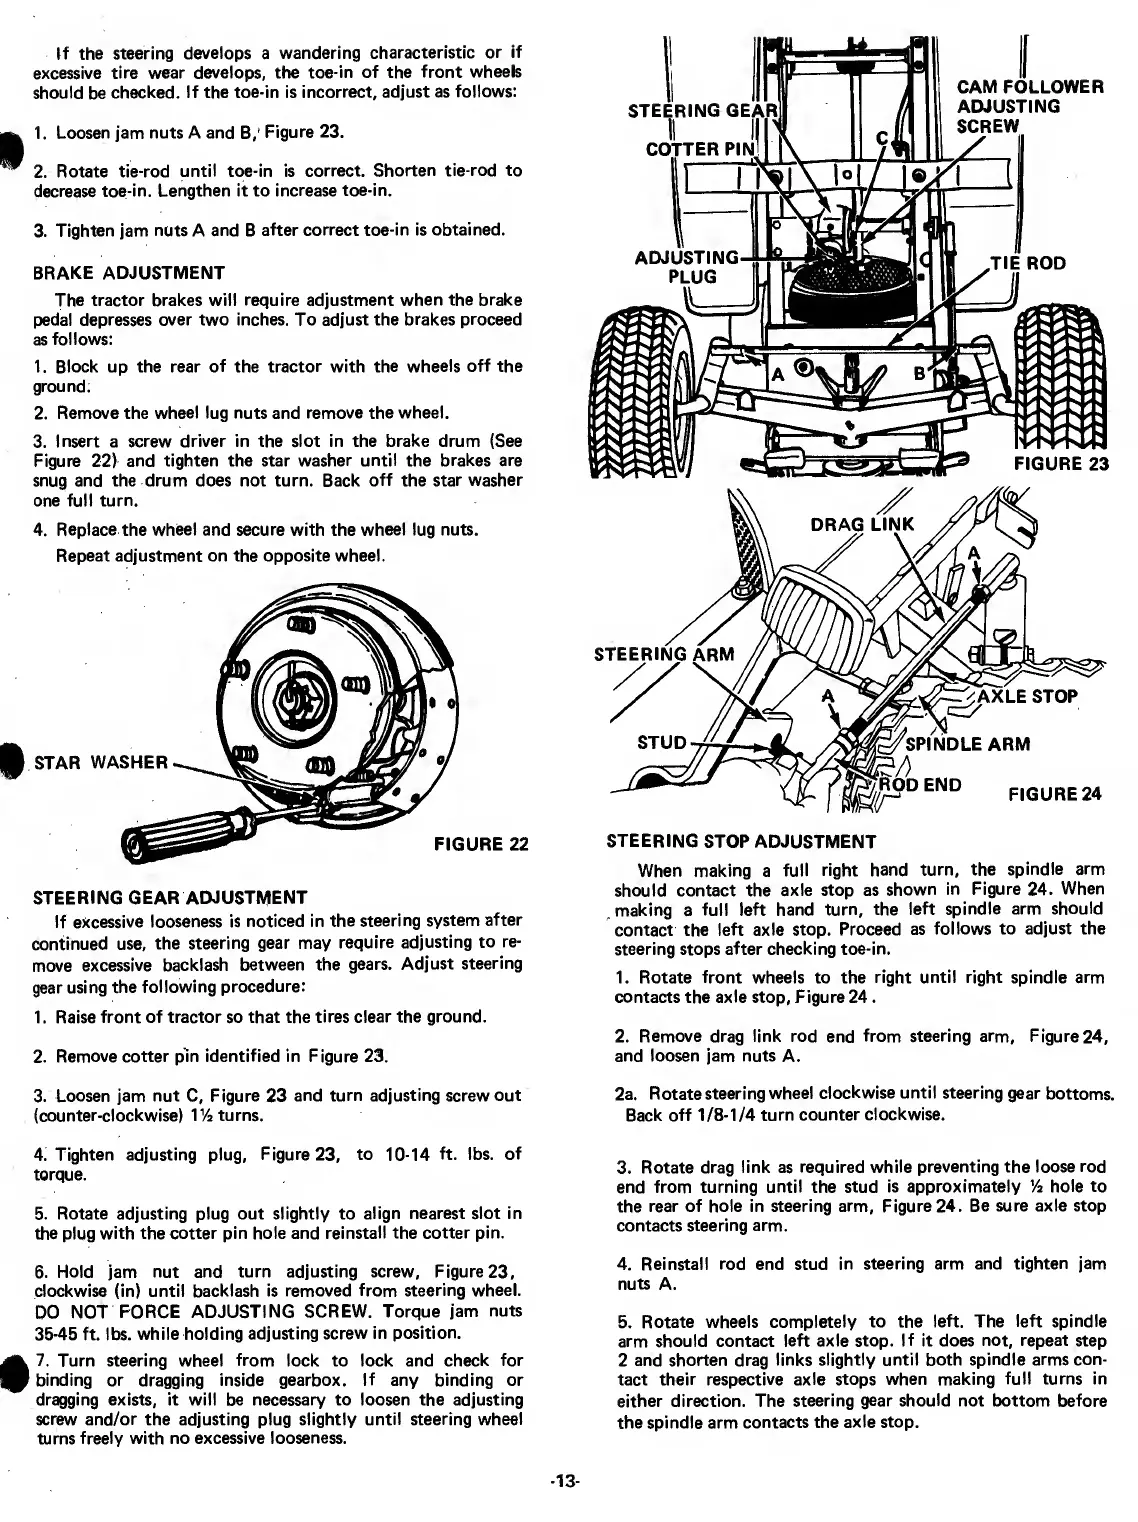
1.
Loosen
jam
nuts
A
and
B,'
Figure
23.
2.
Rotate
tie-rod
until
toe-in
is
correct.
Shorten
tie-rod
to
decrease
toe-in.
Lengthen
it
to
increase
toe-in.
3.
Tighten
jam
nuts
A
and
B
after
correct
toe-in
is
obtained.
BRAKE
ADJUSTMENT
The
tractor
brakes
will
require
adjustment
when
the
brake
pedal
depresses
over
two
inches.
To
adjust
the
brakes
proceed
as
follows:
1.
Block
up
the
rear
of
the
tractor
with
the
wheels
off
the
ground.
2.
Remove
the
wheel
lug
nuts
and
remove
the
wheel.
3.
Insert
a
screw
driver
in
the
slot
in
the
brake
drum
(See
Figure
22)
and
tighten
the
star
washer
until
the
brakes
are
snug
and
the
drum
does
not
turn.
Back
off
the
star
washer
one
full
turn.
4.
Replace
the
wheel
and
secure
with
the
wheel
lug
nuts.
Repeat
adjustment
on
the
opposite
wheel.
STEERING
GEAR
ADJUSTMENT
If
excessive
looseness
is
noticed
in
the
steering
system
after
continued
use,
the
steering
gear
may
require
adjusting
to
re¬
move
excessive
backlash
between
the
gears.
Adjust
steering
gear
using
the
following
procedure:
1.
Raise
front
of
tractor
so
that
the
tires
clear
the
ground.
2.
Remove
cotter
pin
identified
in
Figure
23.
STEERING
STOP
ADJUSTMENT
When
making
a
full
right
hånd
turn,
the
spindle
arm
should
contact
the
axie
stop
as
shown
in
Figure
24.
When
making
a
full
left
hånd
turn,
the
left
spindle
arm
should
contact
the
left
axIe
stop.
Proceed
as
follows
to
adjust
the
steering
stops
after
checking
toe-in.
1.
R
otate
front
wheels
to
the
right
until
right
spindle
arm
contacts
the
axie
stop,
Figure
24.
2.
R
emove
drag
link
rod
end
from
steering
arm,
Figure
24,
and
loosen
jam
nuts
A.
3.
L
oosen
jam
nut
C,
Figure
23
and
turn
adjusting
screw
out
2a.
Rotate
steering
wheel
clockwise
until
steering
gear
bottoms.
(counter-clockwise)
172
turns.
Back
off
1/8-1/4
turn
counter
clockwise.
4.
Tighten
adjusting
plug,
Figure
23,
to
10-14
ft.
Ibs.
of
torque.
5.
Rotate
adjusting
plug
out
slightiy
to
align
nearest
slot
in
the
plug
with
the
cotter
pin
ho|e
and
reinstall
the
cotter
pin.
6.
Hold
jam
nut
and
turn
adjusting
screw,
Figure23,
clockwise
(in)
until
backlash
is
removed
from
steering
wheel.
DO
NOT
FORCE
ADJUSTING
SCREW.
Torque
jam
nuts
36-45
ft.
Ibs.
while
holding
adjusting
screw
in
position.
7.
Turn
steering
wheel
from
lock
to
lock
and
check
for
binding
or
dragging
inside
gearbox.
If
any
binding
or
dragging
exists,
it
will
be
necessary
to
loosen
the
adjusting
screw
and/or
the
adjusting
plug
slightiy
until
steering
wheel
turns
freely
with
no
excessive
looseness.
3.
Rotate
drag
link
as
required
while
preventing
the
loose
rod
end
from
turning
until
the
stud
is
approximately
'k
hole
to
the
rear
of
hole
in
steering
arm,
Figure24.
Be
sure
axie
stop
contacts
steering
arm.
4.
Reinstall
rod
end
stud
in
steering
arm
and
tighten
jam
nuts
A.
5.
Rotate
wheels
completely
to
the
left.
The
left
spindle
arm
should
contact
left
axie
stop.
If
it
does
not,
repeat
step
2
and
shorten
drag
links
slightiy
until
both
spindle
arms
con¬
tact
their
respective
axie
stops
when
making
full
turns
in
either
direction.
The
steering
gear
should
not
bottom
before
the
spindle
arm
contacts
the
axie
stop.
-13-