EasyManua.ls Logo

Aspen Pumps mini white - User Manual

Aspen Pumps mini white
24 pages
Print Icon
To Next Page IconTo Next Page
Loading...
Thank you for buying your new Mini White Pump. This manual provides complete instructions for installation
and maintenance which should be carefully followed. Please record following information for future reference:
/ Agradecemos su compra de la nueva bomba Mini White. Éste manual proporciona las instrucciones completas
que deben de seguirse cuidadosemente para la correcta instalacion y mantenimiento de la bomba. Anote la
información siguente para una referencia futura.
Serial number: Operating voltage:
Número de serie: Voltaje operativo:
Date installed: Location of pump:
Fecha de instalación: : Ubicación de la bomba:
mini white
pump
/ bomba
INSTALLATION & MAINTENANCE MANUAL / MANUAL DE INSTALACIÓN Y MANTENIMIENTO
Product Warranty: Please see back cover / Garantía del producto: Por favor, vea la contraportada
Designed for surface installatión under minisplit
evaporator.
Quick and easy to install.
Quietly and reliably pumps condensate to a maximum
height of 33 feet.
Diseñada para sujetarse a una superficie, directamente debajo del
evaporador.
Rápido y fácil de instalar
Bombea el agua de condensado hasta una altura de 33 pies de
manera silenciosa y confiables
Question and Answer IconNeed help?

Do you have a question about the Aspen Pumps mini white and is the answer not in the manual?

Summary

Aspen Pumps Mini White Manual

Installation & Maintenance Overview

Guide for installing and maintaining the Mini White pump.

Product Warranty Reference

Information regarding product warranty is available on the back cover.

Technical Data

Included Kit Components

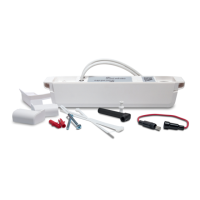
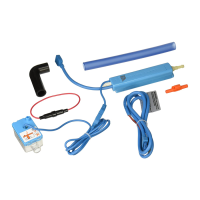
List of all parts included in the pump package.

Performance Graph and Notes

Important Installation & Operation Notes

Crucial advice on performance, noise, and power supply.

Cleaning Procedure and Siphoning Prevention

Cleaning Procedure

Instructions for cleaning the drain pan before installation.

Preventing Siphoning Issues

Mandatory measures to prevent siphoning and its consequences.

Checklist and Product Safety

Installation Checklist

Verification list for ensuring all installation steps are completed.

Product Safety Precautions

Essential safety warnings for operating and handling the pump.

Installation Guide: Initial Steps

Step 1: Pump Positioning

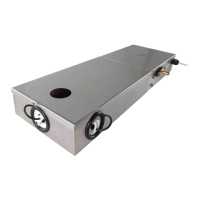
Mounting the pump on the wall beneath the evaporator.

Step 2: Component Removal

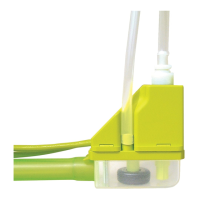
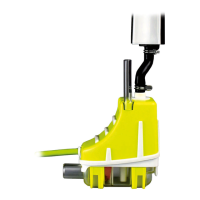
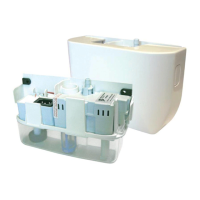
Unclipping pump cover and reservoir from the chassis.

Step 3: Marking and Cutouts

Using template for wall and evaporator openings.

Step 4: Drilling and Hose Prep

Drilling holes, fitting wallplugs, and preparing drain hose.

Installation Guide: Hose and Wiring

Step 5: Discharge Hose Installation

Routing discharge hose and ensuring no restrictions.

Step 6: Wiring and Cableado

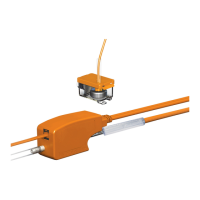
Connecting power and alarm wires according to diagrams.

Wiring Diagram and Notes

Mini White Univolt AC Wiring Diagram

Diagram illustrating the AC wiring for the pump.

Wiring Protocol Notes

Important notes on wiring protocols and manufacturer variations.

Installation Guide: Final Steps

Step 7: Hose Clamp Installation

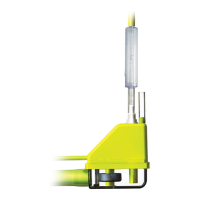
Securing discharge hose to pump outlet barb.

Step 8: Drain Hose Insertion

Inserting drain hose into chassis inlet securely.

Step 9: Chassis Mounting

Mounting the pump chassis to the wall using screws.

Installation Guide: Checks and Completion

Step 10: Float Check

Verifying float presence and retainer position.

Step 11: Water Treatment Tablet Check

Checking water treatment tablet and filter placement.

Step 12: Pump Operation Test

Testing pump operation and checking for leaks.

Step 13: Cover Attachment

Clipping on the front cover of the pump assembly.

Servicing and Coil Cleaning

Periodic Pump Servicing

Routine maintenance including cleaning reservoir, filter, and float.

Approved Coil Cleaner Procedure

Procedure for cleaning coils using approved Aspen cleaners.

Troubleshooting Guide

Pump Runs Continuously

Diagnosing why the pump runs continuously.

Vibration Noise Issues

Identifying causes of vibration noise and solutions.

No Water Discharge

Troubleshooting pump issues when no water is discharged.

Pump Fails to Operate

Diagnosing why the pump does not operate at all.

Warranty Exclusions

Conditions Voiding Warranty

List of conditions that will void the product warranty.

Discharge Hosing Installation Guidelines

Basic Pump Operation Principles

Understanding self-priming, water cooling, and lubrication.

Siphoning Effect and Noise

Explanation of siphoning, its noise, and overheating risks.

Avoiding Pump Damage

Notes on correct hose sizing and anti-siphon device installation.

Discharge Hose Installation Sequence (ES)

Pump Operation Principles (ES)

Key characteristics of minisplit piston pumps.

Abnormal Operation and Siphoning (ES)

Identifying abnormal noise and the siphoning effect.

Important Notes on Hose Installation (ES)

Impact of hose size and anti-siphon device installation.

General Warnings and Recommendations

Pump Usage and Environmental Restrictions

Restrictions on pump usage in oily, dusty, or non-water environments.

Installation and Operation Precautions

Precautions for voltage, piping, wiring, filter, dry run, and cleaning chemicals.

Overflow Switch Requirement

Mandatory installation of an overflow switch for compliance.

Specific Warnings (ES)

Pump Application and Usage Warnings (ES)

Warnings regarding water-only use and environmental conditions.

Installation and Maintenance Warnings (ES)

Warnings on voltage, installation, dry run, cleaning chemicals, and site checks.

Overflow Switch Installation Recommendation (ES)

Recommendation for installing an independent overflow switch.

Incorrect Discharge Hose Installation

Sequence of Operation (Incorrect)

Illustrates incorrect installation leading to pump damage.

Consequences of Incorrect Installation

Explains damage from repeated hot/dry operation and siphoning.

Correct Discharge Hose Installation Sequence (ES)

Sequence of Operation (Correct) (ES)

Illustrates correct installation to prevent pump damage.

Avoiding Siphoning Effect (ES)

Explanation of how correct installation avoids damage.

Correct Discharge Hose Installation with Air Gap

Step 1: Initial State (Incorrect)

Drain pan fills, intake hose is empty (filled with air).

Step 2: Pump Activation (Incorrect)

Rising water lifts float, pump runs hot and dry.

Step 3: Float Deactivation (Incorrect)

Reservoir level drops, float deactivates pump, siphoning occurs.

Step 4: Pump Restart (Correct)

Drain pan fills, intake hose is full, pump runs normally.

Correct Discharge Hose Installation with Air Gap (ES)

Sequence 1: Initial State (Incorrect)

Drain pan fills, intake hose is empty (filled with air).

Sequence 2: Pump Activation (Incorrect)

Rising water lifts float, pump runs hot and dry.

Sequence 3: Float Deactivation (Incorrect)

Reservoir level drops, float deactivates pump, siphoning occurs.

Sequence 4: Pump Restart (Correct)

Drain pan fills, intake hose is full, pump runs normally.

Fixing Template

Pump Assembly Mounting Holes

Holes for mounting the pump assembly on a wall.

Evaporator Opening Requirements

Required opening on the bottom of the evaporator.

Drain Hose Cutoff Mark

Mark for cutting the insulated drain hose.

Product Warranty Information

Warranty Terms and Conditions

Details of the product warranty, exclusions, and manufacturer's liability.

Aspen Pumps mini white Specifications

General IconGeneral
ModelMini White
TypeCondensate Removal Pump
Max Flow Rate0.5 l/min
Max Head10m
Weight0.22kg
Power Supply230 V AC
Hose Connection6 mm

Related product manuals