Astria.US.com
127051-01D
5
FIREPLACE INSTALLATION
SELECTING LOCATION
To determine safest and most efficient location for fireplace, you
must take into consideration the following guidelines:
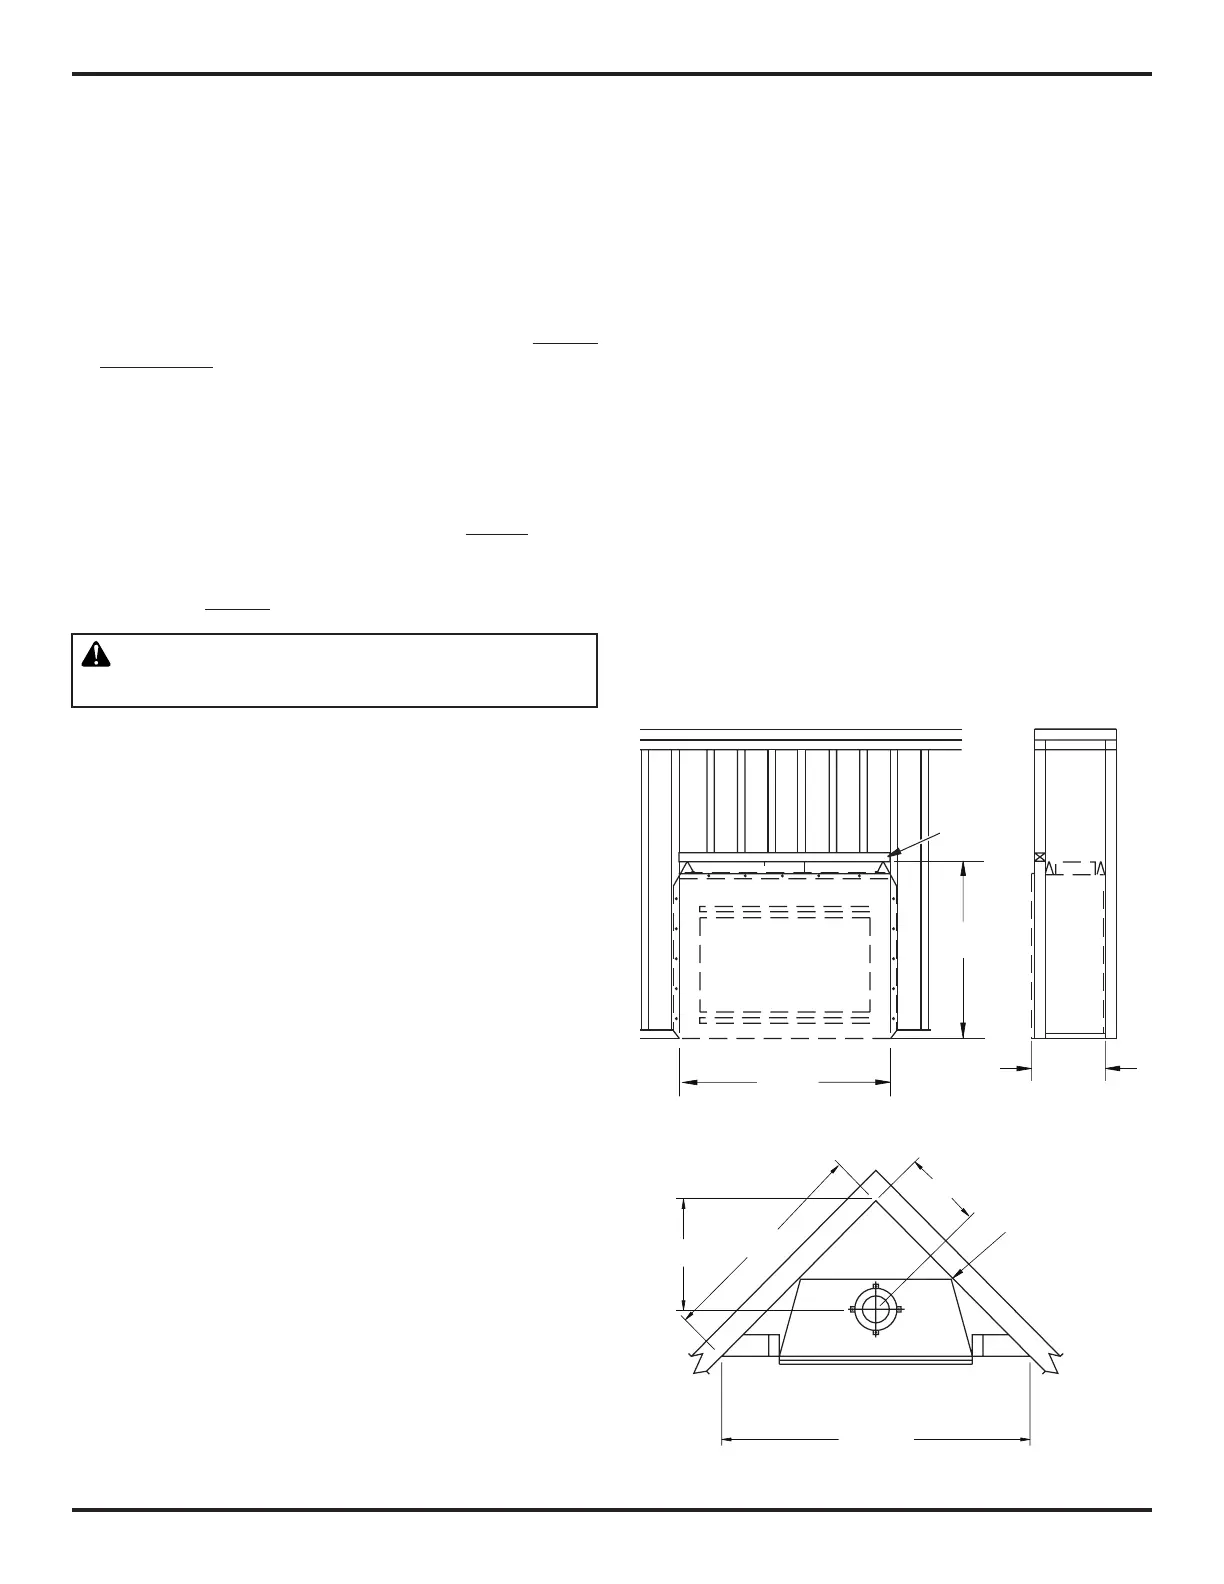
1. Locationmustallowforproperclearances(seeFigures1and2).
2. Consideralocationwherereplacewillnotbeaffectedbydrafts,
air conditioning ducts, windows or doors.
3. A location that avoids cutting of joists or roof rafters will make
installation easier.
4. Anoutsideairkitisavailablewiththisreplace(seeOptional
Outside Air Kitonpage7).
MINIMUM CLEARANCE TO COMBUSTIBLES
Back and sides of fireplace 3/4" minimum*
Floor** 0" minimum
Perpendicular wall to opening 12" minimum
Top spacers 0" minimum
Mantel clearances see Mantels, page 6
Chimneyouterpipesurface1"minimum
*Notrequiredatnailinganges
** See step 2 of Framing
WARNING: DO NOT PACK REQUIRED AIR SPACES
WITH INSULATION OR OTHER MATERIALS.
Minimum/Maximum Chimney Height
The minimum height of the chimney, measured from the base of
thereplacetotheuegasoutletofthetermination,is14.5feetfor
straightueorauewithoneelbowset.Themaximumdistance
between elbows is 6 feet. For systems with two elbow sets, the
minimumheightis22feet.Themaximumheightofanysystemis
50 feet. This measurement includes the fireplace, chimney sections
andtheheightoftheterminationassemblyattheleveloftheue
gasoutlet(seeFigure18,page11).
Minimum/Maximum Chimney Height for Outdoor Installation
The minimum height of the chimney, measured from the base of the
replacetotheuegasoutletofthetermination,is8feet(minimum
of4feetofchimneypipesectionsrequiredforoutdoorinstallation).
Figure 1 - Framing Dimensions
Figure 2 - Corner Installation
FRAMING
1. Frame opening for fireplace using dimensions shown in Figures
1 and 2.
Note: When the fireplace is framed, the header has to be turned
ontheattomaintainproperclearance.
2. If fireplace is to be installed directly on carpeting, tile or any
combustiblematerialotherthanwoodooring,replacemust
beinstalleduponametalorwoodpanelextendingfullwidthand
depth of fireplace.
3. Set fireplace directly in front of this opening and slide unit back
untilnailingangestouchsideframing.
4. Checklevelofreplaceandshimwithsheetmetalifnecessary.
5. Before securing fireplace to prepared framing, ember protector
must be placedbetweenhearth extension (notincluded) and
under bottom front edge of fireplace to protect against glowing
embers falling through. If fireplace is to be installed on a raised
platform,aZ-typeemberprotector(notincluded)mustbefabri-
catedtotyourrequiredplatformheight.Emberprotectorshould
extendunder replace aminimum of 1
1
/
2
". Ember protector
shouldbemadeofgalvanizedsheetmetal(28gaugeminimum)
to prevent corrosion.
6. Usingscrewsornails,securereplacetoframingthroughanges
located on sides of fireplace.
28"
Maintain 3/4"
Clearance at
Sides and
Back of
Fireplace
59
3
/8"
19
1
/2"
83
7
/8"
23
1
/2"
49
3
/4"
47
1
/4"
2x4
Header
Turned
Flat