Do you have a question about the Asus P5LD2-X GBL and is the answer not in the manual?
Statement regarding FCC compliance for the device.
Statement regarding Canadian compliance for the device.
Precautions to prevent electrical shock hazards.
Guidelines for safe installation and product handling.
Overview of the manual's sections and organization.
Sources for additional product and software updates.
Explanation of text formatting like bold, italics, and keys.
Welcome message and thank you for purchasing the motherboard.
List of items included in the motherboard package.
Description of the motherboard's advanced features and technologies.
Detailed description of the motherboard's key features.
Explanation of unique software and hardware features from ASUS.
Important safety and handling precautions before installation.
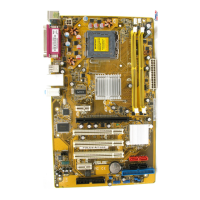
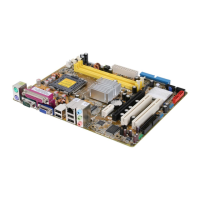
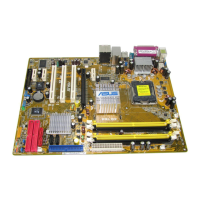
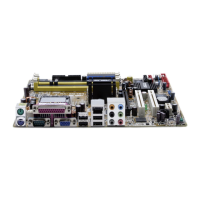
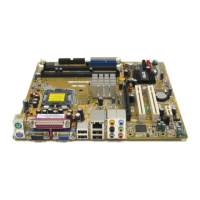
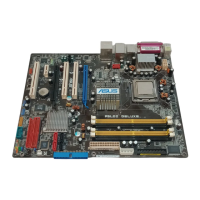
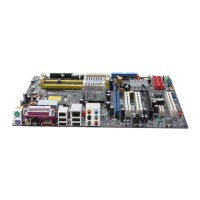
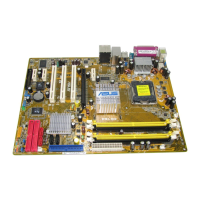
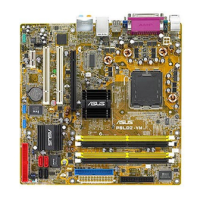
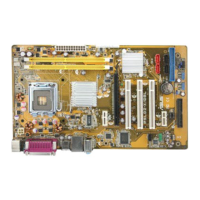
Visual guide to the motherboard layout and components.
Guidance on orienting the motherboard within the chassis.
Locations for securing the motherboard to the chassis.
Diagram identifying all major components on the motherboard.
Listing and categorization of motherboard slots, jumpers, and connectors.
Information about installing and handling the CPU.
Step-by-step instructions for installing the CPU.
Steps for mounting the CPU heatsink and fan assembly.
Procedure for removing the CPU heatsink and fan assembly.
Details on installing and configuring system memory modules.
Description of the motherboard's DDR2 DIMM sockets.
Guidelines for memory module sizes and compatibility.
Step-by-step instructions for installing a memory module.
Procedure for removing a memory module.
Information on installing and configuring expansion cards.
Steps for physically installing an expansion card.
Steps for configuring installed expansion cards via software.
Table showing IRQ assignments for motherboard slots.
Details on the functionality of standard PCI slots.
Information on the PCI Express x16 slot for graphics cards.
Details on the functionality of PCI Express x1 slots.
Configuration settings using motherboard jumpers.
Procedure to clear CMOS and reset BIOS settings.
Configuring USB wake-up functionality.
Description and diagrams of all motherboard connectors.
Identification and function of rear panel ports.
Identification and function of internal motherboard connectors.
Steps for the initial power-on and system boot process.
Methods for properly shutting down the computer.
Shutting down the system via the operating system.
Using the power switch for sleep or soft-off modes.
Utilities and methods for managing and updating the BIOS.
Guide to creating a bootable floppy disk for BIOS operations.
Instructions for using the AFUDOS utility for BIOS updates.
How to recover a corrupted BIOS using ASUS CrashFree BIOS 3.
Using EZ Flash 2 for easy BIOS updates within the BIOS.
Using the ASUS Update utility within Windows for BIOS management.
Guide to entering and navigating the BIOS setup utility.
Overview of the BIOS setup screen layout and elements.
Explanation of the main menu bar items in BIOS setup.
Description of keys used for navigating BIOS menus.
How to interpret menu items and their functions.
How to access and understand sub-menu items.
Explanation of configurable fields and their values.
How pop-up windows display configuration options.
How scroll bars are used to view more options.
Location and purpose of the general help text.
Overview of basic system information and settings.
How to set the system time in BIOS.
How to set the system date in BIOS.
Setting the type of installed floppy drive.
Configuration for IDE devices and their master/slave settings.
Detailed settings for IDE operation modes.
Displays auto-detected BIOS, CPU, and memory information.
Settings for CPU and other system devices.
Configuration for CPU frequency and voltage adjustments.
Settings for USB-related features and controllers.
Details and settings related to CPU features and performance.
Advanced chipset settings for performance tuning.
Configuration for onboard audio, LAN, and serial/parallel ports.
Settings for PCI/PnP device resource allocation (IRQ, DMA).
Configuration for ACPI and APM power management features.
Selecting the ACPI state for system suspend.
Enabling support for ACPI 2.0 specifications.
Enabling support for the APIC interrupt controller.
Settings for AC power loss restore and wake-up events.
Displays CPU temperature, fan speeds, and voltages.
Options for configuring system boot behavior.
Setting the sequence of devices for system boot.
Settings to optimize the boot process, like Quick Boot.
Setting supervisor and user passwords for BIOS access.
Launching special functions like ASUS EZ Flash 2.
Options for saving or discarding BIOS settings.
Saves current BIOS settings and exits the setup utility.
Exits BIOS setup without saving any modified settings.
Loads optimal or failsafe default BIOS values.
Guidelines for installing operating systems on the motherboard.
Information about the included support CD contents.
Instructions for launching the support CD.
Details on available device drivers on the support CD.
Details on applications and utilities on the support CD.
How to find ASUS contact information for support.
Accessing motherboard info, browsing CD, and technical forms.
Displays support CD contents in graphical format.
ASUS Technical Support Request Form for users.
Lists support CD contents with brief descriptions.
Utility to customize the boot logo displayed during POST.
Explanation and configuration of Intel SpeedStep Technology.
Requirements for using Intel SpeedStep Technology.
Step-by-step guide to enable and use EIST.
Explanation of Intel Hyper-Threading Technology.
Steps to enable and utilize Hyper-Threading Technology.
| Form Factor | ATX |
|---|---|
| CPU Socket | LGA 775 |
| Front Side Bus | 1066/800/533 MHz |
| Memory Type | DDR2 |
| Maximum Memory | 4 GB |
| Memory Slots | 2 x DIMM |
| Memory Standard | DDR2 667/533/400 |
| Supported CPU | Intel Pentium 4, Pentium D, Celeron D |
| Expansion Slots | 1 x PCIe x16, 3 x PCI-E x1, 3 x PCI |
| Storage Interfaces | 4 x SATA 3Gb/s |
| USB Ports | 8 x USB 2.0 |
| Audio | Realtek ALC883, 6-Channel |
| LAN | Gigabit LAN |