The Quickset X is a specialized tool designed for managing and maintaining Tire Pressure Monitoring Systems (TPMS). It facilitates the process of relearning TPMS sensors after tire rotations, replacements, or sensor changes, ensuring the vehicle's ECU accurately recognizes the new sensor data. The device supports both OBDII and manual relearn procedures, making it versatile for various vehicle makes and models.
Important Technical Specifications
Battery Type: Rechargeable Lithium Ion
Battery Life: Approximately 1,000 activations per full charge
Dimensions: 7.9" x 4.7" x 1.6" (20.0 cm x 12.0 cm x 4.0 cm)
Case Material: High Impact ABS
Radio Frequency: 315 MHz and 433 MHz
Weight: 1.5 lbs (0.68 kg)
Temperature:
- Operating: -4°F to 131°F (-20°C to +45°C)
- Storage: -4°F to 131°F (-20°C to +45°C)
Usage Features
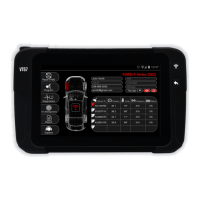
The Quickset X features a user-friendly interface with a clear display and intuitive controls.
Tool Controls:
- Antenna: Used for triggering sensors.
- Display: Shows vehicle information, sensor data, and instructions.
- Result Lights: Indicate the status of operations (e.g., Tx for transmit, Fail, Pass).
- Cancel Button: Used to go back or cancel an operation.
- Trigger Button: Activates the sensor scanning process.
- Directional Buttons: For navigating through menus and selections.
- OK/Enter Button: Confirms selections and proceeds with operations.
- Power Button: Turns the device on and off.
- USB/Charging Port: For charging the device and connecting to a PC for updates.
- OBDII Port: Connects to the vehicle's OBDII port for data transfer during relearn procedures.
Getting Started:
- From the Main Menu, select "SERVICE TPMS".
- Select the vehicle's Make, Model, and year.
- If applicable, select the number of wheels.
OBDII Relearn Procedure:
- All sensors must be scanned before transferring data to the vehicle's ECU.
- Select the Left Front tire on the display.
- Position the tool's antenna on the sidewall of the tire near the valve and press the Trigger Button to activate the sensor.
- The display will show sensor information including Sensor ID, Pressure, Temperature, and Frequency.
- Repeat this process for the Right Front, Right Rear, and Left Rear tires.
- Once all sensors are scanned, select the "RELEARN" button and press OK.
- On the relearn selection screen, choose "OBDII RELEARN".
- Connect the OBD Quick Connect cable to the tool and the vehicle's OBDII port. Ensure the vehicle's ignition is in the ON position.
- Press OK to begin transferring sensor data.
- Upon successful transfer, the tool will display "TRANSFER SUCCESSFUL", indicating the relearn is complete.
Manual Relearn Procedure:
- Before performing a manual relearn, read the relearn instructions provided by the tool. Select the "RELEARN" button.
- On the relearn selection screen, choose "MANUAL RELEARN".
- The tool will display vehicle-specific instructions for the manual relearn. These instructions typically involve applying the parking brake, turning the vehicle to ON/RUN, navigating the vehicle's DIC (Driver Information Center) to the tire pressure display, and pressing/holding specific buttons (e.g., SET/CLR).
- Once the vehicle is in "learn mode" (often indicated by horn chirps), begin activating the sensors.
- Position the tool in front of the Left Front tire's sensor and press the Trigger Button.
- Repeat this process for the Right Front, Right Rear, and Left Rear tires.
- After all sensors have been scanned, the vehicle's horn will sound twice, confirming a successful relearn.
Tool Tips:
- When triggering sensors, position the tool's antenna on the sidewall of the tire near the valve.
- The OBD Quick Connector is essential for OBD vehicle relearns. Plug the OBDII cable into the tool and the vehicle with the ignition ON. Sensor data cannot be transferred while the ignition is OFF.
Tool Settings:
Accessible from the Main Menu, the "SETTINGS" option allows customization of the tool's operation:
- REGION: Select America or Europe.
- UNITS: Choose between PSI/kPa/bar for pressure and °F/°C for temperature.
- FORMAT: Select Sensor ID formats (Decimal/Hexadecimal/Automatic).
- BUZZER ON: Turn ON/OFF the audible beep sound during sensor scanning.
- AUTO OFF: Set the inactivity time before the tool automatically turns off.
- LANGUAGE: Select the tool's display language. Supported languages include English, Spanish, French, German, Croatian, Italian, Hungarian, Dutch, Norwegian, Polish, Portuguese, Romanian, Slovak, Slovenian, Finnish, Swedish, Turkish, Greek, Russian, Hebrew, Czech, and Danish.
- ABOUT: View tool information such as Serial#, Software Version, and Software License Expiration.
Maintenance Features
Updating the Tool:
- Visit webvt.ateq-tpms.com or quicksetx.com to download the WebVT update software.
- Install the software on your PC.
- Connect the Quickset X tool to your PC via the USB/Charging Port with the power ON.
- Open the WebVT software and select the "Update Tool" option.
- The update process typically takes 10-15 minutes, after which the tool will be up-to-date.
Battery Information and Safety:
- The device contains a rechargeable Li-Po battery.
- Only use the power supply provided by ATEQ for charging.
- Charge the battery on a non-flammable surface (ceramic tray or metal box).
- Stop charging immediately if the battery overheats (above 60°C/140°F).
- Never charge a hot battery immediately after use; allow it to cool down.
- If smoke or liquid comes from the battery, disconnect it, isolate it, and return the device to your dealer.
- Keep a fire extinguisher for electrical fires nearby during charging.
- Do not dispose of Li-Po batteries with household waste; they must be collected and recycled by specialized organizations.
- Store batteries in a dry place, away from flammable materials, and with a minimum charge of 30%. Recharge regularly if stored for long periods.
- Do not disassemble, crush, pierce, or dispose of the battery in fire or water.
- Battery replacement must be performed by the factory. Opening the tool or breaking the seal will invalidate the warranty.
General Safety Information:
- Read all instructions before use.
- Wear safety goggles (user and bystanders).
- Do not use on live electrical circuits.
- Be aware of the risk of entanglement.
- The product emits electromagnetic waves that may interfere with pacemakers; individuals with pacemakers should not use this product.
- Comply with FCC Rules Part 15 regarding interference.
- Follow all specific regulations in your work sector and switch off the device where its use is prohibited or may cause interference/danger.
- Use the tool only in its normal operating position.
Warranty and Legal Information:
- Limited Hardware Warranty: ATEQ warrants the product to be free from defects in material and workmanship for one year from the purchase date. This warranty is non-transferable.
- Remedies: In case of breach, ATEQ will repair or replace the hardware.
- Warranty Exclusions: Does not cover damage from accidents, abuse, incorrect use, unauthorized disassembly, inappropriate maintenance, or use with incorrect power supply/consumables not supplied by ATEQ.
- Warranty Support: Visit https://www.ateq-tpms.com/ for technical assistance. Claims are generally processed through the point of sale within 30 days of purchase.
- Limitation of Liability: ATEQ is not liable for special, indirect, or accidental damages, including loss of profits, revenue, or data.
- Duration of Implied Warranties: Limited to the duration of the applicable limited warranty period.
- National Statutory Rights: Consumers retain statutory rights under applicable national legislation.
- CE Statements: The device complies with ETSI EN 300 330-1 V1.8.1 (2015-03), ETSI EN 300 330-2 V1.6.1 (2015-03), and BS EN 62479:2010 standards.
- Recycling: Do not dispose of the rechargeable Lithium-polymer battery or the tool and its accessories in general waste. They must be collected and recycled separately.