2) Fixing the comfort temperature :
The comfort temperature that you would like while the room is occupied.
a) Set the cursor to
, the heating light V2 comes on.
b) Set the control knob to 5, the heating light V1 comes on, if the room temperature is below the required temperature.
c) Wait a few hours until the temperature stabilizes.
d) If the setting is satisfactory (if necessary use a thermometer to check), mark the position.
If the setting is not satisfactory, adjust it and start again from point c.
3) Fixing the Eco temperature :
This involves a reduction in degrees compared to the Comfort temperature. We recommend that you use this mode
for periods of absence of more than 2 hours or overnight.
Warning: This reduction applies to the Comfort temperature so it is important to set the Comfort temperature first,
before setting the Eco reduction.
a) Set cursor to
, indicator light, V3 light up.
2) Set the wheel to –3.5°, the heating indicator light V1 comes on if the ambient temperature is less than the desired
Eco temperature.
c) Wait a few hours until the temperature stabilizes.
d) If the setting is satisfactory (if necessary use a thermometer to check), mark the position.
If the setting is not satisfactory, adjust it and start again from point c.
NB: The measurement is set to –3.5°C in our laboratories. It is possible that the setting for the reduction is not precisely
–3.5°C, depending on your installation’s particular characteristics. In this case, adapt the setting to obtain the desired
reduction.
4) Frost-Free mode :
This mode is used to keep the temperature at approximately 7°C in the room when you are absent from the house for
a prolonged period (i.e. more than 24 hours).
a) Set the cursor to
.
5) The heating indicator : V1
This light indicates periods during which the element is heating. It flashes when the temperature is stable, and it goes
off if the temperature is too high.
6) Stop heating :
Move the cursor to .
7) Locking the controls :
66
66
6
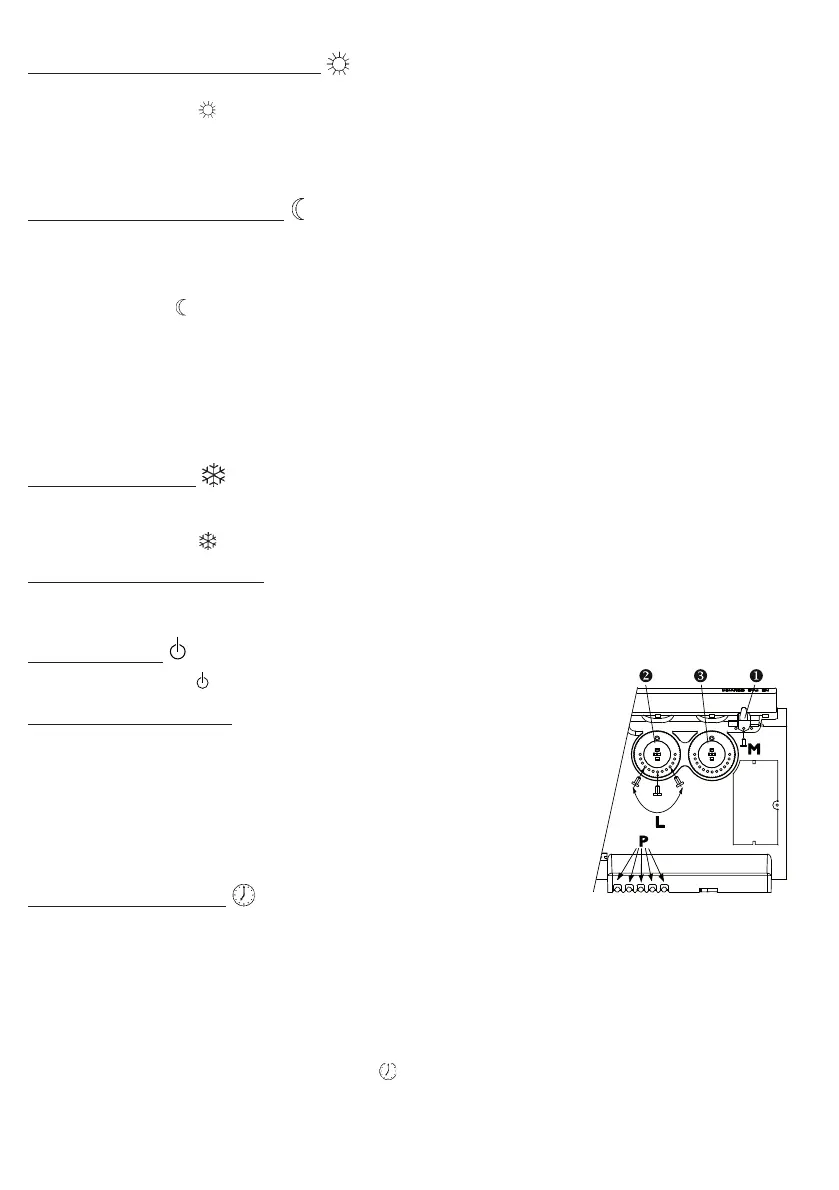
It is possible to lock or limit the range of use of thumb-wheels and and lock
selector switch cursor to prevent the inadvertent manipulation of the device
(by children, etc).
a) Detach the device from its wall bracket.
b) On the back of the thermostat box, detach pins P from their supports.
c) Choose position B to lock the thumb-wheels or position L to limit the range of
use of the thumb-wheels.
Choose one of the positions M to lock the person in the desired mode.
8) Programming mode :
This device has a thermostat capable of receiving orders through its pilot wire. It
recognizes the following commands:
- CONFORT (comfort) : Temperature set using the thumb-wheel
- CONFORT –1 (comfort –1) : Temperature set using the thumb-wheel -1°C
- CONFORT -2 (comfort –2) : Temperature set using the thumb-wheel -2°C
- ECO : Temperature set using the thumb-wheel
- HORS GEL (frost-free) : Room temperature maintained at approximately 7°C
- STOP HEATING : Immediate stoppage of the heater (used for load-schedding).
To activate the programming mode set cursor to
.
In this way, by connecting the pilot wire to a timer, you can program your Comfort and Economy temperature periods.
It is possible to connect several devices to one timer and, in this way, make energy savings.
NB: When there is no command given over the pilot wire, the device heats in the Comfort mode. HG and load-shedding
commands override the Economy and Comfort modes. On changing from the Comfort mode to the Economy mode,
the changeover time is approximately 12 seconds.
66
66
6
N
080125_CEETnirvana_ang.PMD 11/09/2008, 19:163